Why 2019 Christmas decorations? Partly because I had pix that I
didn't get around to organizing. Another reason is my mental contrasting
what I've seen this year to what I'd taken pix of last year. Seems this
year I've seen fewer balloons (varieties and quantity).
Most of the pix were daytime, some at night. Join me in the short trek and look for the following items in the video:
Scene that includes dragon that seems to want to party beyond Halloween
Couple of scenes of penguins with snowmen
Christmas candy train
Christmas tree train ("Santa's Tree Farm")
Train with Santa, snowman, and penguin
Santa and reindeer, without Rudolph ("North Pole Stable", with reindeer names)
Couple of scenes with bipolar critters (polar bears, penguins)
At the slideshow end, a couple of lighted Christmas tree
decorations, one actually a windmill with pyramid/conical base, another a
lookalike.
The time stamps showed 9 minutes difference between the pix. Because the
final picture did not show a windmill mechanism, I concluded that I
took the pictures at different places.
After viewing, re-viewing, editing, and preparing images for the
slide show video, I noticed with amusement how all the penguins seem to
be tot-sized. Thinking emperor penguin looks, but black and white rather
than gray-fuzzy-feathered and white like the ones in "Happy Feet" and "March of the Penguins".
December 31, 2021: Visit "2021 Christmas Decorations Tour" (video, article),
my 26-site tour of video clips. As I started organizing my project
clips, I initially felt the pandemic pall colored my perception of the
decorations. As I continued the process, my spirits lifted. In comparing my 2021 captures to my 2019 (pre-pandemic) captures, I notice more and varying images, not fewer. Hope you enjoy the ride and sights! May 2022 be more joyous than
2020 and 2021!
Around winter holiday season, chocolate-covered cherries tend to
float into my consciousness. Another chocolate and cherry concoction has
also been staring at me recently when I open the freezer: ice cream
with cherries and chocolate chips "H-E-B Select Ingredients Creamy Creations Cherry & Chocolate Limited Edition Ice Cream".
One yummy I wanted to buy so I could add chocolate chips and make
cookies with is a cherry-chip cake mix. Unfortunately, have heard the
supply is spotty "Betty Crocker Super Moist Cherry Chip Cake Mix".
The basic cooky recipe uses cake mix, eggs, and oil. For flavor and
color enhancements, I added a package of Cherry Kool-Aid and 10 drops of
red food coloring. Another cooky variation is a chocolatey covered one.
BTW, I used Black Cherry Kool-Aid for my "Kool-Aided Cake",
an experiment. It turned out so well that I rationalized that
Kool-Aided cookies could turn out well. View the video for full details of preparing one, two, or three types of cherry-themed cookies.
While thinking about implementation, I decided that chocolate in a
form or two would be interesting. My recent foray into chocolate coating
and also chips with mint themes inspired me to borrow from those ideas.
The intention, besides making tasty cookies, was to improve on similar
processes. Additional ingredients for this combo-batch cooky recipe are
red food coloring, chocolate chips, and optionally, white chocolate "bark".
Because of the nature of dough stiffness, I recommend using a
tilt-head mixer. If you use a pastry blender, wire whip, or hand mixer,
stamina would be helpful. Another helpful item is a cooky press for shaping and dispensing cooky dough pieces. Or you can use a tablespoon-and-spatula method.
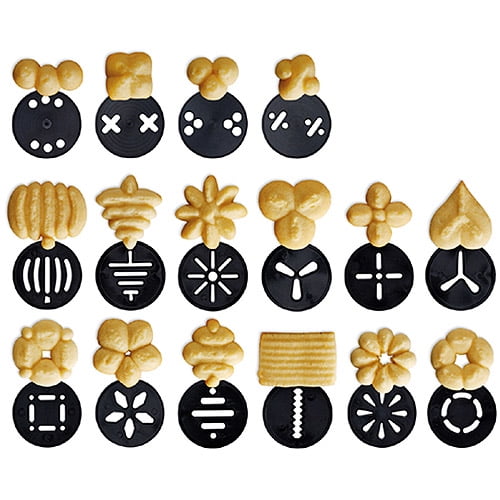
Cooky Press Thoughts—Disks
I misplaced my Wilton cooky press container, which showed the baked
cooky shapes for each disk. The images for the following models look
mostly similar.
For the cookies for "Scent o' mintal Journey, Part 4, Choco Unadorned/Coated Minty Cookies",
I used two trigger squeezes per cooky. I think the heavier cooky made
chocolatey dipping more awkward and used a lot more coating. The yield was fewer than I liked. I'll use 1 1/2 trigger squeezes when using a
cooky press.
I'd spotted loads of bucks in October and November this year. I'd
created several short YouTube videos of them and included links to them
in playlists "Eye-caught Snippets" and "Oh, deer!". In the last few days, I decided these October and November bucks warranted their own playlist.
As I'd run across so many bucks recently, I became curious enough to
Google about bucks and antlers, particularly about growth spurts.
Antlers grow rapidly from their pedicle (base) while in
velvet during the spring and summer, as fast as 3/4 inch/week for
yearlings and 1 1/2 inches per week for adults during peak growth ...
Growth rate slows dramatically during late summer while mineralization
of the antler is completed.
over a course of 120 days from late March through early
August, a mature buck can grow in excess of 200 inches of bone on his
head
This site includes lot of pix showing antlers by time of year. The video link points to "Whitetail Deer Antler Growth Timeline". Note the looks for October and November.
This year of the pandemic, I hadn't thought I'd run across lots of
Halloween decorations. I was surprised at numerous views that I
collected from a few days before through a few days after Halloween,
different parts of days.
Some houses didn't have decorations, some were similar to previous
years. A few were noteworthy for having candy stations outside for
safety of dwellers and trick or treaters. No need for some to approach
and ring doorbells. One unusual item I snagged on Halloween day itself
was a headdressed buck.
The video includes 42 stills and 15 video clips of 27 places I visited. Take a leisurely tour!
These cookies are actually Plan B use of remaining unadorned mint chocolate cookies from "Scent o' mintal Journey, Part 4, Choco Unadorned/Coated Minty Cookies".
I had run out of melted chocolate after having coated only about
one-third of my 40 cookies. It wasn't until the third day that I thought
about gussying up uncoated ones. Hmmm, I didn't have spare frosting,
but had ingredients for buttercream frosting.
My buttercream frosting recipe called for 3 cups of powdered sugar and typical additional ingredients. "Vanilla Buttercream Frosting".
And rather than making pedestrian sandwich cookies, I added 7 drops of
blue food coloring to the frosting. Why blue? Eh, I didn't notice that
the cap was blue instead of green until I mixed up the frosting. Maybe
weirdly, the color looks more mint green than baby blue.
I had only 19 unadorned cookies remaining. I dispensed 1 T frosting
each for 10 cookies, mated them with 9 others. (I indulged and ate the
single cookie with excess frosting. Yum!) Yield: 9 ~3" diameter sandwich
cookies (each ~2 ounces, 255 calories), and one oddball (~ 190
calories)
Note: For future possible sandwich cookies from cake mix recipe that
yields 40 cookies, an entire 16-ounce can of spreadable frosting might be enough for 20 sandwiches.
How did I decide the amount of frosting per cooky sandwich? From
experimentation with these ~ 3" diameter unadorned cookies, I felt one
tablespoon of frosting filled in well.
This cooky recipe uses cake mix, eggs, oil, mint extract, and
chocolate chips. The ingredients and methodology are very similar to "Scent o' mintal Journey, Part 3, Spearymintal Choco Chip Cookies". The biggest differences are the cake mix flavor and chocolate chip use.
I visited mostly video sites for melting chocolate and also methodology for coating the cookies. I bought a dipping tongs gadget. Some unknowns going in:
Cautions about melting process (temperature, durations, microwave vs. double boiler)
Number of cookies I'd get from my favorite cake mix cooky recipe
Tablespoon-and-spatula dispensing of dough vs. cooky press
Baking time—chocolate cookies not as easy to spot browning edges
Amount of chocolate for coating the cookies—enough vs. too much
The yield was 40 baked cookies. The 12 ounces of melted chocolate
chips was nowhere enough—only 12 cookies well-coated and 2 half-topped.
Why'd I so badly underestimate the amount of chocolate I needed?
My inexperience (clumsiness) with coating methodology and failure to revisit sites on baking day
Too-late thoughts about scraping excess chocolate back into bowl, resulting in overcloaked cookies
Fear of breaking cookies while coating, thus, handling them gingerly during dipping and transporting
1/3 to 3/8 cup of oil (I forgot that my standard recipe uses 1/3 cup. Results were acceptable.)
2 eggs
3/4 teaspoon of mint extract
Chocolate chips or other chocolate form for coating (Note: I
severely underestimated the amount of chocolate I needed. I managed to
coat only about 1/3 of the baked cookies.)
Dough Process (Using Pastry Blender or Electric Mixer for Combining)
For mixing this few-ingredients cooky dough, I used a manual pastry
blender. For parceling out the dough onto baking pan, I initially used
the method of measuring spoon and spatula, then switched to a cooky
press. A cooky press is fast if the dough is single-texture consistent.
It's not appropriate if the dough has chocolate chips, nuts, or other
items too big to fit through smallish disk holes.
Preheat the oven to 350.
Mix oil, eggs and mint extract in a large bowl. (Most of the times, I
usually break each egg separately into the bowl before adding the other
wet ingredients.)
Mix in the cake mix.
Parcel out tablespoons of dough onto pan, leaving ~1" margins for baking expansion.
Bake each batch for up to 7 minutes. (Because the dough is chocolate, checking for browning edges is not helpful.)
Cool for ~ 2 minutes before using cooky spatula to transfer them onto cooling rack(s).
Chocolate Coating Process
Set aside a large surface for this process. It's also helpful to
have a plate for resting dipping tongs, spoon, or fork for handling the
cookies.
Lay out parchment paper for laying chocolate-dipped cookies onto.
Melt chocolate chips or other chocolate forms in a medium bowl until syrupy.
Coat each cooky separately, lightly scraping excess chocolate before
transferring onto paper.
Carefully pull parchment sheet or partial sheets of coated cookies
onto rack or pan, and place inside fridge to cool and harden the
chocolate.
How long before melted chocolate sets? From "Chocolate-Dipped Cookies"—"Refrigerate
until the chocolate just sets, 10 to 15 minutes." From looking at my
camera's pic date stamps of cooky refrigeration and bringing them back
to the kitchen island, 40 minutes passed. (I probably did some other
task during that time.)
The journey to these simple-to-make munchies started out with a discussion about chocolate mint cookies. I meandered to researching mint flavoring and food coloring for mintifying chocolate chip cookies. I wanted them have the color, taste, and chippy looks of mint chocolate chip ice cream, but avoid overdosing.
"Scent o' mintal Journey, Part 1, Sweetish Thoughts"
describes my initial journey towards my cooky recipe. It started out
with a friend's recommendation for a minty iced chocolate cooky. I got
to thinking about similar cookies, then about other sweet, minty
yummies. I wondered about mint flavorings, of which I included some
info.
"Scent o' mintal Journey, Part 2, Nose 4 Mints N Chips"
describes my deeper dive into making a mint chocolate chip cooky,
greenish to resemble mint chocolate ice cream. As I would add food
coloring and extract, I wondered about their shelf lives. I pointed to
various recipes, calculating dough weights for inferring appropriate
amounts to use. The toll house mini-chip recipe ingredients help me
conclude reasonable amount of chips to use.
My ingredients for these cookies are a box of yellow cake mix, 1/3
cup of oil, 2 eggs, 5 drops of blue food coloring, 3/4 teaspoon of mint
extract, and a 10-ounce bag of mini chocolate chips. For saving time and
elbow grease in mixing up this dense cooky dough, I used my tilt-head stand mixer. I mixed the liquid ingredients with the balloon whisk, then switched to the flat beater paddle to add the cake mix, then the chips. I doled the dough portions onto a baking pan using a measuring spoon and rubber spatula.
Ingredients
1 box of yellow cake mix
1/3 cup of oil
2 eggs
5 drops of blue food coloring
3/4 teaspoon of mint extract
10-ounce bag of mini chocolate chips
Process (using pastry blender or mixer for combining)
Preheat the oven to 350.
Mix oil, eggs, mint extract, and food coloring in a large bowl. (I tend to break each
egg separately into the bowl before adding the other wet ingredients.)
Mix in the cake mix.
Fold in the chips.
Dole out tablespoons of dough onto pan, leaving ~1" margins for
baking expansion. (I use the measuring spoon with rubber spatula
method.)
Bake each batch for ~ 10 minutes, checking for browning at edges.
Cool for ~ 2 minutes before using cooky spatula to transfer them onto cooling rack(s).
I preheated the oven to 350 for about 10 minutes while I doled the
dough portions onto a baking pan, between level and rounded tablespoons.
Baking time was ~ 10 minutes, about the time cooky edges became
slightly brown. YMMV for amount of time, especially if your parcel out bigger dough
dollops than mine. BTW, with bigger dollops, you should allow bigger
margins and increase baking time.
Line up all your implements (bowls, cooky pans, measuring cups/spoons, etc.)
Remember to preheat the oven.
For additional help, the web and YouTube are LOADED with cooky
recipes and advice. If you want the easiest way to step into cooky
baking, start with refrigerated cooky pellets (located near refrigerated
biscuits).
Cooky Stats
Raw ingredients weight and the chips: ~35 ounces
Yield: 51 ~2/1/2" diameter cookies (24 for 1st pan, 27 for 2nd pan)
Calories: 78 each (3990/51)
(cake mix powder, 1800, chips, 1400; oil, 650; eggs, 140 -> 3990)
Post-recipe Notes
The amount of 3/4 teaspoon mint extract seemed reasonable.
Baked color was less green than I hoped for, some color interference
because of slight browning, maybe. Might have been OK to use 7 drops of
color instead of 5.
Weight evaporation from baking was about 2 1/2 ounces.
My mind percolated about making cookies that would integrate yellow
cake mix, mini chocolate chips, mint extract, and blue food coloring.
This cooky should resemble mint chocolate chip ice cream. I became
curious about some of my ingredients.
Shelf life of food coloring? Shelf life of mint extract? What kind of
mint is in my extract? Difference between peppermint and spearmint?
Difference between peppermint oil and peppermint extract? How much
extract to use? How much food coloring? Use blue instead of green?
Amount of chocolate chips?
I'd written my "Minty Choco Chip Pudding" recipe article awhile back, so I wondered about the extract's safety and potency. Still Tasty site's info:
How can you tell if mint extract is still good? Mint extract
typically loses flavor over time - if the extract develops an off odor,
flavor or appearance, it should be discarded.
I did a sniff test after noting that the fluid was transparent. Yup, strongly minty!
Peppermint, Spearmint, Oils, Extracts
For this article, I'm emphasizing more about the cookies than mint. Visit "Scent o' mintal Journey, Part 1, Sweetish Thoughts" for sections where I contrast peppermint vs spearmint, and peppermint oil vs extract. BTW, my bottle of "McCormick® Pure Mint Extract" lists both spearmint and peppermint oils, along with water and 89% alcohol.
Ideas for the Cooky Recipe Extract, Food Coloring
A recent discussion with a friend about mint chocolate cookies
spurred me to consider making a batch. A little uncertainty about seeing
obvious doneness for chocolate cooky dough got me to thinking of using a
lighter-color cake mix. Also, I thought the cookies might look kinda
cute if they resembled colors in mint chocolate chip ice cream. Several
sources gave me enough ideas about amount of mint and food coloring, and
eventually, amount of chocolate chips.
The cooky recipe is similar to the spearymintal cookies, except for
different means of mint flavor, kinds of chips, and cake mix flavor. At
that time, I used a pastry cutter for mixing.
The pudding recipe uses both extract and food coloring. I had referred to page 20 of the Cuisinart Instruction Booklet (for soft-serve ice cream maker) for mint ice cream (ingredients: 30 ounces). The pudding ingredients weighed 19 1/2 ounces.
The ice cream called for one teaspoon of extract. I hedged my bet and
used half the amount for the pudding. Turned out to be the right
decision. I had used green coloring; would use blue another time.
"Addictive Double Chocolate Mint Cookies" calls for 1 teaspoon mint extract to make a batch of 36 cookies. I decided I needed to calculate the dough weight (29 ounces), although I consider the recipe to fussy for my taste.
"McCormick® Pure Mint Extract"
intrigued me with "Mint Brownies: Prepare and bake 1 package (21
ounces) brownie mix as directed, stirring 1/2 teaspoon extract into
batter." One-half teaspoon! Now I needed to find out what recipe with
added ingredients would weigh that would warrant a seemingly teeny
amount of extract. I found an 18-ounce box
fudge recipe that called for 3 T water, 1/2 cup of oil, and 2 eggs. OK,
powder amount is close enough. The added ingredients would add about
another 9 ounces. So, one half teaspoon of extract for 29 ounces of dough.
Gauging Appropriate Amount of Chocolate Chips
I usually use regular-size chips, commonly packaged for 12 ounces
each bag. I wanted to try mini-chips. OK, so mini-chips packages weigh
less, and cost about $2.50. Seems the smallness gives the taste buds
pretty good bangs for buck. Anyway, the recipe for "Original NESTLÉ® TOLL HOUSE® Mini Morsel Cookies" calls for a 10-ounce package of mini chocolate chips. The weight for flour, sugars, butter, and eggs totaled 31 ounces. I concluded the entire pack of chips was a reasonable amount for my spearymintal cookies.
I recently tried some chocolate-covered mint chocolate cookies, Fudge Mint Cookies (Back to Nature brand), recommended by a friend. Mmmm. Got me to thinking about other minty chocolate cookies. I recalled my supermarket sells Hill Country Fare Fudge Mint Cookies. They're square, minty chocolate with chocolate coating. Decided to look up more similar cookies.
I thought I recalled that Girl Scouts has a minty cooky. Yes! Thin Mints, tersely described in "Meet the Cookies".
The Google results for "girl scout cookies mint chocolate" yielded not only a pointer to the Girl Scouts Thin Mints info, but also loads of pointers to DIY recipes.
All three brands of minty chocolatey cookies, besides sharing
characteristics of minty cooky coated with chocolate icing, use
peppermint oil. I wondered how that differed from peppermint extract.
The fundamental difference is that peppermint oil is made of
pure peppermint, while peppermint extract is essentially a flavored
solution—a little peppermint and a lot of something else.
Peppermint oil is the pure, concentrated oil—known as an essential
oil—derived from the stems and leaves of the peppermint plant. … An
extract is a mixture of an essential oil and a medium—usually
alcohol—that helps carry the flavor. … Never ingest pure peppermint oil,
which can be toxic in large doses.
Hmm, my bottle of "McCormick® Pure Mint Extract" lists both spearmint and peppermint oils, along with water and 89% alcohol. Speaking of peppermint and spearmint, …
Peppermint is an incredibly pungent—almost spicy—herb. … And
though peppermint is perhaps the better known of the two, it’s actually
a natural hybrid of spearmint and water mint. … much more potent than
its counterpart. Because peppermint is a mix of two types of mint, it
contains a higher content of menthol (40% as opposed to spearmint’s
0.5%).
Spearmint, containing less than 1% menthol is the far more
delicate with a subtly sweet profile, and thus often found in savory
dishes; much less likely to overpower other herbs and spices. …
peppermint is actually a hybrid of spearmint and water mint. At 40%
menthol, it is the surly, punchy and powerful member of the Metha
family, and the intensity of it’s “minty” flavor borders on spiciness,
earning it a fitting name.
Both Taste of Home and Chowhound sites contain expansive explanations and also links to recipes that use either kind of mint.
My mind started percolating about another cooky recipe that would
integrate yellow cake mix, mini chocolate chips, mint extract, and blue
food coloring. This cooky should resemble mint chocolate chip ice cream.
I needed to confidently determine the amount of extract and food
coloring to use.
In poring over additional web info, I concluded the intriguing plant
is a gopher plant, aka silver spurge, aka Euphorbia rigida. (That
scientific term causes me to think it best to copy/paste it, as I might
easily mistakenly spell euphoria instead of Euphorbia.)
Rigid spurge? Sounds like more of a social disease than a
great garden plant. ... The upright stems are clothed in long, pointed,
powder-blue, deer-resistant leaves. In very early spring, the ends of
each stem are adorned with yellow bracts similar to a miniature
poinsettia.
Bract? From Garden Word of the Day site for "Bracts": "Bracts are specialized or modified leaves. ... The presence of bracts, or lack thereof, can help you identify plants."
It belongs to the Euphorbia genus, named after Euphorbus, a
Greek physician who is credited for introducing the Euphorbian plants.
... Native to the Mediterranean and Middle East regions, the gopher
plant is a low-maintenance plant-type and a drought-resistant evergreen.
Euphorbia Rigida or Gopher Plants
also provides overview of the plant. The explanation for why "gopher
plant": "The same milky sap that causes irritation to humans also repels
rodents and small mammals like gophers, hence the plant's name."
The video includes stills and clips that I took 5/23/2019, 6/1/2019, 8/6/2019, 3/18/2020, and 8/2/2010. Near the end, a
four-footer makes a guest appearance, with a few other hoofers making
cameos. BTW, deer hooves are special, according to "Hooves make everything deer do possible".
Initially, I started out with a rolled, refrigerated pie crust, which I had intended to use in my MayDay lemon meringue pie. The box had info about letting the dough warm up a few minutes to room temperature before unrolling it onto a pie pan. Or could microwave for a few seconds.
My brain misfired and had my fingers microwave the dough for defrost on a low setting. Unfortunately, the defrost setting is meant for FROZEN items. When I pulled out the plate of the rolled dough, I discovered the dough was tepid and soft, un-unrollable. D'oh!
I hatched Plan B—cookies. That plan worked OK. Yield was 13, with confetti sprinkles, but I thought it could use additional sweetening.
I hatched the sweet-tweak the next day after having only three cookies left. I spread some vanilla frosting, then glued additional sprinkles.
During the resolution of the pie dough, I poked around the web for ideas about pie dough cookies. I also expanded my thoughts about easy cooky making. Not addressing no-effort, ready-to-eat cookies nor the other extreme—scratch cookies. (I'm practically on permanent hiatus from physical effort and expense required for scratch cookies.)
Actual Pie Crust Cookies
I stumbled upon some sites for making cookies from pie crust. Some recipes use unroll-pie-crust dough, some suggest either unroll-dough or homemade. One calls for leftover dough. The commonality of these recipes is addition of cinnamon and extra sugar. Looks like adding butter is helpful.
"3-Ingredient Cinnamon Sugar Cookies" is a true unroll-pie-dough recipe that uses only pie crust, sugar, and cinnamon. This recipe would not have worked in my case, as my dough was already kaput.
"Easy Pie Crust Cookies" actually calls for a package of refrigerated Pillsbury Pie Crusts! She adds cinnamon, sugar, and melted butter, then cooky-cuts them out.
"Pie Crust Cookies" provides guidance for using leftover pie crust. I do wonder about the small scale the baker uses—4 ounces of pie dough and rest of ingredient amounts. BTW, she calls for a lot more than three ingredients. The pix, however, are divine!
"Easy Pie Crust Cookies" also suggests either store-bought or homemade pie crust. Spartan amount of ingredients besides the crust—sugar, cinnamon, and optionally, melted butter. Her recipe uses cooky cutters.
Pretty EZ Cooky Dough Using Room-temperature Kits
Making cookies out of refrigerated rolled pie dough like I did is not economical. The pack of two was ~$3, total of just over 14 ounces. You can buy cooky mix in the cake aisle for about $2 for 17.5 ounces (example: Betty Crocker) with several varieties.
BTW, I used only one-half of my pie dough package for the 13 cookies. From looking at a website for BC cookies, the entire package yield would be 36. Sooo, if I'd used half of a BC package, the cost would have been 1/3 less than the pie dough, and the yield would have been about 50% more.
Almost EZ Cooky Dough Using Cake Mix
The standard easy recipe I use is one box of yellow cake mix, 1/3 C oil, and 2 eggs. Yellow cake is easy because the ingredients are simple. I'm not sure how factory ingredients differ among yellow, white, and butter-recipe; however, I know they require different added ingredients. For chocoholics, chocolate cake mix requires the same ingredients as yellow cake.
As for economy, each boxful weighs about 15.25 ounces. The yield, after adding oil and eggs, can range between 48 and 56. Yield is even higher, but the cost also more, if you add in choco chips and nuts.
EZ Cooky Dough Using Refrigerated Pre-mixed Cooky Dough
Refrigerated pre-mixed cooky dough comes in two forms—pellet-shapes and sausage-shaped wrapped ("chub"). Pellets come usually 24 to a pound. Open the pack, break at edges onto pan, and bake in pre-heated oven. With the slightly more laborious chubbed dough, peel away the plastic wrap, spoon the dough onto pan(s) or cut into pieces onto pan(s), and bake in pre-heated oven.
So, are you inclined to make pie dough cookies? Various other types of cookies with varying efforts?
I recently made a two-layer cake using yellow cake mix and added Black Cherry Kool-Aid powder. The flavoring contained one teaspoon of powder. I used half in one cup of my batter for marbling effect, and the other half in 18 ounces of spreadable frosting.
Tasted good, although the colors were a bit pale. I didn't feel confident about adding food color to darken anything. As for the swirling, I think zebra-ing would have looked more interesting. Oh, well, I have more beverage powders to try the next time
Short Version of Kool-Aid Cake Infusing
Experienced bakers know the cake preparation process or how to find reminders. FYI, I've omitted the info for utensils, pre-prep, and post-bake.
I used a yellow cake mix, adding the ingredients called for (3 eggs, 1/3 C oil, 1 C water).
I added 1/2 pack of Black Cherry Kool-Aid into 1 C mixed batter for marbling before dispensing and baking.
I added the other 1/2 pack of the Kool-Aid into 18 ounces of spreadable frosting.
Longer Version of Kool-Aid Cake Infusing
Novice bakers can use my content as supplemental info about cake making. Additional and reinforcement info is available on cake mix boxes and web searches.
Pre-preparation
Cake mix boxes provide excellent instructions for preparation. Obtain cooking utensils, bowls, measuring cups and spoons, ingredients, plates for setting cookery items on, cake pan(s). Be forewarned: Making a cake dirties up a lot of items and surfaces.
Pan Preparation
Pan(s) need preparation so that the batter doesn't stick to the surfaces during baking. Cake mix boxes tend to advise greasing and flouring. I use spray oil at the bottoms and sides, then press down parchment paper circles, and spray more oil. Pre-heating the oven to 350 at this time is good.
Batter Mixing
Cake mix box instructions say to mix water, oil, eggs, and powder together, slowly for 30 seconds, then 2 minutes on medium. I tend to draw the process out as follows:
Ensure no bad eggs or loose egg shells during cracking process. Crack an egg into the bowl. Crack another egg into a cup; pour it into the bowl if no mishap. Pour the third egg into the cup; pour it into the bowl.
Measure and pour the oil into measuring cup, then add to bowl.
Measure and pour the water into measuring cup, then add to bowl. Blend these wet ingredients about 20-40 seconds.
Slowly add the cake powder while continuing to mix for about half a minute. Speed up mixer to medium for the next two minutes, also using rubber spatula to help blend.
Scoop out 1 C batter into a smaller bowl. Lightly blend in Kool-Aid powder. (I used 1/2 envelope, which amounted to 1/2 teaspoon)
Batter Dispensing, Baking
Pour lighter-color batter into pan(s).
Pour Kool-Aided batter afterward, use spatula to lightly swirl colors.
In my case, I used 2 9-inch pans, aided by kitchen scale for weight checks. Another option for batter distribution is using additional measuring cups to alternate the different batters, thereby getting a zebra cake effect. (Visit "Zebra Cake, Using Two Half Boxes of Cake" or "Zebra Cake, Using Marble Cake Mix".) Advisory: Weigh battered (grin) pans to ensure similar doneness.
Bake according to box instructions, then cool.
Part of the baking process includes checking for doneness, often poking a toothpick into the risen cake, pulling the toothpick out and seeing if still-raw batter sticks. If not, cake's done. Pull the pan(s) and place onto cooling racks for about 10 minutes, invert the cake(s) onto the rack(s), remove papers if you used them, and let cool to room temperature, about an hour or more.Blending Kool-Aid into Spreadable Frosting
I had a partially used can, which I pulled out of the refrigerator for warming to room temperature. I added enough from a new can to total 18 ounces. I added the other half of the Kool-Aid (1/2 teaspoon) into the frosting.
Caution: If your frosting isn't at least room temperature, blending the powder in is laborious. I'd be sure to microwave chilled frosting in very small doses before attempting to stir in the Kool-Aid.
Frosting the Cake, Two-layer (Assembly)
Frost a layer, flat side up.
Set other layer on top, flat side down, and frost.
Finish frosting sides.
Looking Closer at Unsweetened Beverage Powders
I noticed that weights seem to vary among brands, even among Kool-Aid flavors. My collection:
Kool-Aid, Black Cherry, .13 oz, 3.6 g (Used this one.)
Kool-Aid, Cherry, .13 oz, 3.6 g
Kool-Aid, Tropical Punch, .16 oz, 4.5 g (Oy, I have 5!)
Strawberry Fresa Flavor Aid, .15 oz, 4.3 g
Hawaiian Punch Berry Blue Typhoon, .35 oz, 10 g
Looking a Bit into Kool-Aid
Each packet costs about a quarter, takes up very little room, and is non-perishable. I poked around the web for shelf life. It seems that Kool-Aid lasts forever if the packet is unopened. If you're inclined to try Kool-Aid to flavor your cake, frosting, or both, you can find plenty of info on the web.
"KOOL AID OLDER THAN ME!" includes research that the teen did, revealing some Kool-Aid was up to 18 years old.
"The History of Kool-Aid" provides overall history of the product, inventor, and the product path since its invention in 1920 (under a different name). It had cost 10 cents an envelope for a long time, then dropped 5 cents for awhile. My supermarket shows envelopes for 26 cents.
Lemonade Kool-Aid and More Flavor Suggestions
I previously wrote "Lemon Juice Aid 1, Let There Be Cake!", where I first mentioned my intention to use Kool-Aid lemonade flavoring for next lemon cake or pie.
Earlier, I mentioned different weights for Kool-Aid powders. Oddly, lemonade Kool-Aid weight seem to vary even more. "Kool-Aid Lemonade Unsweetened Drink Mix" shows .23 oz (6.5 g). "Kool-Aid Cake or Cupcake Recipe" looks like a reasonably uncomplicated recipe—one packet for the cake, and one packet for the frosting. Amount of Kool-Aid in one envelope is .15 oz.
All I do is just add the Kool-Aid to my icing as I am making it. You already have the water and it doesn't leave a gritty taste. ... I also marble it into my cake mixes for the kids and kids at heart.... Lemon lime, grape, and lemon is very tart so don't add that much. I have have even mixed 3 to 4 different flavors in the cake mixes ...
How tall are sotols? They're distinctly tall. Ones that I've seen tend to be at least as tall as street lights. And they're pretty, especially with flower/flowery stalks/spikes!
Sotols have relatives that confuse the casual observers. Before I dug into sotols, I'd blogged about a yucca that some friends had suggested was a sotol. The leaves that radiate from base areas for both kinds of plants look similar. Overview websites provide introductions to sotols and similar plants, the first two also advocating sotols in xeriscaping.
Dasylirion texanum and Dasylirion wheeleri Habitat and Overall Contrast
In researching sotols, I kept encountering the scientific names Dasylirion texanum and Dasylirion wheeleri. My initial information about habitat and leaf features come from Monrovia, a plant seller.
"Texas Sotol Dasylirion texanum" states "Native to Texas Hill Country. ... Stiff, spiny, sharp-edged green leaves, to 23 [sic] feet long and 1 inches wide".
Note: After having poked around numerous sites, I'd concluded the text should have said "2-3 feet".
"Silver Desert Spoon Dasylirion wheeleri" states "Native to West Texas, Arizona, and northern Mexico. ... Spiky, fairly stiff, bluish gray leaves to 3 feet long and less than 1 inches wide".
I'm guessing these neighborhood specimens I've found are texanum because they're native to Hill Country, whereas the wheeleri WRT Texas is West Texas. Maybe if the specimens were bought and transplanted plants, they likely came from from plant sellers. Texanums would likely be cheaper and less effort to transport to Central Texas than wheeleris.
Anyway, the two Monrovia pages include images in leaf and leafhead contrasts. (I'm using "leafhead" to mean the part of the plant where the leaves grow from. The actual technical term is caudex.) Texanums' leafhead centers seem to grow from ground level, and wheeleris' leafhead centers look to radiate leaves in a spherical shape above the ground. Tiling the images side by side, the color difference stands out.
Succinct leaf descriptions come from Southern Living's "sotol": "Slender, green leaves with spiny margins form a symmetrical, rounded rosette" (Dasylirion texanum) and "Twisting, curling, ribbon-like, blue-green foliage" (Dasylirion wheeleri).
Plant Lust's "Dasylirion wheeleri" describes the twist with visuals—"the end of each leaf forms a little cowlick curl...like Elvis used to have .... If you are having trouble imagining this, think of a giant, blue-braided Afro."
More About Dasylirion texanum and Dasylirion wheeleri Foliage
The arching leaves (of Dasylirion texanum) may grow to four feet long. They are green to grayish green, slender and flexible with teeth along the margins. The unbranched flower spike can be fifteen feet tall. The top two to three feet of the spike is densely covered by small creamy white to yellow flowers.
Slender, three foot long, spiny, blue-gray leaves (of Dasylirion wheeleri) form a dense rosette at the top of the stem. Slender flower stalks of white flowers can grow to ten feet long or more.
A Dasylirion wheeleri characteristic that Dasylirion texanum doesn't have: "Desert Spoon, Desert Sotol, Wheeler Sotol, Grey Sotol" states "The (Dasylirion wheeleri) leaves ... are spoon-like at the base, giving the genus the common name of "desert spoon". "Dasylirion wheeleri - Spoon Yucca" succinctly describes wheeleri leaves and spoon association: "The 3 foot long narrow leaves are blue-gray color with sharp serrated margins and a spoon shaped base that gives the plant one of its common name."
It (Dasylirion wheeleri) is immediately recognizable by its pale blue, usually somewhat twisted, flat, heavily armed, very stiff and narrow 3'-4' leaves that end in a brownish tassel. It is called a desert spoon because if the leaf if removed in its entirety the base of the leaf is spoon-shaped where it was attached to the caudex/stem. The leaves come off the caudex in a strikingly symmetrical pattern forming a perfect sphere of viciously sharp but ornamental leaves.
This species (Dasylirion texanum) is not unlike Dasylirion wheeleri but distinctly a pale green color and the leaves are not twisted. Otherwise it is a very similar plant in both shape and size, and nearly as cold tolerant. Some populations, particularly in the very dry areas, are significantly smaller than most other Dasylirions having leaves only up to 2.5'-3' long.
Specimens in My Video that I'm Mostly Certain of Species
The sotol pix and videos I recorded were in late spring and early summer of 2018, 2019, and 2020.
A, newly planted plant starting to bloom
B, two sets of bloomed plants at a business
C, plant and more recently spotted plant with heavily bloomed stalk
D, plants with focus on bloomed stalks, some sagging, loads of bees
E, plant with heavily bloomed stalk
Leafheads and closer-in looks of leaves for C, D, and E, followed by one compilation image.
A and B leafhead grouping images indicate Dasylirion texanum because of the leaves radiating from the ground. C's leafheads look spiky (sunburst-like) with mild leaf twistiness, seemingly more wheeleri than texanum. (My two-year old composite shows "Texas", but I'm not totally convinced for either texanum or wheeleri.) D's leaves seem to radiate from the ground (texanum characteristic), although the color doesn't seem bright green, like E.
"Pretty Tall Sotols, Part 1" emphasizes mostly the plants' physical characteristics. (Video: "Pretty Tall Sotols") This article includes secondary info: sotol as alcohol and resemblance to yucca. On the periphery of sotols, having viewed numerous videos with bees around blooms, I wondered long bees live. The final section includes additional resources.
Sotol is made from the desert plants Dasylirion wheeleri and Dasylirion texanum (known as sotol in Spanish), which are harvested in the wild. ... This liquor is most closely associated with the Mexican states Chihuahua, Durango and Coahuil, although there are now distillers in Texas producing sotol.
Only around one liter can be extracted from a single plant compared to the six liters extracted from a single plant during the tequila making process. Furthermore, sotol distillation takes place in a column still instead of a pot.
Sotol and Elata Yucca Resemblance
About two years ago, I wrote "Spiky-head, Multi-branch, Blooming Yucca (Elata/Soaptree)". Sending an image out, I'd asked for help IDing it. Some people IDed it as a yucca, and some guessed sotol. Note the spiky leafhead in the articles image that resembles images of sotols leafheads. Yuccas' bloomy stalks have bell-shaped flowers. Sotols' bloomy stalks have yellowy, clustered cheeto-shaped blooms.
A Bee Thought in My Bonnet
Some of my video clips showed blooming sotol stalks with loads of hovering bees. The footage was from June of 2019; I wondered how long bees live. "What Is the Life Span of a Honey Bee?" provides the following longevity info:
Drone bees (male bees hatched from unfertilized eggs) live for around eight weeks. Sterile worker bees tend to live for up to six weeks during summer and five months or more during winter. However, the queen bee, the only fertile bee in the colony, can live for several years.
Sites that Display Pages for Both Dasylirion Texanum and Dasylirion Wheeleri
Several of the resources have separate pages for Dasylirion texanum and Dasylirion wheeleri. Descriptions range from similar style and content publishing to left-hand-doesn't-know-what-the-right-hand-is-doing published content.
Mortellaros' two pages have nearly identical between the species, as though one person used one paragraph and tweaked a copied paragraph into the other page. Thankfully, they use different pictures. Also they do differentiate between texanum and wheeleri blooms and flower gender.
Texanum ("Yucca, Sotol Dasylirion texanum"): "Numerous small greenish-white flowers .... The Sotol Yucca is dioecious, meaning the flowers are either male or female on the single plant."
Wheeleri ("Yucca, Blue Sotol Dasylirion wheeleri"): "Numerous small white flowers .... The Blue Sotol Yucca is dioecious, meaning the flowers are either male or female on the single plant."
Additional Dasylirion texanum and Dasylirion wheeleri by same-resource sites:
"Sotol and bees"
Sign says wheeleri. See spiky leaves, bees around 30-second mark.
"Sotol (Desert Spoon)"
Good views of leaves are at 3:02 mark—grayish green, spines 90 degrees from leaf axis. About 6 minutes in, shows a good cross-section of the leafhead and "spoons" at base end of leaves.
The lemon meringue pie I made Friday 5/1 (May Day) is a followup to the pies I made in March ("Assessing My Mid-March 2020 Lemon Meringue Pie" (article, video) and December ("Assessing My Christmas 2019 Lemon Meringue Pie" (article, video). Timing the pies on significant days makes it easier for me to remember when I made them.
May Day Not the Same as Mayday—MayDay a Nod to Both Terms
"History and Origin of May Day" provides background of the celebration of May 1—"celebration dates back to the days, even before the birth of Christ. And like many ancient festivals it too has a Pagan connection." The significant symbol is the maypole. "What Is May Day?" includes similar info but also describes the rise of the date's significance to worker issues in the 1800s. "May Day" further describes actions by American presidents Cleveland and Eisenhower pertaining to workers and observation dates.
As for mayday, "May Day" explains that it is a distress call and the phonetic reason for its pronunciation—"it sounded like 'm'aider,' a shortened version of the French term for 'come and help me.'" For fuller explanation, visit "What Does Mayday Mean?"
Mulling Over Differences Between This Pie and Previous Ones
For the previous two pies, I used frozen pie shells that came with their own pans. This pie shell was a refrigerated one that needed unrolling, then shaping into a pie pan before pricking and baking it. Pie tasted good, as the previous two tries.
The main oddity is fluid that I'd characterize as dewiness rather than weepiness. Instead of cutting the finished pie the same day, I stored it in a cake tote overnight. Next day (day 1), I noticed dew drops. Cutting and removing two slices showed the pan to be dry. For days 2 and 3, I'm guessing it's condensation in the pan where I'd previously removed slices.
I did butcher the slicing—maybe moreso than the other two. I should have dipped the knife into hot water first before cutting into the pie.
Homing in on the Possible REAL Reason(s) for Excess Fluid
I reviewed still images for all three pies, in addition to re-viewing the videos. At the time the pies came out of the oven, the pies looked good. After time of refrigeration, dew drops had formed.
Christmas 2019 pie—I made it in the morning and had time to cool and serve slices that day. No dew drops (and fluid) until the day after. Dryness at cut slices indicate my fluid problems were actually dew. Although using food wrap for overnight day 1 and 2, new fluid (dewiness) developed.
Mid-March 2020 pie—I started part of the process in the morning and completed it after lunch (interruption between pie filling and meringue slathering). Found info later that the hot filling helps cook the slathered meringue. Weepiness occurs because reheating the filling in the oven creates trapped condensation between the shell and the pan. Although using food wrap for overnight day 1 & 2, new fluid developed, I think from both baking process AND dewiness.
May-Day 2020 pie—I made the pie after lunch; it took HOURS for cooldown. Decided to store it overnight in the cake tote, uncut. Dew drops the next day. Not a lot of fluid after slicing till subsequent days. Although using aluminum foil for overnight day 2 & 3, new fluid (dewiness) developed.
Resolving Excess Fluid for the Next Pie
I've seen several sites say to make a lemon meringue pie on low-humidity days. Maybe not willing to wait till winter, but could try to ensure sunny days.
I think the food wrap and foil storage methods don't seal the pie well enough to keep out surrounding refrigeration atmosphere. Two things I can do:
Minimize the time that I have the pie out in room temperature before returning it to the refrigerator. Soooo, fewer pix next time!
Use a smaller and more shape-appropriate container to enclose the pie. I'll set the pie my 9 1/2" springform cake pan (3" deep), and cover it with a snug tin lid. Lucky I managed to rustle them up!
Incidental Should-Does for Future Pie (Room for Improvement)
Start and finish making the pie early in the day so it'll be ready to serve by early afternoon or right after dinner. Related: Cool baked pie on a rack for an hour, then refrigerate for further cooling till refrigerator temperature (4 hours or so).
Cut with a sharp knife dipped in HOT water.
Revisit sites and videos that show good meringue making for the following considerations:
Optimal stickiness of whipped meringue to beater blade(s)
Optimal time for adding sugar
Suggestions for egg white temperatures
Possible addition of cornstarch during meringue process
Whimsical might-do—try Lemon Kool-Aid powder and water instead of lemon juice.
Resources
It's a big list. Several sites include similar pieces of advice, many pertaining to the meringue process, pie cooling, and pie storage. Visit the sites and come up with your own advisory list. (Duplicated info can help reinforce important points!) Maybe you'll have beginner's luck and make a perfect pie! I'm still not there yet, despite several tries over time!
About as easy a recipe for a beginner as possible (3 eggs, 1/2 C lemon juice, info for using frozen shells or refrigerated dough)
Best wishes to all the mamas and mamas-to-be! (This upcoming Mother's Day inspired me to create and publish this article and video.)
I recorded some deer 4/21. I noticed one that I was able to keep in view looked belly-rounded. Made a mental Post-It to look up doe pregnancy for possible time of year commonality. One of my curiosities was what a pregnant doe looked like.
My inquiry for Google images for "pregnant does" yielded images of pregnant women, no deer at all, guessing Google interpreted my image inquiry as pregnancy does and don'ts. Image Googling "pregnant deer" yielded lots of pregnant deer. (Whoa! Some images astounded me!) A Google image hit for "what does a pregnant deer look like" yielded similar images, many overlapping the previous image results.
Spotted and recorded some snippets of does 5/7. Most of the does looked svelte, but one or two looked slightly distended. Re-viewing the 4/21 clip helped with visual comparisons. My video includes both pregnant and non-pregnant does.
Curious about doe pregnancy and fawn birth? Lead-ups to the process? "How Long Are Deer Pregnant? [Gestation Period For Deer]" explains deer season regarding "rutting", mating, doe gestation, and a table of various deer types and number of days for pregnancy.
What's rutting? Why do we talk about being in a rut, a bad thing? Why does it seem that rutting is so often associated with deer?
"In a Rut - Breeding Season Behaviors in Deer" explains:
The term "rut" is often used to describe a boring, monotonous routine or a trench worn in the ground by a wheel. However, if you hang around much in white-tailed deer hunting circles, chances are that it means something completely different. Many people use the term rut only in reference to the peak of the breeding season, but it really applies to a much more extended period of time. The rut refers to all behaviors and activities associated with the breeding season.
Additional resources:
"Spotting" Whitetail Deer Fawns" states, "A doe goes into estrus in the fall, which means whitetail deer fawns are normally born sometime between late April and early July."
Spring and summer is the time of year deer give birth to their young. A deer may have between one and three babies, two being most common. Fawns are born from April though June. They are born with their eyes open and fully furred.
As early as April, but most often in May and June, you may find a White-tailed Deer fawn curled up in your lawn, garden, bushes, or nearby field or trees. You may think it has been abandoned, but most of the time this is not the case. White-tailed does spend a small portion of the pre-dawn hours looking for a quiet, secluded spot to place their fawn(s) that are three weeks of age and under, as they will not be able to keep up with the doe’s pace.
For blog articles pertaining to deer, use search feature at the upper left of th4e website. For videos, go to my YouTube link for deer playlist (Oh, deer!)
My profession had been technical writer/editor. Through TheWriteJob clublet (blog at http://thewritejob.blogspot.com), I have been exploring my inner creative writing, which includes mostly language enlightenment, entertainment, and a-muse-meant. Over time, I have become more active with images and my YouTube channel.


