Tuesday, December 18, 2012

Some Verb-ose Observations 2

As I was set to publish my initial article about conjugations and other verb-ose observations, I kept thinking it was getting pretty long. Splitting the observations into a main one about conjugations and a second one seems sensible. (Visit "Conjugations--Some Verb-ose Observations"!) This part of my verb-ose observations pertains to mostly infinitives and gerunds, a couple of verb forms.

The noun infinitive seems more familiar to people than gerund. Gerund is merely the noun usage of the same word that is easily recognizable as a present participle. Baking. Walking. Eating. I'm [gerund] at 5 o'clock. [Gerund] is a fun activity.

Closely related to gerunds are other noun forms that are rooted (!) in the same verb. For example, conjugating and conjugation are both nouns, but they differ. I consider conjugating as a generalized action, but conjugation as a process. Thus, I use conjugation in my blog title instead of conjugating.

As I looked for differentiations of -ing vs. -tion or -ation, I was sidetracked by usage of gerund vs. infinitive, a dilemma that occurs frequently. The English, baby! website explains "only gerunds follow prepositions" To split hairs, the English Teacher Melanie website explains about purpose of something or someone.

Regarding infinitives, I find it curious that Spanish and French infinitives are single words. In English, however, the infinitives are verbs preceded by "to". That complicates conjugating. A Hub Pages article uses a famous phrase in discussing split infinitives. Well, I think it's fine to boldly go where no one has gone before! :-)

Friday, December 14, 2012

Conjugations--Some Verb-ose Observations

Occasionally, I think about conjugation as either a second-nature reflex or a throw-up-the-hands convention for rolling the eyes at. I have no problem with writing, editing, and verbalizing subject and verb agreement and tenses in English. But my recall for almost anything in Spanish and French (my foreign language electives from way back)—well, fuggedaboutit.

I studiously and happily conjugated away, and made great grades. These days, however, I'm lucky to remember more than one or two conjugated forms. And I'm pretty much limited to third-person simple present indicative tense.

I think it's actually appealing to just drop all the subject-verb number agreements. Let's just have one verb, as number is already accounted for with the subject. What's wrong with the following?
I work.
We work.
You work. (Skip y'all work.)
He, she, or it work.
They work.
I also find it curious that singular for a verb would be adding an "s" for third person singular. Yet, most cases of making a single noun plural is adding an "s" or "es" at the end.
A baker bakes.
Bakers bake.
It'd be simple to just use one verb and let the noun take care of the number.
A baker bake.
Bakers bake.
Come to think of it, future and past tenses don't differentiate the verb form for number.
A baker baked.
Bakers baked.
A baker will bake.
Bakers will bake.
To take this observation even further, check out the conjugation for "to bake". The only differentiation for subject-verb number agreement is in the present tense and the present tense variations! And for only third-person singular vs. plural!

The basic online conjugator site looks good for mechanical conjugation. Fill the field with an infinitive, select French, English, Spanish, or German, and click the Conjugate button. For English, you can just enter a root verb, omitting "to". For that matter, you can enter a non-verb, and the site conjugates anyway. I discovered that anomaly when I stumbled onto the site, and history was already in the input field. Maybe "history" autofilled because of my poking around the web with "history" as a keyword.

The silver lining to the silliness of conjugating "to history" is gleaning the patterns and technical terms for conjugation groups themselves, which the site nicely shows in a mostly logical grid pattern. After I got over the initial surprise of seeing "to history" conjugated, I appreciated the layout for mostly orderly groupings. Curiously, the future tense conjugation was not near the present and past conjugations as I would have expected. Present and past (noted as preterite) were grouped as Simple form, along with infinitive, imperative, present participle (historying), and past participle (historied).

Ah, the Compound form group also has a past participle, but it's listed as having historied. Curiously, the future tense is in the compound grouping. To complicate matters, the group also lists present continuous, past continuous, past perfect continuous, present perfect, past perfect, future perfect continuous, future, future continuous, future perfect, past perfect continuous. Not sure why the grid arrangement.

The second part of my verb-ose observations pertain to mostly infinitives and gerunds. Visit Some Verb-ose Observations 2.

Sunday, November 25, 2012

Halloween Music Baker's Dozen Matter

YouTube playlist for this article, playlist compilation article

Near the end of October, I published Baker's Dozen Halloween YouTube Links, a compilation of Halloween songs. One of my fellow tech writers responded to my blog post with a humongous list of video and audio clips. He generously provided YouTube hyperlinks, and also steered me to a couple of prominent audio download places that were new to me—Juzp and Grooveshark. ("I did not know that!", to swipe a famous and oft-spoken Johnny Carson utterance.)
YouTube links
Juzp links
Grooveshark links

For more articles about Halloween, enter "Halloween" in the search box at the upper left of this window. Or find and click "Halloween" link at Partial Index of Keywords section (just below Popular Posts section).

Tuesday, November 20, 2012

Chocolate Chip Oatmeal Mini-muffins

This snack is a hybrid of chocolate chip cookies and muffins—a long-time favorite cooky, but softer, and in a smaller, bite-size shape. The cooks.com recipe that I derived my recipe from does not provide the size of muffin pans to use or the expected yield. Fortunately, I have enough experience in baking to infer some unstated information.
  • The amount of fluid and flour (+ oatmeal) looked to be enough to equal about one box of cake mix.
  • The stated baking time of 22 minutes seemed appropriate for normal cupcake size.
Recipe deviations from the cooks.com recipe
I tend to deviate from recipes that I try out. For instance, I might substitute an ingredient that I have on hand. Deviations and disclosures follow.
  • Granulated sugar instead of brown sugar
    (If you'd rather use brown sugar and find yours is brick-hard, you can use the info in my oatmeal cooky recipe for resoftening it.)
  • Replacement of 1/8 of oil with sesame oil
    I had hoped to add a nutty flavor, but the nuttiness didn't seem apparent in the results.
  • Regular-sized chocolate chips instead of mini-chips
  • Mini-cupcake pans and paper liners, baking the batter for 17 minutes instead of 22
  • Double-recipe batch, which yielded 72 mini-muffins.
    I made enough to tote to two events that coincidentally occurred on the same day—a workplace potluck lunch and an evening professional organization meeting.
My pixstrip shows five image areas:
  1. Implements
  2. Ingredients (dry, wet, and chocolate chips)
  3. Batter in pans
  4. Baked mini-muffins on cooling rack
  5. Baked mini-muffins in goodies tin
Implements
  • large mixing bowl
  • medium small mixing bowl
  • mini-cupcake pans
  • mini-cupcake paper liners
  • pastry blender
  • measuring cups
  • measuring spoons
  • additional spoon for ladling batter if desired
  • rubber spatula(s)
  • cooling rack for done mini-muffins
Ingredients
  • Dry
    • 2 2/3 C flour
    • 2 C uncooked oats
    • 2/3 C granulated sugar
    • 2 tbsp baking powder
    • 1 tsp salt
  • Wet
    • 2 C milk
    • 1/2 C oil
    • 2 eggs
  • 12 oz chocolate chips
Instructions
  1. Preheat the oven to 400 degrees.
  2. Place mini-cupcake paper liners into each mini-cupcake cavity.
  3. Pour the dry ingredients into a large mixing bowl, using the pastry blender to blend well.
  4. In the smaller bowl, mix the wet ingredients.
  5. Pour the mixed wet ingredients into the larger bowl and stir the ingredients until they're moistened.
  6. Stir the chocolate chips into the batter.
  7. Scoop about a rounded spoonful of batter into each paper-lined well, about 2/3 to 3/4 full. (I filled two batches of 36 wells. YMMV.)
  8. Bake for about 17 minutes or until the mini-muffins are lightly browned. (Use toothpick test for doneness if desired.)
  9. Transfer the baked mini-muffins onto cooling rack.

Saturday, October 27, 2012

Baker's Dozen Halloween YouTube Links

YouTube playlist for this article, playlist compilation article

So many spooky-creepy songs to pick from! I compiled a list of maybe 30 songs before I even started to poke around Google for ideas. I decided to stop vetting YouTube videos after listing links for 13, a nice number for Halloween. The collection being eclectic, I listed the titles alphabetically.
** Bonus addition! Nature Trail to Hell (In 3D), Weird Al
Speeded-up video of Weird Al being drawn as a startled uniformed scout in the woods, being terrorized by someone thrusting a stick with marshmallows at him. The song itself is incomplete, but the image creation from start to completion is beautiful to behold.

The next two lists include honorable mentions, suggestions for songs or videos that you might consider for your own playlist.

Magic and mystery
  • Magical Mystery Tour, Beatles
  • Magic Carpet Ride, Steppenwolf
  • A Whole New World (on a magic carpet ride), Peabo Bryson/Regina Belle
  • Do You Believe in Magic, Lovin' Spoonful
  • You Can Do Magic, America
  • Oh Oh It's Magic, Electric LIght Orchestra
  • Magic, Olivia Newton John
  • Old Black Magic, Louis Prima/Keely Smith
  • Supernatural, Santana
  • Superstition, Stevie Wonder
  • If You Could Read My Mind, Gordon Lightfoot
  • Can You Read My Mind, Maureen McGovern
  • It's Gonna Take a Miracle, Royalettes
  • It's a Miracle, Barry Manilow
People, people to creep out people
  • Devil Woman, Marty Robbins
  • Devil Woman, Cliff Richard
  • Evil Woman, Electric Light Orchestra
  • Witchy Woman, Eagles
  • Black Magic Woman, Santana
  • Magic Man, Heart
  • Witch Doctor, Alvin & Chipmunks
  • Abracadabra, Stephen Miller
  • I Put a Spell on You, Nina Simone
  • Every Breath You Take, the Police
  • I Always Feel Like (Somebody's Watching Me), Rockwell
Visit the following sites for more Halloween music and video links.
Images in pixstrip obtained from http://apps.corel.com/paint_shop_pro_photo_studio/tubes.html and http://www.freetubes.com/artxyz/halloween/index.html.

For more articles about Halloween, enter "Halloween" in the search box at the upper left of this window. Or find and click "Halloween" link at Partial Index of Keywords section (just below Popular Posts section).

Saturday, October 13, 2012

4-ingredient Raspberry Chocolate Fudge

This recipe is a variation of the Convenient Fudge recipe that I published nearly a year ago. Caramel, peanuts, and chocolate were in the fudge, although I omitted brand IDs. This time, I'm calling out brand names and products—Duncan Hines' Frosting Creations mix of raspberry powder {"Flavor MIx") and the base frosting ("Frosting Starter"), Kraft marshmallows, and Wilton meltable candies (chocolate this time).

I'd run across various complaints about the Duncan Hines (DH) base frosting. Bakers loved the powder, but complained about frosting sliding off cakes and not having the characteristics of normal frostings. Well, because I had two of the base frosting and two of the flavor packets, I thought making fudge might be a good way to avoid cake disasters. The results were very nice for taste and mouthfeel.

From past experience with chocolate chips and Wilton candies, it seems the Wilton candies have a lower melting temperature or density than chips. The results seem less hard than when using chips. Using both DH AND Wilton resulted in fudge that was quite soft. The Other prefers more fudge firmness, which is doable by refrigerating the fudge instead of keeping it out at room temperature.
My pixstrip shows images for utensils, ingredients, mixing, and post-mixing. (The images inside the dashed section show preliminary preparation before the microwaving.)
Utensils (spray oil being a bridge from utensils to processing)
  • Large mixing bowl
  • Large cooking spoon
  • 2-cup measuring cup or jar
  • Butter knife (for mixing flavor powder into base frosting)
  • 8" x 8" pan, prepared with spray oil
  • Cooky spatula (for cutting fudge into pieces)
Ingredients
  • 16 oz. Duncan Hines Frosting Creations base frosting
  • Duncan Hines Frosting Creations raspberry flavor packet
  • 12 oz. Wilton chocolate meltable candies
  • 1 1/2 cups Kraft marshmallows or 15 large marshmallows (one of my few instances of brand loyalty)
Instructions
  1. Using a butter knife, make a deep hole into the frosting and stir the powder into it.
  2. Melt chips or other meltable candy the large mixing bowl in the microwave oven, using reduced power. Check about a minute or so for about two rounds of heating.
  3. Add the mixed frosting to the bowl. If necessary, microwave another minute or so until you can easily blend the ingredients with the spoon.
  4. Add marshmallows to the bowl. If necessary, microwave another minute or so until you can easily blend the ingredients with the spoon.
  5. Blend the ingredients with the spoon.
  6. Pour ingredients into the spray-oil prepared pan.
  7. Refrigerate for no more than two hours. (If longer, the fudge could be difficult to cut.)
  8. Cut into 64 pieces (8 x 8) or fewer. (FYI, the paper cups are available at craft stores and baking supply outlets.)
Note: Instead of waiting 2 hours and cutting the fudge block with a knife, you can wait 1 1/2 hours for cooling, then use a cooky spatula edge, pressing down. The pic shows the 8 x 8 fudge grid and spatula. If edges of middle fudge pieces look a little warped, lightly shape them.
October 29—Fudge variation: Made a mint fudge, using the mint white chocolate powder instead of respberry, and Wilton green meltables instead of chcolate meltables. Raves all around!

Wednesday, September 26, 2012

Contextual Train

Now and then, I'd think about words that had seemingly unrelated multiple meanings. I'm listing just a few that came to mind in the last few days. For that matter, "train" has bobbed up and down in my consciousness for probably years.

Train
Choo-choo train, fancy bridal-gown train, train of thought, the verb for teaching and often showing how to do something.

Lime
I had a recent discussion with a co-worker about soup she thought was too acidic from too many tomatoes. I remembered just enough about acids and bases from school days and piped up about lime, recalling that it was somewhat alkaline. I then recalled that the lime fruit, it being citrus, would be acidic, like its skin brethren, oranges and lemons. Then I recalled that the lime I thought of pertained to limestone. Bad idea to use THAT lime to counter soup acidity! But interesting that these lime meanings are so unrelated.

Light
About the same day my co-worker and I talked about her soup, which she lessened the acidity by adding parmesan cheese and black beans, I noted "It's kind of light in here." I immediately recognized the ambiguity. I had meant that I perceived fewer cafeteria customers than usual. As the sky was overcast, my statement could have meant room brightness. Speaking of brightness, "bright" could pertain to illumination, or intellect, or instance of apparent intellect.

Base
We can be talking about alkalinity aspect of the pH scale, soup base, political base (firing up the base), basing feelings on certain influences, baseball base. Reaching way back, I recall "Mr. Bass Man" by Johnny Cymbal. All through the song life on the radio, I had never seen the song title in print, and was too young to buy records. I was fairly unaware of lyrics and bass singing levels. I actually used to think the song was about baseball—Mr. Base Man!

Bass
We could be talking about a musical instrument or voice level. Or a fish. Bass can be very ambiguous in written form. If spoken, the long-vowel word can be confused with base, its homophone. See base.

Left and Right
Left and right are paired for directions when used as adjectives, such as left turn and right turn. More recently, when used as nouns, left and right refer to political leanings. Left can also mean remaining items—"how many are remaining" for "how many are left". Right can mean right turn or correct turn when someone confirms a direction with someone else. (I use "correct" rather than "right" in automobile traffic navigation.)

Straight
Within the last 40 years, I have seen "straight" evolve in reference to cultural attitude (vs. hippie) to sexual orientation (vs. gay). The song "Straight Life" by Bobby Goldsboro seems so out of date now, when I think of its context when it came out.

Timing can also cloud the meaning of "hippie". Before the term became so popularized in the 60s to indicate a usually counterculture youth, it derived from "hip", a term for coolness, associated with jazz. "Mohair Sam" by Charlie Rich had lyrics that did not seem to confirm a counterculture image, particularly in the context of his 1965 appearance on Shindig, with his slicked back hair and tuxedo.

Counter
At home, I had occasionally referred to the kitchen island as a table while actually meaning its top surface, but the other party calls the island a counter. I suppose differentiating helps to distinguish the island from the table where we eat. "Counter" seems an odd word for a kitchen furnishing, as I think of integrated circuits called counters. The difference between table and counter seem more obvious at a diner. I previously mentioned counterculture. In this context, counter means opposite of.

Rear
I'm now bringing up the rear of this article, the caboose, so to speak. Besides "rear" as a position descriptor, it also means "bringing up" offspring. Rearing offspring, however, might be less common than raising them.

Sunday, September 16, 2012

Creating a YouTube Playlist PDQ

In April, I wrote an article that provides step-by-step instructions for creating a YouTube playlist. In this article, I emphasize using repeatable steps with minimal keystrokes for creating a playlist—my PDQ (pretty darn quick) method.

For my Dreamy Music article from a couple of weeks ago. I wanted to create a YouTube playlist quickly so I could roll out the article and playlist at the same time. The biggest speed factor was having already vetted my list of YouTube links—for destination AND order. You can whip out a YouTube playlist similarly.

Prerequisites for creating a YouTube playlist PDQ:

  • You know how to use browser rightclicks to open the menu choice for copying a link location. Examples: Copy a Link Location, Copy Shortcut, Copy Link Address, …
  • You have an account at YouTube.
  • You know how to save a file as an HTML file.

Note: Familiarize yourself with info for creating a Youtube playlist as necessary.

Prepping your list of YouTube videos into an HTML file

  1. Open a blank email page or word processor application (Open Office, in my case).
  2. Copy and paste a URL of a YouTube video you want in your playlist. Enter a video title adjacent the URL so you instantly know where the link goes.
  3. Skip a line for readability.
  4. Repeat the previous two steps until you have all the videos you want, periodically saving the collected info as an HTML file. (For convenience, save the file to your desktop.)
  5. Rearrange and cull entries until you're happy with your list. Do a final save-as, overwriting your HTML file.

Setting up your new YouTube playlist

  1. Log in to your YouTube account.
  2. At the upper right of your account page, click the arrow to the right of your account name to open the main menu, and click Video Manager.
  3. At the left menu, click Playlists.
  4. At the upper right, click New playlist, type something in the Playlist title box, and click Create playlist. (If you want to add or change info, you can do that later.)

Entering your HTML list of videos to your new Youtube playlist

  1. At the YouTube Editing playlist window, accept or change Privacy and Settings choices, and click Add video by URL. Click Save at any time.
  2. Open your HTML playlist file in a browser.
  3. Rightclick a URL and put the link into the clipboard. Examples: Copy a Link Location, Copy Shortcut, Copy Link Address, …
  4. Paste the URL into the YouTube space—Ctrl+V or rightclick Paste, and click Add. A successful add states that the video is now in your YouTube playlist.
  5. Repeat the previous two steps until you finish adding all your YouTube links to your playlist.
  6. Click Save.

Repositioning video order if necessary

Near the checkbox at the end of each thumbnail, when you hover the mouse until the cursor turns into a cross with arrowheads, you can click and drag the video link to another position. If you want to move a video directly to the top or bottom of the list, you can select the action in the Actions menu.

Wednesday, August 29, 2012

Dreamy Music

YouTube playlists for this article (1, 2),
playlist compilation article


Songs with the word "dream" conjure mind wanderings. It's difficult to be asleep AND think or mentally sing songs about dreams and dreaming. However, one song that could fit the bill might be one about daydreaming, such as "Daydream Believer" by the Monkees.

List 1 of 2 (compiled late August 2012)
List 2 of 2 (compiles and added early October 2012)

Sunday, August 19, 2012

Tubular Waffle Grid Wafers

These tubes are soft rollups that you can spread frosting or other sweet filling in. The softness comes from rolling up baked waffle-cone wafers and dropping them into cylinders that are narrow enough for steam to stay in. For my recipe, I used color-coded 1-inch diameter test tubes. The recipe is actually from the waffle-cone machine manufacturer for making waffle cones. I wanted to try making tubes, as I don't keep ice cream in the house. If you want crispy tubes, roll each baked waffle around a dowel or chop stick and hold them together for a few seconds. (For my next experiment for making crispy tubes will be trying a fortune cookie batter recipe, a test tube rack, or both.)
My pixstrip show the following images:
  1. Equipment and utensils
  2. Ingredients and mixing
    1. Eggs and salt, to be mixed together first
    2. Sugar, to be added to the eggs and salt mixture
    3. Rest of ingredients
  3. Process completion
    1. Batter baking process (1st and 2nd image in the 2nd row)
    2. A set of rolled baked wafers
    3. Finished tube wafers
    4. Some tubes and frosting (filling optional)
Equipment and utensils (spray oil being a bridge from equipment to baking process)
  • Waffle cone maker
  • Mixer (I used an electric hand mixer.)
  • Measuring cups
  • Measuring spoons
  • Rubber spatula(s)
  • Plastic spatula
  • Mixing bowl(s)
  • Cooling rack
  • Cylinders (I used test tubes—aka "test tube shooters"—that I bought at Urban Outfitters, which are also available online.)
Ingredients and mixing (from the Simply Vanilla Wafer Cones recipe of the Bella Recipe Guide)
  • 2 eggs
  • 1/4 teaspoon salt
  • 2/3 cup granulated sugar
  • 1/3 C of water
  • 2 tablespoons vegetable oil
  • 1 C cake flour (can sub with 1 C flour -2 T flour +2 T cornstarch)
    Note: I'm 'fessing up to having putting only 2/3 the amount of flours because I, duh, misread my list of ingredients
  • 1 teaspoon vanilla
Recommended: Spray oil application about every other wafer or so.
  1. Beat the eggs and salt.
  2. Add the sugar and beat it. :-)
  3. Add the water, oil, cake flour (or replacement flours), and vanilla.
Process completion (baking, etc.)
Prepare the iron as instructed with your appliance. Because I've used mine a few times, I've only wiped the cooking surfaces with a clean, warm, damp kitchen rag for cleaning preparation, sprayed the cooking surfaces, and plugged the cord. Heating time is a minute or so.
For each disk, pour about 1 T batter, close the lid, and heat for about 30 seconds.
Note: If you want to make cones or bigger tubes, which won't easily fit into test tubes, pour 2 T. With 1 T batter, the lid locks fine. More than 1 T at a time, the lid tends to not stay locked. In my past recipe for waffle-grid tortillas, I held down the lid, using an oven pad for each hand. (Warning: The lid gets hot.)
Move the cooked disk onto the cooling rack, roll it up, and drop it into a cylinder. Continue the batter dispensing and baking process until you use up the batter. (My pixstrip shows a set of six filled, poured out tubes, and tubular wafers.)

I wound up with 22 tubes and some 2-T batter disks. Those disks didn't last long enough to make it into the picture. :-) My calculations for calories, considering my reduced amount of flours, came to about 50 calories for each tube. Placing about a teaspoon of frosting nudges the calories by another 25. IOW, the plate of four as shown in the pixstrip amounts to about a 300-calorie snack, about the amount in a good-sized candy bar. Eater beware!

Monday, July 23, 2012

Simplest Scratch Oatmeal Cookies

This oatmeal cooky recipe uses the minimal amount of ingredients, for those who want a nekkid cooky that has lots of oatmeal, and no raisins, nuts, chocolate chips, white sugar, extracts, or whatever additional ingredients. The ingredients are simple—oatmeal, flour, baking soda, oil, eggs, and brown sugar. As a bonus, I include information for resoftening a brown sugar brick into its spoonable form. (How many of you bakers have found your brown sugar dried out like I did?)

Most oatmeal cookies call for butter (saturated fat!). A few call for oil. In both types of recipes, they seem to call for way more oil than I want to use. After having poked around several online and oatmeal box recipes, I've come up with a recipe that reflects fewer steps and fewer calories. Forget having to let butter soften and creaming it with sugars, in the cream-butter-and-sugar instructions.

The recipe that came with my oatmeal box was appealing because it called for the most oatmeal and claimed the yield to be about four dozen. It was weird that the oatmeal company did not list the calories. I had to look elsewhere for the recipe AND caloric info..

Oddly, I have two oatmeal box lids with the same-name recipe. The only difference is that both call for 1/2 pound of butter, but one lists 2 sticks and the other one lists 1 stick and 6 tablespoons. Cooking measurements typically show 1/2 pound to equal 1 cup to equal 8 tablespoons when talking about water or fat.

My upper pixstrip shows five image areas:

  1. Implements
  2. Ingredients, dry and wet
  3. Mixed ingredients in one bowl
  4. Dough spoonfuls on pan
  5. Baked cookies

Implements

  • cooky pan(s)
  • pastry blender
  • mixer
  • large mixing bowl
  • medium small mixing bowl
  • measuring cups
  • measuring spoons
  • additional implements in case of needing to resoften brown sugar
  • rubber spatulas
  • cooling rack for done cookies

Ingredients (adapted from Dale Goodman's Food.com webpage)

  • 2/3 C oil
  • 1 1/3 C brown sugar, firmly packed (See note in Instruction 4 if you first need to resoften the brown sugar.)
  • 2 eggs
  • 1 1/2 C all-purpose flour
  • 1 teaspoon baking soda
  • 3 C Quicker Quaker Oats or 3 C Old-Fashioned Quaker oats, uncooked

Instructions

  1. Preheat the oven to 350 degrees.
  2. Pour the flour and soda into a large mixing bowl, using the pastry blender to blend well.
  3. Add the oatmeal, blending well.
  4. In the smaller bowl, mix the oil, eggs, and brown sugar.
    Note: If you need to resoften the brown sugar, refer to 10 Ways To Soften Hard Brown Sugar. (I used Quick Tip #1, the 7th suggestion—illustrated in the Brown sugar resoftening pixstrip at the top of this article.)
    Need it soft now? Put it in a container and set in the microwave with a small bowl full of water beside it. Microwave for about 1 minute–check. If it’s still hard, try for another 30 seconds. You can keep doing this until it’s soft, but watch that you don’t melt it.
  5. Pour the wet ingredients (oil, eggs, brown sugar) into the larger bowl.
  6. Use the pastry blender to stir the ingredients together.
  7. Use a tablespoon to scoop the dough.
  8. Drop the spoon's dough onto the cooky sheet.
  9. Bake for about 10-12 minutes until the edges are lightly browned.
  10. Transfer the done cookies onto cooling rack.

Calories

The recipe yielded 56 cookies. Initially, I calculated the calories to be about 63 calories each. I've started to include a calorie and sodium table to be more accurate.


"Pt 1 Revisiting Simplest Scratch Oatmeal Cookies, Plain and Chocochip Batch"

"Pt 2 Revisiting Simplest Scratch Oatmeal Cookies, Closer Looks at Process"

"Simplest Scratch Oatmeal Cookies"

View more cooky recipes.

Saturday, July 7, 2012

Macaroons (egg whites replacement)

Last month, I offered up cake mix macaroon cookies, and I mentioned gluey coconut clumps in context of macaroons. I still think macaroons are gluey and clumpy, but my results taste better than macaroons I remember from way back. This recipe includes information for substituting egg whites with Wilton meringue powder. It also includes my best guess for coconut calories, espite the coconut package squishiness for numbers of servings and calories.

In researching macaroon recipes, I noticed many used egg whites. I myself prefer to avoid recipes that call for only egg whites or only egg yolks—arggghhhh, leftover egg yolks or leftover egg whites! I recalled I have a container of Wilton meringue powder, which I used for making meringue cookies once. (They came out light and airy, but were not a big hit in the household.)

Macaroons should be a good way to try using up some of the powder, I thought. The container showed substitution information of 2 teaspoons of powder and 2 tablespoons of water for one egg white. Interestingly, I could not find macaroon recipes that showed substitution. I encountered macaroon recipes that specified beating egg whites lightly to beating them to stiff peaks. I decided to beat the egg white substitute to a froth.

I looked up macaroon recipes mostly for fewest ingredients, which is my main standard for simplicity. The Scribbler macaroon recipe is intriguing for both simplicity and complication. The blog owner was gracious and prompt in responding to some questions I posted.

The simplicity was in the basic ingredients. The complications lay in the decorative areas, nicely detailed for those who like to add flair to their macaroons. The Scribbler recipe shows several appealing pictures and lists steps to achieve the visual effects.
My pixstrip shows five image areas:
  1. Implements
  2. Ingredients, dry and wet
  3. Mixed ingredients in one bowl
  4. Dough spoonfuls on a parchment-lined pan
  5. Baked macaroons
Implements
  • cooky pan(s)
  • pastry blender
  • mixer
  • medium-large mixing bowl
  • small mixing bowl
  • measuring cups
  • measuring spoons
  • rubber spatulas
  • parchment paper
  • cooling rack for done cookies
Ingredients
  • 3 C flaked coconut (~10.5 oz, 3/4 of 14-oz. package)
  • 3/4 C sugar
  • 1/3 C flour
  • 2 T and 2 t Wilton meringue powder and 1/2 C water
    (You can use 4 egg whites.)
  • 1 t vanilla extract, optional (I forgot to add it!)
Instructions
  1. Preheat the oven to 325 degrees.
  2. Line the baking pan with parchment paper.
  3. Pour the coconut into a medium-large mixing bowl, breaking up the lumps.
  4. Add the flour and sugar into the coconut, using the pastry blender to blend well.
  5. In the smaller bowl, mix the water and meringue powder together. (I mixed on low speed for one minute, then medium speed for one minute.)
    Note: For using only egg whites, lightly beat them.
  6. Add the extract, if you want extract, (Or fuggedaboutit it like I did.)
  7. Pour the beaten egg whites or egg-white substitute ingredients into the larger bowl.
  8. Use the pastry blender to stir the ingredients together.
  9. Use a tablespoon to scoop the dough.
  10. Drop the spoon's dough onto the parchment-lined cooky sheet.
  11. Bake for about 15-17 minutes until the edges are lightly browned.
  12. Transfer the done cookies onto cooling rack.
Calories and coconut servings
The recipe yielded 34 macaroons, calculated to about 66 calories each, 40 that come from coconut—almost 2/3 of each macaroon's calories. YMMV. The coconut was the most problematic ingredient for calculating calories. The package of coconut contains 14 ounces (396 grams).

The nutritional table shows 70 calories for every 2 tablespoons (15 grams) and claims 27 servings for the package. If dividing 396 grams by 15 grams, however, the total servings is 26.4. The front of the package prominently claims to contain 5 1/3 cups. If calculating VOLUME servings at 8 servings per cup (16 tablespoons per cup), the number of servings should be 8 x 5.33, or (gasp!) slightly fewer than *43* servings.
November 14, 2013: I made a double batch to take to a workplace potluck. Instead of using a pastry blender, I wore latex gloves to blend the dry ingredients, then later used a couple of large cooking spoons to stir the egg-white replacement fluid into the dry ingredients. My yield was 84 cookies, about 52 calories each.

Saturday, June 30, 2012

Lemon Poppyseed Mini-cupcakes

My recipe calls for following the instructions for boxed lemon cake mix and adding two tablespoons of poppy seeds. Box mixes usually omit information about mini-cupcakes, which are about 1/3 the volume of regular cupcakes (2 1/2 x 1 1/4). The mini-cupcake size is 1 3/4 x 1. This article includes also includes mini-cupcake baking times, yields, and paper liner vs. oil vs. oil/flour methods.

Regular cupcake vs. mini-cupcake

Cake mix boxes usually indicate the yield to be 24 cupcakes. I have encountered recipes that hedge and claim 24 to 30 cupcakes. I have seen recipes claim that a box cake mix should yield 60 mini-cupcakes. My yield was 77, using the recommendation of slightly rounded tablespoon of batter for each pan well. Suggested baking times for regular cupcakes had a range of 15 to 20 minutes for the low end, and 22 to 27 minutes for the high end. If baking mini-cupcakes, use the regular cupcake baking time, but reduce it by maybe 25%. My batches came out fine at 13 to 14 minutes. As for oven temperature, from gleaning various recipes, 350° seems to be common.

Note: For a serving size between regular cupcake and mini-cupcake, cut each cupcake in half. Hypothetical yields per box cake mix batch can be 24 (regular cupcakes), 48 (regular cupcakes cut in half), and 60 (mini-cupcakes).

Paper liner vs. spray-on oil vs. oil/flour spray

In past experiences of using paper liners, it seemed like the paper did not cleanly separate from baked cupcakes without maybe 10% of the cake sticking to the paper. I don't know if the detachment problems were because of the cupcakes being regular size, or because of the cake mix formulation being from pre-pudding eras.

I was pleased that the paper peeled away from the mini-cupcake neatly. The method that yielded the least satisfying results was using spray oil with flour in it. The dispensing was not as easy as with using spray oil. The oil and flour spray method left a thin layer of baked cake inside the wells, and more than with using spray oil.

My pixstrip shows four sections:

  1. Implements
  2. Ingredients
  3. Paper liners, oil spray, oil/flour spray
  4. Baked mini-cupcakes

Implements

  • mixer
  • medium-large mixing bowl
  • rubber spatula(s)
  • measuring spoon
  • measuring cup(s)
  • mini-muffin pans (Use different size pans if desired, following baking time suggestions on the cake mix box.)
  • cooling rack for done mini-cupcakes
  • paper liners, spray oil, or spray oil/flour (Using paper liners yielded the best results for me.)
    Note: Greasing the bottoms of the wells is another batter lining method.

Batter ingredients

  • 1 box lemon cake mix (~18 oz.)
  • eggs, number as listed on cake mix box
  • oil, amount as listed on cake mix box
  • water, amount as listed on cake mix box
  • 2 T poppy seeds

General instructions for all cake pan sizes (Have the cake mix box handy!)

  1. Prepare the cake batter according to cake mix box instructions.
  2. Fold in the poppy seeds.
  3. Prepare baking pans by using paper liners, spray oil, or spray oil/flour.
  4. Pour batter into the baking pan(s) of your choice.
  5. Bake as recommended; however, if baking mini-muffins, reduce time by 25%. (Mine came out fine between 13 and 14 minutes.)
  6. Test cake for doneness. If done, remove pan(s) from the oven.
  7. Transfer cakes (or mini-muffins) onto cooling rack.

Calories and additional information

Total calories for the ingredients I used, the cake mix brand and flavor being the biggest variable, the calories totaled 2900, give or take a few. Dividing the number by my yield of 77 mini-cupcakes comes out to ~38 calories each. YMMV, depending on cake mix brand, egg sizes, and recipe that you use. Also, adding icing or frosting will increase the calories.

Note: The container of the poppy seeds that I bought recommended yellow cake mix and 1 tablespoon of lemon extract for another version of lemon poppyseed cake. I myself advocate minimal ingredients—lemon cake mix instead of yellow cake mix and lemon extract. If someone wants to try the alternate recipe, I would be interested in the contrast results.

Wednesday, June 13, 2012

Cake Mix Macaroon Cookies

How about a macaroon cooky that tastes a lot better than a gluey coconut clump? How about a cooky that chews like a softish cooky and has dominant coconut texture and flavor? Use a cake mix for the dry-ingredient base.

Most of my recipes are about minimal process and few ingredients. Most recipes I read lose me if I see more than six ingredients or multiple steps or time investment, or a combination of those conditions. Some of my ingredients at home drive my baking choices. One item I had was a bag of coconut I got free with a purchase of something else. I also had a box of white cake mix that I wanted to use up.

I based my recipe mostly on the ExclusivelyRecipes.com French vanilla macaroon bars recipe. A main deviation was mixing 1/3 C cooking oil into the wet ingredients instead of cutting in 1/3 C butter into the cake mix powder. I decided to try making individual cookies instead of shaping the dough into a pan and cutting it into bars after baking. I omitted the chocolate to keep the recipe simple.

Another recipe I consulted was the Chocolate Chip-Coconut Macaroons from the Betty Crocker Ultimate Cake Mix Cookbook. I deviated from the recipe as follows: I used only 2 T water instead of 1 C, used half as much coconut, used 1 egg instead of 3 egg whites, and omitted the chocolate. The recipe is online except that they omitted the quantities for the ingredients, which they want readers to request by email. Smart cookies will be able to infer the quantities, based on this paragraph and my list of ingredients. :-)

My pixstrip shows three images:

  1. Implements
  2. Ingredients, dry and wet
  3. Baked cookies

Implements

  • cooky pan(s)
  • pastry blender
  • medium-large mixing bowl
  • small mixing bowl or large cup or jar
  • fork or similar item for mixing wet ingredients
  • measuring cup
  • measuring spoons
  • cooky spatula to lift and transfer baked cookies
  • cooling rack for done cookies

Ingredients, dry

  • 1 1/2 C flaked coconut
  • 1 18ish oz. white cake mix

ingredients, wet

  • 1 egg
  • 1/3 C cooking oil (Replace 1 T with sesame oil if desired for flavor twist.)
  • 1 t vanilla extract
  • 2 T water
Instructions
  1. Preheat the oven to 350 degrees.
  2. Pour the coconut into a medium-large mixing bowl, breaking up the lumps.
  3. Pour the cake mix powder into the coconut, using the pastry blender to blend together.
  4. In a bowl or large cup, combine the oil, egg, vanilla, and water. For a more aromatic flavor, exchange 1 T of the oil with 1 T sesame oil.
  5. Pour the wet ingredients into the larger bowl and use a pastry blender to stir the ingredients together.
  6. Use a round tablespoon to scoop the dough. Shape to rounded, level, or concave height.
  7. Drop the spoon's dough onto the cooky sheet.
  8. Bake for about 12+ minutes until the edges are lightly browned.
  9. Use the cooky spatula to lift and transfer the done cookies onto cooling rack.

Shaping the dough slightly concave yielded 45 cookies, calculated to about 80 calories each. YMMV.

Additional Past Cooky Recipes

Wednesday, May 30, 2012

Waffle-grid Tortilla Recipe to Avoid

Instead, make use of some tortilla and biscuit recipes that I compiled links to for ideas. My previous blog article was a recipe for making tortillas by using a waffle cone iron. It was an experiment for omitting sugar in cones and saving loads of calories. The sugarless cones did not harden or keep their moldable shapes like the sugary ones, so I decided to call them waffle-grid tortillas and use them for wraps and foldovers.

I wanted to be able to present a recipe that made use of an online recipe for flour tortillas, using my cone waffle iron as a means to cook both sides of the tortilla. The panfry method requires frying one side of a tortilla and flipping it to cook the other side.

As I researched flour tortilla recipes, I noticed a commonality of ingredients, five items: all-purpose flour, baking powder, salt, fat, and fluid. Somehow, I veered into looking up biscuit recipes, many of which had the same five ingredients. The major difference between flour tortillas and biscuits were as follows:

  • Biscuit dough—at least twice as much fat as tortilla dough
  • Tortilla dough—much more handling (kneading/rolling) than biscuit dough (minimal mixing)
  • Tortilla dough—one to two "rest" periods of about 10 to 20 minutes each, depending on recipe, but none for biscuit dough
  • Pre-cooking shapes—tortilla dough sheet, to dough balls, to flattened shapes; biscuit dough sheet, to shapes cut with a measuring cup or biscuit cutter

I followed a simple tortilla recipe for ingredients, up until flattening the dough balls. Instead of using a rolling pin or palote, I used thumbs and fingers. Instead of pan frying each tortilla, I baked it in my waffle cone appliance, pressing the clamshell down with a couple of hot pot holders. The results looked decent, although a bit thick. I even took pictures of the stages, so optimistic that waffle-grid tortillas (II) would turn out well!

What a surprise and disappointment to discover they are tough! Not one to throw out food, I've been eating some in small bites, spread with butter and lightly heated. I'm emphasizing that these tortillas were not good results! If you infer the process and try your own batch, don't be surprised that you come up with the same chewy results. If you do come up with more tender results, let me know!

Revisiting some of the recipes, biscuit recipes warned of toughness from overhandling, but the tortilla recipe instructions seemed to contradict, seeming to require dough-playing. Another thought that came to mind was compressing the dough while cooking might have contributed to the less-than-desired results, as the actual recipes indicate airy heat.

The following recipe links that I compiled call for the ingredients in common of all-purpose flour, baking powder, salt, fat, and fluid:

Flour Tortillas

Biscuits

The recipes that called for shortening or lard instead of oil required cutting the fat into the dry ingredients before mixing in the fluid. The recipe I used called for oil, which I stirred into the fluid (milk). Most of the recipes called for water for the fluid, but some called for milk. Maybe some knowledgeable cook can enlighten about using milk vs. water, aside from nutritional benefits of using milk.

All my previous articles featuring recipes were successes. This time, I wrote about a failed recipe. In failure, however, lessons learned, with curiosity for a different approach in the future, is an experience gained.

Sunday, May 20, 2012

Waffle-grid Tortillas

Just after Christmas while browsing for post-holiday sales in a department store, I spotted a clerk placing a sale sign for an appliance that I'd been lightly considering buying for the last couple of years. I'd seen waffle cone makers selling for $20, which I just wasn't willing to commit for. Woohoo! The sign said $7.99! What a deal! It took me a couple of months to try a recipe. A bit time consuming, and calorie-loaded because of a lot of sugar called for.

About a month later, I talked to an associate about waffle cones, how I was amazed that the baked disks were moldable for about only 10 seconds. He speculated that sugar in the batter crystallizes during the baking and hardens them when they cool. I decided to try making sugarless waffle cones. Well, I confirmed that the baked results did not retain a molded shape after cooling, whether cone or tube. So, this recipe is making waffle-grid tortillas, which are good for folding over or rolling up after microwaving fillings in them. (I've tried cheese and spinach, and cheese only.)

My tortilla recipe has significantly fewer calories than either the Simply Vanilla Wafer Cones or Orange Cinnamon Waffle Cones recipe at the Bella Waffle Cone Maker pdf manual, which I used for my basis. My tortilla batch makes about 11 5-inch disks. Interestingly, both waffle cone recipes claim 6-9 sweet cones for 2-3 T batter per waffle shape, although the volume of flour differs by about a third: 2/3 C flour all-purpose vs. 1 C cake flour.

My pixstrip's boundaries delineate the following sections:

  1. Equipment and utensils
  2. Ingredients
    1. Eggs and mixing
    2. Flour (replacement for cake flour)
    3. Oil and water, and mixing them into the flour and eggs
  3. Batter baking process
  4. Baked tortilla, microwaving with cheese (foldover, rollup)

Equipment and utensils

  • Waffle cone maker
  • Mixer (I used an electric hand mixer.)
  • Measuring cups
  • Measuring spoons
  • Rubber spatula(s)
  • Plastic spatula
  • Mixing bowls
  • Cooling rack
  • Cone shaper (for reference only, in case you decide to make sweet waffle cones)

Ingredients

I created the following table that shows ingredients and amounts for two model waffle cone recipes, and the would-have-been unsweetened cone recipe.

Note: Recipe #1 sweet refers to Orange Cinnamon Waffle Cones. Recipe #2 sweetrefers to Simply Vanilla Wafer Cones.
Ingredient
#1 sweet
#2 sweet
Tortilla
1 whole egg + 1 egg white
2 eggs
1/4 t salt
1/2 C granulated sugar
2/3 C granulated sugar
1 t ground cinnamon
2/3 C sifted all-purpose flour
1 C cake flour (can sub with 1 C flour -2 T flour +2 T cornstarch)
2/3 C cake flour (subbed with 2/3 C all-purpose flour -4/3 t flour +4/3 t cornstarch)
2 T butter, melted and cooled slightly
2 T vegetable oil
1 t orange extract
1 t vanilla extract
1/3 C water (Add more if needed.)

Recommended: Spray oil application about every other tortilla or so.

Eggs and mixing

Beat the eggs. If you want to make cone waffles, this is the stage where you mix in sugar after beating the eggs, then also add extract(s).

Flour (replacement for cake flour)

Choose the flour type and amount. I used the 2/3 C cake flour replacement.

Oil and water, and mixing them into the flour and eggs

Blend the flour, cake flour, or cake flour substitutions into the beaten eggs.

Batter baking process

Prepare the iron as instructed with your appliance. Because I've used mine a few times, I've only wiped the cooking surfaces with a clean, warm, damp kitchen rag for cleaning preparation, sprayed the cooking surfaces, and plugged the cord. Heating time is a minute or so.

For each disk, pour about 2 T batter, close the lid, and heat for about 60 seconds.

Note: The lid tended to not stay locked, so I held down the lid, using an oven pad for each hand. (Warning: The lid gets hot.)

Move the cooked disk onto the cooling rack. Continue the batter dispensing and baking process until you use up the batter.

Baked tortilla, microwaving with cheese (foldover, rollup)

If desired, as depicted on pixstrip, place filling on disk, microwave (about a minute, depending on filling, microwave power, and your preference), and fold over or roll up. Repeat for as many tacos or wraps as you want.

In case you want to use store-bought tortillas for fast preparation, try my convenient spinach-cheese taco recipe.

Monday, April 23, 2012

Creating a YouTube Playlist

YouTube playlist for this article, playlist compilation article

My February blog article was about YouTube video playlists that correspond to music-theme articles I had written. With this article, you can create your own YouTube playlist. Play the videos for viewing and listening, or for just listening.

The assumption is that you have successfully registered for online accounts and know how to enter basic information requested of you. You should also be aware of and can handle interface requests for demographic information. Enter information and set the privacy controls that you feel comfortable with (wink).

Start at http://www.youtube.com/. In the page that opens, you must open a Google account or log in. Follow the steps. When a welcome page at YouTube opens for you, you can start creating your playlist. Click [your user ID] > Video Manager > Playlists. Download my tiled .png file with screenshot images.

Initial Considerations

Consider establishing a theme for your playlist. Think music genre, time period, artist, tempo. Search for YouTube videos that fit your theme. For my article, summer songs is my theme. Billboard's top 30 summer songs helped remind me of some additional songs for my final playlist.

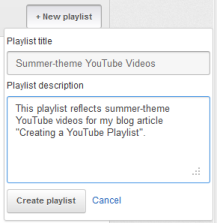
Creating and Naming Your Playlist

  1. After you settle on a theme, at the Playlist webpage, click New playlist.
  2. At the New Playlist window, enter the playlist title and playlist description, and click Create Playlist.
  3. The Edit Playlist page opens. While you create the playlist, for now, you might want to click Private until you finish the playlist creation process.
  4. Click Save.

Adding Videos to Your Playlist

Two methods of adding videos to a playlist is using the Playlist interface or adding videos while you play them.

Using the Playlist Page for Adding a Video

When you click Save at the Edit Playlist page, a new webpage opens, displaying the playlist title and description. You can click Edit Playlist and add video URLs in this interface. Click Add Video by URL, and follow the prompts.

Note: During the Creating an Naming Your Playlist stage, you CAN add URLs before saving the playlist. Follow the prompts. Continue adding YouTube URLs of videos that you want.

Newly added (September 2012)—Creating a YouTube Playlist PDQ, which emphasizes minimal keystrokes for the playlist creation process. The information is helpful if you have already successfully created your first playlist.

Adding a Video While Playing It

  1. Find and start playing a YouTube video.
  2. When you find one that you want to save in your playlist, just beneath the video window, click Add to. This action opens the "Add to playlist" window and displays your playlist name.
  3. Highlight and click your playlist name.
  4. Enter a note, and click Add Note. Or just click Close.
  5. Continue viewing videos and adding them.

Testing Your Playlist for Continuity

If your saved playlist is in a different browser window, go to it, and click Refresh/Reload so that changes to the list of videos show up. Otherwise, click [your user ID] > Video Manager > Playlists > [your new playlist]. Click the circled arrow (Play All) to test the playlist. Check for problem pages about copyright violations or disallowance of the video in a playlist. If either disallowance page shows up, the playlist automatically rolls over to the next video in your list.

When you click to play the playlist, the first video starts up. After it finishes, the next video starts playing. The process continues through the videos until the last video finishes playing. A successful playlist plays the videos without encountering error pages (disallowance messages). These messages tend to be about copyright or not-allowed-in-a-playlist information.

Shortening the Time for Testing your Playlist

To vet the playlist without needing to listen to the entire collection in real time, interrupt and advance each video while it plays. Click the forward arrow. Each time you do, the front number, which precedes the forward slash, counts to the next number. (The number that follows the slash indicates the total number of videos in your playlist.)

Encountering Error Pages with Your Playlist

If you encounter a disallowance message during playback, note the video. If you want, find a replacement video and add it to the playlist as it plays. Return to the playlist page and click the playlist hyperlink text, which displays the individual videos. Click the video that is just AHEAD of the one you just added. At the video window, click the forward arrow and confirm the added video does not open a disallowance page.

If your addition succeeded, delete the initial video as follows:

  1. Click [your user ID] > Video Manager > Playlists.
  2. Click Edit to display the list of individual videos.
  3. Click the X at the right of the video, which marks it for deletion.
  4. Click Save to finalize the deletion.

Reordering your Videos

If you want to change the order that the videos play, you can shift them with three move options:

  • Quick move-to-top
  • Quick move-to-bottom
  • Click-and-drag (Be sure to FIRMLY drag the video to the position you want.)
  1. Click Edit Playlist to display the list of individual videos.
  2. Change the order of the videos as desired.
  3. While you are still in edit-playlist mode, you can select one of the video images as your playlist thumbnail icon. If you don't choose one, your playlist displays a nondescript icon.
  4. Click Save.

Uncloaking Your Playlist

If you initially made your playlist private, you can now make it public.

  1. At your playlist, click Edit Playlist to display the list of individual videos.
  2. Change the Private setting to Public.
  3. Click the Settings checkboxes if you want.
  4. Click Save.

Tuesday, April 10, 2012

2nd Life 4 Cereal Packaging

Reuse and repurpose your cereal packaging. Reuse the bags. Create stick fans and make campaign sings with the box fronts and backs.

About a year ago, I wrote about cold cereals. I mentioned I would return to talking about cereals, but regarding packaging. Most cereals come in waxy bags inside rectangular boxes. (Malt-O-Meal bagged cereal doesn't apply.)

Two re-uses for the packaging are bags for food storage and stick fan signs. The stick fans are especially timely for upcoming warm weather and this year's elections. The pixstrip shows the two main uses—food storage (bags), and message stick fans (box fronts and backs).

Food Storage

I don't save and use every cereal bag that I run across. And my usage is usually for some items that I freeze, mostly meats. I use bags of the cereals that are fairly flavor-neutral. These cereals tend to be unsweetened, nearly unsweetened, and free of gumminess or candy stickiness. I parcel servings so that the papers separate portions, whether for single or double servings. This usage is especially good for raw meat for easy defrost later.

If I cut and cook meat for stir-frying, after I cook and cool the meat, I parcel it into maybe one-pound packages, flatten each, fold over the tops, and freeze for a few hours. The flat shape freezes the cooked meat fast. And I can break up the layers into convenient portions for making my own microwave meals with other ingredients. Or I gather up the newly frozen bags and store them all into a Ziploc bag.

Stick Fan Signs

I put most cereal boxes in the recycle bucket these days because I eat way more cereal than I have reasons to make signs for. I share the information for reusers and repruposers who have not thought about another use for the boxes. Use fronts and backs for making campaign stick fans or I'm-here signs. At some events, you can use signs that serve both purposes.

The series of images in the second row of my pixstrip shows a progression of steps. You need a cereal box, something to cut it with (paper cutter recommended), craft sticks that are available at craft stores, stapler and staples, and sheets of paper with slogans.

  1. Open up the cereal box. Trim as indicated—folded in half, tops and bottoms trimmed, sides trimmed.
  2. Place a craft stick at each panel and staple twice. (Try different boxes for size. Rotate for landscape orientation.)
  3. Create and print out slogans. Staple sheets onto the stick fans.

Tip: By cutting a tall cereal box in half along the width, you can make two smaller landscape signs.

You can also use snack food boxes for making signs. Think cheese crackers and boxed cookies. Happy signing!