Monday, May 24, 2010

Pixstrips in Blog Articles


My convenient-recipe blog articles show series of progressive pictures at the top, from start to finish of each recipe. Each recipe pixstrip (the assembled image) contains eight images except for one that has nine. Clicking a pixstrip opens a new window with an enlargement. Nice of Blogspot to have that easy-access feature.

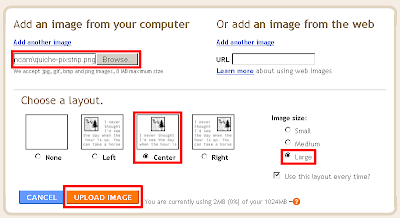
This article describes the process—staging the shots, processing the individual pictures, assembling them into a pixstrip, and uploading it into the article. The settings I use (outlined with red rectangles) appear in the image above. (I omitted the in-progress and completed images, as those stages should be obvious.)

The first time I made the decision to include pictures was for the spinach-cheese taco recipe. During preparation, I took pictures as follows:

  1. plate
  2. tortilla added
  3. cheese added
  4. spinach added
  5. contents microwaved
  6. more cheese added
  7. contents microwaved
  8. taco folded, with fork above it

My other convenient recipes I put pixstrips in are "A Convenient Cake Mix Cooky Batch" and "A Convenient Cake Mix Cooky Batch--Easter". The first cooky recipe is for Valentine Day cookies, which results in red cookies. The second one is for Easter-theme cookies. Both recipes use the basic ingredients of a box of cake mix, one-third cup of oil, and two eggs. I recently retrofitted "A Convenient Quiche" with a pixstrip. I took about a dozen pictures, winnowed the collection down to nine shots, then created the strip.

Principles for Pictures

  • Take more pictures than you'll need—preferably in the order of the actions. If you think you might use any shots, take them. Better to have the pictures and not need any than need any and not have them.
  • Find a decent-sized staging area that has minimal clutter or visual distractions. Most of my areas have been a countertop where I don't need to move many items more than once or twice. (I'm not a professional photographer; just using gut feelings.)

Gathering the Recipe Items

  1. Gather all the ingredients.
  2. Gather as many utensils as you can remember. Basic ones are bowls, spoons, spatulas, pans, and utensils to blend with. Secondary ones are cooling rack(s), oven mitts, egg timer as necessary. (I use the term "utensils" very loosely.)

Taking Pictures During the Recipe Process

  1. Stage ingredients and utensils for big-picture effect if it makes sense. Take a few pictures from different angles if unsure of how the items look together.
  2. Take pictures in the logical order of action. If possible, take the pictures from the same angle and distance. (Note: I stand on a stepladder about a foot away and shoot my pictures using my camera's highest resolution and quality.)

Storing and Processing the Pictures—Camera Off-loaded Set, Processing/Processed Set

  1. Offload the pictures into a folder; keep these originals in one place.
  2. Copy the original pictures into a different folder for modifying them. Typical modifications will include cropping and lightening as necessary, then saving them. (I save as .png to avoid losing picture quality.) Occasionally, cropped enlargements help.
I create a folder called "images". I create two subfolders—one I call "fromcam" for the pictures I off-load from my camera, the other I call "inprocess&finished".

Generating the Final Image (the Pixstrip)

  1. Resize and save each image to save filesize space. I resize to about 15%, or about 150 x 150 pixels.
  2. Enlarge the first image's canvass wide enough to accommodate the other images in order.
  3. Copy/paste the images as desired, then save the pixstrip, using a reasonable name.

Note: An alternative is to resize and save each image first (skipping the first step), follow the second and third steps, resize the entire strip, and save the reduced pixstrip under a different name.

Uploading the Pixstrip

  1. After logging into the blog account, select or create a blog article.
  2. Use the blog image-upload command to upload the pixstrip.
  3. View the image at the top of this article for the settings I use in Blogspot. YMMV for your own blog site.

Thursday, May 20, 2010

Tooling A Round

I have run across several tools I use often, sometimes in spurts. Some are online calculators; some are downloadable tools to be installed on the computer. The page titles are self-explanatory. Most instructions at the sites are intuitive. Note that I cite timeanddate.com a LOT.


"The World Clock ­ Time Zones"
http://www.timeanddate.com/worldclock/

I used this online resource often to determine the times for co-workers in other time zones, particularly those located overseas. Timing was important when communicating or passing documents back and forth.


"Calculate distance between two locations"
http://www.timeanddate.com/worldclock/distance.html

Select "From location", "To location", then "Calculate distance".


"See other locations near a city"
http://www.timeanddate.com/worldclock/distances.html?n=24 (Austin)

Select a city, then click the button "See cities close to location".


"Calendar for year 2010 (United States)" (default settings, customizable)
http://www.timeanddate.com/calendar/

Here's my shameless plug for my article about creating monthly calendars:
http://whilldtkwriter.blogspot.com/2010/01/create-monthly-calendars-for-year.html


"CSS Font and Text Style Wizard"
http://www.somacon.com/p334.php

Click buttons, then see the results and code.


"Free File Converter
Convert your files into different formats."
http://www.freefileconvert.com/

Click the Convert File tab to get to the interface as follows:

  1. Obtain the existing file (Browse)
  2. Select the format you want (dropdown list box).
  3. Click Convert.
  4. Click the download button to save or open the converted file.

"Cool Ruler 1.5: Free Download"
http://www.softpedia.com/progDownload/Cool-Ruler-Download-40393.html

This tool's features include variable length, capabilities of launching multiple instances, rotating them for 90° positions, and marking tics at onscreen image widths. This is and excellent aid when working with mechanical images or other images where visual scaling is desirable.


"PrintFolder 1.2" (at URL below)
http://no-nonsense-software.com/download.html

This tool makes it possible to rightclick a folder and generate an onscreen list of your folder's files and other information, suitable for copy/paste onto email.


"EditPlus 3.12" (text editor, HTML editor, PHP editor and Java editor for Windows)
http://download.cnet.com/EditPlus/3000-2352_4-10018241.html

I had used this tool for html coding for about year or so before I acquired Dreamweaver.


"Irfanview ...one of the most popular viewers worldwide!"
http://www.irfanview.com/

I had used Irfanview initially for its thumbnail features. My graphics tool of choice has been PaintShopPro; however, I will probably soon explore more recent Irfanview's features that have caught my eye, such as playing movies, playing sounds, and creating slideshows.

Monday, May 3, 2010

Wanted Unholed Lotta Bagel

The first time I'd become aware of bagels was about the early 90s. Oh, I'd encountered "bagels and lox" in books occasionally, but never gave them much thought. Seems when I read about them and saw pictures, they mystified me. They looked like doughnuts. Sometime shortly thereafter, I bought one. I ate it as though it were a doughnut. Hmmm. Kinda plain, not sweet. (Hadn't thought about the lox; thought cream cheese sounded icky.)

Over the years, I'd eat them in spurts. Sometimes a co-worker would bring in a box of them, accompanied with little containers of specialty cream cheeses. I really liked the salmon-flavored ones, also the jalapeno ones. Now I've finally settled into eating them mostly toasted, with a layer of butter.

I sometimes wondered about bagel denseness contrasted with store bread. Whenever I occasionally bought bagels at bagel stores, the stores tended not to list caloric information. Maybe I was too much into the out-of-sight-out-of-mind mode to bother looking up nutritional information.

In any case, bagels have become another bread aisle staple, in the same area as loaf bread, buns, and English muffins, with something called sandwich rounds starting to make appearances. Not long after I started to add bagels to the weekly shopping list, I looked at the nutrition table. Wow! 300 calories! That's about the same amount of calories as four slices of bread! Now, my days of eating one whole bagel (or more) at a time are gone, hopefully not to return.

The other day as I started the butter smear on my toasted half bagel, it crystalized in my brain that the hole in the middle makes the smearing inconvenient. I then thought about other times I'd thought about bagels and their holes. Bagel shops sell sandwiches on bagels. Occasionally, I'd bought bagels that had almost no hole. (I attributed the condition to the bagel dough preparer using a small ring to cut the dough instead of using a big one.) Most times, holes seemed to be about an inch in diameter.

I had thought using a bagel absent a hole at all would make a better sandwich than using a bagel where you need to be artful with the spreader; otherwise, condiments fall through. Also, if you're going to eat bites that have bread for each bite, it seems odd to run into breadless bites. The spreading care is even more crucial if buttering or creamcheesing a toasted bagel.

Why do bagels have holes? According to answerbag.com, the serious answer is that the holes allow thorough cooking of the bagels. "History of the Bagel: The Hole Story" has some history of the bagel in addition to details about the hole. Googling keywords "bagels no holes" yields numerous results. Closely related to why holes is how to make them. I ran across three ways to make them, none of which involve use of a cooky cutter device as I originally thought might be the case.

From baking911.com

Hole in the Middle Method: From a ball shape, moisten your finger with water and poke your index finger through the center to form the hole. Moisten your finger with water, if necessary to smooth and to reshape the sides. Pull gently to enlarge hole.
The Hole Around the Finger Method: Flatten the ball of dough slightly into a disk shape, folding the bottom edge under and smoothing it until it looks like a doughnut shape. Make a hole in the center of the circle from the bottom up and twirl around your index finger to widen the hole. Reshape the round into a doughnut shape.
The Tube Around the Palm of the Hand Method: To form the bagels, take each piece of dough and roll it into a ball. Flatten the ball, then fold it in half, sealing the edges with your fingertips. Then fold again to form a tight cylinder. Roll the dough into a tube about 9 inches long. Wrap this piece around the palm of your hand, overlapping the dough about 2 inches. Pinch the ends together to form a ring. I like this way because it is quite fast.

Besides explicit information about shaping bagel dough to make the holes, Baking911.com has lots of detailed background and techniques throughout the stages of bagel making—even a q/a section. A passage that had caught my eye was "Boil on each side, about 3 minutes or less at a time, turning with a slotted spoon or skimmer. When done, the bagel will be puffy and the center will be nearly closed." Soooo, it's possible commercial bagels might have larger holes than necessary (or for my taste, anyway. ).

Well, after having poked around some sites to find out why bagels have holes and also reading the methodologies, maybe I'll settle for the normalcy of most bagels having approximately 3/4" diameter holes. OTOH, it seems possible that homemade ones might yield almost-closed-hole results.

I have listed some promising recipes that use breadmaking machines. My criteria for recipes tend to be calls for few items and ease of the process. (Look in my blog index for any title that has "convenient" in it, then visit articles. The fewer the ingredients, the better, I say.)

http://www.cdkitchen.com/recipes/recs/1180/Breadmaker-Bagels129588.shtml
Lists 6 ingredients. Features a calculator for adjusting recipe ingredient amounts to numbers of servings.

http://www.recipezaar.com/recipe/Basic-Bagel-For-the-Bread-Machine-55609
Lists 5 ingredients for the bagels, 2 additional for egg wash substitute for Pam-type spray. Also includes recipes for bagel sticks and chips.

http://vegweb.com/index.php?topic=5812.0
Lists 5 ingredients, accompanied by numerous comments.