Showing posts with label cake mix. Show all posts

Sunday, October 30, 2022

Sweet Bakings--A Few Re-peerings

Last month, I blogged about sweet bakings, recipe undertakings spread over 13 years of blogging. Recipes I spotted on the web inspired me to experiment, not merely replicate. i came up with 28 cooky recipes and 19 cake and cake-ish recipes. For cakes, I started out mostly blogging about cupcakes and occasional mini-muffins. For cookies, I varied baking cake mix cookies but also baked scratch cookies.

Maybe surprisingly, I'd done several of the recipes seldom since blogging about them. A few never-agains are because a particular ingredient, usually a cake mix, is either no longer available, formulation is different, or weight is different (mostly less).

Specific to cake mix powder, I'd made cakes AND cake mix cookies over years to remember the standard size weighed 18.25 ounces. Manufacturers reduced the amount to 16.25 for a few years. Now it's 15.25. It's irritating about companies screwing around with powder amounts that, worse than result in smaller finished good(s), make an inferior item. Some recipes WERE perfect with 18.25 ounces of powder.

Cooky Monsterous

With "A Convenient Cake Mix Cooky Batch" (#018), I combined Red Velvet cake mix (especially seasonal for Valentine's Day) and strawberry flavor cake mix. I'd made several batches for a few years for sharing in the workplace. Haven't made them for well over a decade.

I must have been really ambitious or patient when I did Krusteaz Choco Caramel Squares" (#139). Or I might have used a compelling coupon. Anyway, Seems that Krusteaz no longer carries my main recipe ingredient, Krusteaz Molten Deep Dish Chocolate Cookie with Caramel Center.

I noticed that I had omitted "Baking Cookies with Trader Joe Cake MIx" from my cooky recipe list. I can only guess that my results weren't great. In any case, TJ's 28-ounce Golden Yellow cake mix is no longer available. Instead, TJ sells Yellow Cake & Baking Mix, $2.99 for 16 oz. Price is double what I'd consider for name-brands Duncan Hines, Betty Crocker, or Pillsbury. BTW, I often buy my supermarket brand, comparable in quality to the name brands, and a smidge more powder (16.5 oz).

Cakes and Cupcakes and Muffins, Oh, My!

In June 2012, my first cakey recipe was "Lemon Poppyseed Mini-cupcakes" (#070). Not much of a stretch for deviating from a set recipe, but it was a start.

"Square Mini and Whoopie Muffin Experiment" (#88) was an experiment for using up two half-boxes of cake mix (Red Velvet, Strawberry) to try making muffins, and trying out two different pans. Let's just say the experiment was a been-there-done-that experience.

"Mini-cupcake Offload: Pan Type & Prep, Batter Amt" (#118) is another recipe that I made while in muffin mode, specifically mini-muffins. I might be inclined to try layer-caking it at another time. The ingredients sound tasty! The amount of cherry filling, however, sounds maybe more than necessary,. With a few cake experiments under my belt, I might be able to gauge actual amounts to use. Google can also help guide.

In 2016, I moseyed over to something bigger, to be eaten with a fork, then zebra layer cakes. It was another four years before making and documenting a layer. Did another couple more this year. Cakes are a bit more labor intensive than cookies.

I haven't baked muffins or cupcakes in a long while is because of a shifting preference for layer cakes. The longer baking times for such cakes seem to result in more moistness retention. (Cupcakes and muffins have more surface area per batch than two layers of cake.)

I have had an eye on a springform pan cake recipe "Cake in 5 minutes! You will make this cake every day. Few people cook cakes like this!". Thinking that chocolate pudding or blueberry jam in place of the orange filling might be interesting.

Serving Sizes SNit

Related to cake mix manufacturers' weight reduction is supposed number of servings. I distinctly recall that nutrition tables used to state that number of servings was 12. Now it's 10. Imho, it's a lot easier to cut a cake into 12 wedges than 10.

Meandering to barely-related topic--pizza portions. I won't name names, but one big-name pizza manufacturer states that the number of servings is 5. How easy is it to cut a pizza, whether round or square, into FIVE pieces?


Related:
Pt 1 Sweet Bakings--Cookies, Mostly
Pt 2 Sweet Bakings--Cakes, Cupcakes, and Mini-muffins

Friday, September 30, 2022

Pt 2 Sweet Bakings--Cakes, Cupcakes, and Mini-muffins

I've been blogging since September 2009. I'd started out with text content, later adding images. Over the last few years, I've accompanied articles with slide shows and videos that I've posted to YouTube.

Sweets seem to have piqued me, particularly from early to mid 2010s. This year has re-piqued me. In inventorying my recipe blogs, i came up with 28 cooky recipes and 19 cake and cake-ish recipes. In the cake-centric video, I list my blog catalog number with the article title and finished-item image (newest at top).

In musing about sweets, I'd noticed similarities and differences in topic choice and execution over the years. (For cakes, I started out mostly blogging about cupcakes and occasional mini-muffins.)

Morselly Cakes to Whole Cakes

Amusingly, my interest in cake recipes and documenting them have evolved from earlier times. Early on, most of my cakey topics have been articles with thumbnailish images. I did a few cake items a few years ago, with video. I recently got more involved with making whole cakes and videos for them. I seldom narrate videos anymore.

Some Cake Prep Changes Over Time

My cake pan preparation is now neater. And, after having had my tilt-head mixer, I finally decided to use it for cake batter mixing. The metal bowl's handles make pouring easier than using both hands on a glass mixing bowl.

One recent acquisition I've appreciated is my digital scale. It has five clickable units of measure and reads out to two decimal places. Zeroing out containers is a breeze, and weight readouts are more accurate than my old Braun scale.


Related:
Pt 1 Sweet Bakings--Cookies, Mostly
Sweet Bakings--A Few Re-peerings

Saturday, April 30, 2022

Low-effort Choco Chip Cake Mix Cookies


How low effort are these cookies? Only four ingredients, for starters. The cake mix itself conveniently includes the flour, sugar, and leavening. (I prefer yellow cake mix because of the psychological color of eggs and butter, but other mixes also work.) You mix eggs and oil together, mix in the powder, and fold in the chips. Dispense, bake, cool.

The video shows still images and clips for the steps. Note: The cookies are doable using a pastry blender, but a tilt-head mixer cuts down on elbow grease.

One instruction I've seen in many cooky recipes is chilling the dough, from an hour to a few days. Fuggetaboutit for my recipe! Another skippable item is parchment paper. Cake mix cookies have never stuck to my baking pans, except once when I tried using a Trader Joe's cake mix.

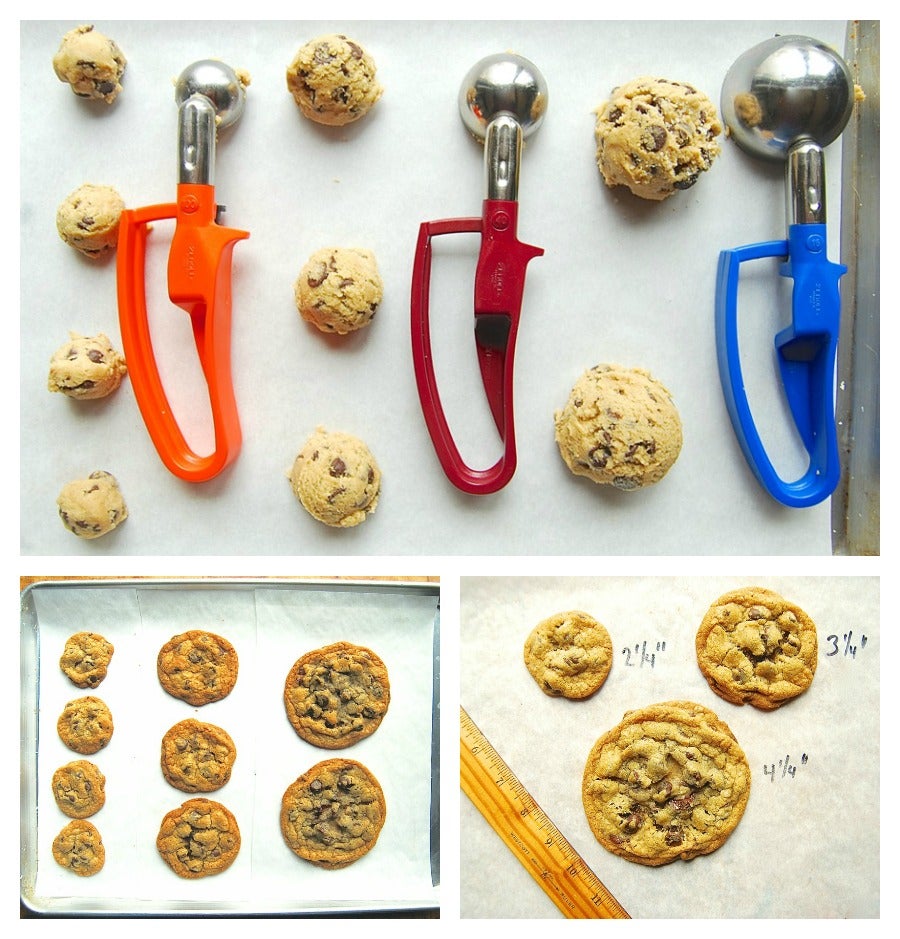
One other item I took a leap of faith in skipping--pressing the dough dollops flat, sometimes using fingers, other times using a glass. Without extra help, the dollops (using 1 1/2 T cooky scoop, level fill) expanded and spread during baking, but not too wide.

Dough Dispensing

A cooky scoop works same as a spring-release ice cream scoop, but faster than tablespoon-and-spatula method of scoop cough with one hand and push with spatula using the other hand.

After I had baked the cookies, I searched on the web for fast dollop dispensing. "The fastest way to scoop drop cookies" showed me that I've been really pokey. When she used two spoons, she dispensed 15 cookies in 1:34. When she used a 1-teaspoon cooky scoop, she dispensed 15 in 54 seconds. BTW, she shows her 1-teaspoon baked cooky as a 2 1/4" wide. My baked cookies were about as wide, but taller, I think. YMMV.

My smoothing dough against a spatula to flatten the dough before dispensing was slow. Method 1 (using side of bowl for flattening dough) in "How to Scoop Cookie Dough" shows a more streamlined method. Method 2 is much slower with 2nd hand handling. Useful info is seeing that the dough handler uses food gloves, which seems to help keep fingers dough-free.

View the image of different dollops and scoops, accompanied by helpful info for size and capacity. Another good resource for cooky scoops is "12 Best Cookie Scoops in 2022 – Reviews and Buying Guide", which also includes a table that summarizes brands and characteristics. "How to use baking cookie scoop [ Cake Decorating For Beginners ]" provides good info about five portion scoops for batters and various cooky types. The size numbers refer to the number of scoops obtainable from a quart-size container.

Baking and Results

The yield was 40 cookies. Tasty, soft, chewy! I wondered why they were perfect for softness and chewiness, compared to some of my other chocolate chip cooky variations. The web listed several results WRT chewy cookies. One suggested ingredient was cornstarch. Not much, but enough to affect dough. "From What Does Cornstarch Do in Cookies? (Plus Simple Substitutes to Use in a Pinch)":

Cornstarch isn’t used as a thickening agent in cookies, but it does have a very important purpose. When a recipe calls for cornstarch, it’s basically going to be there to help provide structure. ... Certain types of cookies are meant to be very chewy, and cornstarch is a common ingredient in those.

The cake mix box did list cornstarch. I also recall a trend awhile back of cake mix companies touting the addition of pudding mix. A main ingredient of pudding is cornstarch. Another ingredient some sites list for chewy cookies is brown sugar. The box did not list that. Thus, I infer that the cornstarch contributed to the texture.

Calories and Sodium

These rich-tasting cookies are 98 calories each, fewer than the 139 each in "Triple Choco Granola Cereal Cookies".


"Pt 1 Cooky Pressing Choco Chip Cooky Dough, Not One-at-a-Time Dollopin"

"Pt 2 Cooky Pressing Choco Chip Cooky Dough, Closer Looks"

"Low-effort Choco Chip Cake Mix Cookies"

View more cooky recipes.

Monday, March 30, 2020

Lemon Juice Aid 1, Let There Be Cake!

Make a lemon cake by adding lemon juice to non-lemon flavor cake mixture and vanilla frosting. The info is intended more for cake makers who've had a coupla cakes under their belts, so to speak. Novices might consider also reaching outside this article to get beginner info.

I've tended to buy "classic" yellow cake (good color, uncomplicated add-in ingredients), especially when they've gone on sale for 88¢ each. (Regular price for lemon cake mix tends to run about $1.40.) Spreadable frostings seem to all cost the same, so no savings between lemon and vanilla frostings (about $1.55 at my supermarket).

Some time ago, I'd made a round, 2-layer lemon cake w/lemon frosting using a 4-oz (1/2 C) bottle of lemon juice. My recollection was it cost 80¢. More recently, I've noted in a couple of previous articles about using lemon juice that was a freebie (15 oz bottle). I've used about 1 C for two lemon meringue pies. For this cake, I used 1/4 C for cake and 1/4 C for frosting.

Pre-preparation for Cake-bake Newbies

Before starting out, read all instructions on containers. (Cake boxes have instructions and table info for pan shapes and recommended baking times.) Items needed include measuring spoons, measuring cups, mixing bowls, mixer, spatulas, cake pans, potholders, cooling rack. Helpful options: Plate for putting implements on, spoons.

Cake pan preparation, for easy removal of baked cake from pan: Various methods, such as parchment paper, spray oil, flour sprinkled onto pans and tapping to distribute the flour. The following videos are good, short guides.
Ensure the oven racks are in position for cake pans, preheat the oven as directed on cake mix box (about 350° for 10-ish minutes).

Cake (Yellow) with Added Lemon Juice
I like using yellow cake mix because of its color and simplicity. Using white and butter-recipe cake mixes are more hassle, imho.

Directions:
  1. Add 1/4 C lemon juice into a measuring cup. Add enough water to total the amount called for in cake mix instructions.
  2. Pour the fluid into a medium mixing bowl.
  3. Add the required number of eggs and amount of oil into the bowl.
  4. Lightly mix these wet ingredients using a hand mixer.
  5. Pour cake powder into the wet mixture, mixing as box directs (30 sec on low, then 2 min medium), occasionally scraping w/rubber spatula.
  6. Pour the mixture into two prepared cake pans. (Use different pan plan and timing as you want, following box guidelines.)
  7. Bake for the duration recommended, starting with minimum time. Check for doneness as required.
  8. When finished baking, remove and cool as the cake mix box instructs.
Vanilla Frosting with Added Lemon Juice

The steps in this section are in the past tense. I was glad to see that the juice did not affect the frosting (such as curdling it) because of frosting's tendency to include milk.

"What Happens to Milk When Lemon Juice Is Added?" states "If the milk is cold when the lemon juice is added, the chemical reaction does not happen for some time." Seems no chemical reaction occurred during the cake's existence (about 5 days in and out of refrigerator).

The extra liquid, however, made the mixture initially runnier than I expected. I added powdered sugar to re-thicken the frosting.

Process (YMMV)
  1. I deposited a 16-oz can of vanilla frosting into a mixing bowl roomy enough to stir in juice and powder sugar (for thickening).
  2. Stirred in 1/4 C lemon juice. (Amazed to see runniness!)
  3. Added 1/8 C powdered sugar, then more for total of 1/2 C.
  4. Added 8 drops of yellow food coloring.
With extra frosting, I was surprised that I needed to carefully spread it as thin as I did to cover the cake. If I'd used canned lemon frosting, it might have cost the same as vanilla frosting, but I probably would have run out.

Saturday, November 19, 2016

Zebra Cake, Using Two Half Boxes of Mix


Last month, I wrote up "Zebra Cake, Using Marble Cake Mix", which differs from this zebra cake only slightly. While the marble cake method has the convenience of using one box of cake mix (marble), the two-half-box method provides flexibility in varying flavors and brands. Try different varieties of chocolate (fudgy, devil's food, …) and lighter color cake (white, yellow, vanilla).
My pixstrip shows the following image areas:
  1. ingredients
  2. equipment
  3. preparing pans (spray oil with parchment paper)
  4. separate bowls for chocolate and white cake mixes
  5. mixing of wet ingredients
  6. mixing of white cake batter
  7. mixing of chocolate cake batter
  8. start of dispensing of batters into the pans, alternating colors
  9. batters in pans, kitchen scale
  10. baked cakes
  11. parchment paper removal
  12. frosted cake with slice showing zebra effect
Ingredients
  • 1/2 box chocolatey cake mix (I used Duncan Hines Devil's Food.)
  • 1/2 box lighter color cake mix (I used Duncan Hines Classic White.)
  • 2 egg yolks
  • 3 egg whites
  • 3/8 C cooking oil
  • 1 1/8 C water
  • spray oil
  • frosting of your choice (I used mocha frosting. Scroll down for EZ instructions.)
Implements
  • electric mixer
  • 3 mixing bowls, 1 for mixing wet ingredients, the other two for mixing the batters
  • 2 round cake pans
  • cooling rack(s)
  • measuring cups
  • rubber spatula(s)
  • 2 1/4-cup measuring cups for dispensing different color batters
  • measuring cup or pitcher that holds more than two cups
Additional (straggler) items
  • parchment paper as desired
  • knife for spreading frosting
  • cake plate
Instructions (Have the cake mix box handy! And watch the YouTube video for more details.)
  1. Prepare baking pans. (I used parchment paper and cooking spray.)
  2. Pour the cake powders into separate bowls.
  3. In the third mixing bowl, mix the wet ingredients together, then measure. (Mine measured about 2 cups.)
  4. Pour half of the liquid into the lighter color cake powder, then mix (about 30 seconds on low, then 2 minutes on medium).
  5. Preheat the oven (350°).
  6. Pour the other half of the liquid into the chocolatey cake powder, then mix (about 30 seconds on low, then 2 minutes on medium).
  7. Use the two 1/4 C measuring cups to alternate pouring light and dark batters into the two pans. (Afterward, if desired, weigh the two filled pans to confirm the amounts are close to equal. Adjust as desired.)
  8. Bake for about 24 minutes. YMMV
  9. Test cake(s) for doneness with toothpick.
  10. Remove the pans of cake and place on cooling rack(s) for about 15 minutes for cooling.
  11. Decorate as fancy as you wish. Conventional, not-too-fussy decorating is as follows:
    1. Place one layer upside down on a plate and decorate the exposed side
    2. Place the other layer right side up on the first layer.
    3. Frost the sides.
    4. Frost the top.
Mocha frosting:
o 1/2 can white frosting
o 1/2 can choco frosting
o 2 tsp instant coffee dissolved in 1 tsp just-boiled water or just-brewed coffee

If necessary, microwave the frostings a few seconds for stirrability, then stir all ingredients together.
Post-recipe Thoughts
This two-half-box method for zebra cake yielded only slightly less batter than the marble-cake method, but final cakes looked and tasted similar. (I'm not a pro.) For the marble-cake method, the wet ingredients were 3 eggs, 1 cup water, and 1/3 cup oil; baking time was two minutes shorter. Anyway, for future zebra cakes, I need to improve my aim in pouring batters in concentric circles.

Friday, October 21, 2016

Zebra Cake, Using Marble Cake Mix


I'd been intrigued by a cute Duff zebra cake mix. (Love those stripes!) But it was so much more expensive than household names like Betty Crocker, Duncan Hines, and Pillsbury. In googling"zebra cake", I found a wealth of resources—especially how to create the stripey effect.

A particularly easy, non-Duff way to make a yummy zebra cake with using only one box of mix is getting marble cake mix. My store carried marble cake mix from only Duncan Hines. Surprisingly, Pillabury and Betty Crocker seem to have ceded the marble cake market to Duncan Hines, as googling those mix products indicates.

My pixstrip shows the following image areas:
  1. ingredients
  2. equipment
  3. prepared pans (spray oil with parchment paper)
  4. mixed cake batter, pre-cocoa powder
  5. scooping of 2 C batter into another bowl
  6. mixing of chocolate cake batter
  7. dispensing of batters into the pans, alternating colors
  8. baked cakes
  9. parchment paper removal
  10. frosted cake
  11. frosted cake with slice showing zebra effect
Ingredients
  • 1 box marble cake mix
  • ingredients for recipe, using the box info for guide
    • eggs
    • cooking oil
    • water
  • spray oil
  • frosting of your choice
Implements
  • mixing bowls
  • measuring cups for oil and water
  • 1/4 C measuring cups for dispensing different color batters
  • rubber spatula(s)
  • electric mixer
  • 2 round cake pans
  • cooling rack(s)
Additional (straggler) items
  • parchment paper as desired
  • knife for spreading frosting
  • cake plate
Instructions (Have the cake mix box handy! And watch the YouTube video for more details.)
  1. Preheat the oven (350°).
  2. Prepare baking pans. (I used parchment paper and cooking spray.)
  3. Prepare the batter as instructed on the box, up till blending in the cocoa powder. (I mixed wet ingredients, then mixed in the cake mix powder.)
  4. Pour 2 C of the batter into a smaller bowl.
  5. In the bowl of remaining batter, pour the cocoa powder and blend together.
  6. Use the two 1/4 C measuring cups to alternate pouring light and dark batters into the two pans. (Afterward, if desired, weigh the two filled pans to confirm the amounts are close to equal. Adjust as desired.)
  7. Bake for about 22 minutes. YMMV
  8. Test cake(s) for doneness with toothpick.
  9. Remove the pans of cake and place on cooling rack(s) for about 15 minutes for cooling.
  10. Decorate as fancy as you wish. Conventional, not-too-fussy decorating is as follows:
    1. Place one layer upside down on a plate and decorate the exposed side
    2. Place the other layer right side up on the first layer.
    3. Frost the sides.
    4. Frost the top.
Post-recipe Thoughts
Seems I wound up with slightly more chocolatey batter than white batter. Maybe next time I'd set aside slightly more of the lighter color cake batter. Maybe the cocoa powder wound up adding more bulk to the chocolate batter than I anticipated.

November 19, 2016: Visit "Zebra Cake, Using Two Half Boxes of Mix" for another zebra cake methodology. It requires only slightly more effort, but has a lot more flexibility for flavors and brands.

Saturday, August 20, 2016

Duncan Hines Perfect Size Cake--Off Golden Path


Duncan Hines debuted its Perfect Size cake line about a year ago. The ingredients make a smallish single-layer cake. The kit includes cake mix powder, a 6" paper pan with detachable liner, and frosting powder. The five flavors:
The Duncan Hines Perfect Size product I tried was “Golden Fudge”—the “Golden” referring to the cake itself, and “Fudge” referring to the accompanying frosting. "Chocolate Lovers" name, and to some degree, "Strawberries and Creme" seem pretty implicit of cake and frosting flavors also. The other two flavor names seem marketingish, but their accompanying images and very short descriptors provide info for expected results.

I decided to try out the recipe, even though the cake result is less than half an actual fully frosted cake but nearly the same cost ($2.78, fortunately, offset by 55¢ off coupon). The instructions seemed more bothersome than what I’d normally tolerate. I figured by the time I finished the project, I might deviate anyway, and I could get an article, video, or both out of the effort.

The main off-golden-path part of cake is the frosting—having used ready-to-spread white frosting instead of following instructions of the included frosting packet. (The frosting pack requires mixing the powder with water and butter.) An example video of the frosting hassle is at "Duncan Hines Perfect Size Cake Review", starting at 5:55 and stopping at 10:27.

My other deviation was using oil with the cake mix instead of butter. "Fat chance: Is Butter Really Better?" indicates that subbing oil for butter is fine, if not better, than using butter for the fat. I tend to favor mixing oil with water and egg together as a wet-ingredient mixture, then mixing the powder in.

The baking temperature was 300°, and for 34-39 minutes. My cake required 34 minutes—good thing I went for the minimum time. Looking at full-size cake mix boxes, most times are shorter and baking at 350°.

View my video of my Duncan Hines Personal Cake experience. If you want to try making one of these cakes, beware of some caveats. To Duncan Hines' credit, the websites I cited at the top of the article for their Personal Size cakes include comments from customers and their 1-to-5 star ratings. The most common complaints:
  • Costly for such a small cake result.
  • Too much time required for baking.
  • Labor-intensive for making frosting with included powder. Would be much more appealing for an envelope of ready-to-spread frosting.
  • Terrible-tasting frosting results from using powder and required additional ingredients.
  • Leaky paper baking pan and liner during baking, spilling batter onto the oven. (Oy!)
My recommendations: Buy a full-size box of cake mix and full container of ready-to-spread frosting. It'll be less preparation hassle, more flexibility for cake and frosting flavors, and better economy. The only real convenience to the Perfect Size is a throwaway paper baking pan.

If you want to make a smaller size cake, divvy up half a box of cake mix, follow the instructions on the box, adding only half the added ingredients. Pour the batter into one prepared (wax paper or whatever) round cake pan and bake as instructed. After cooling, frost with 1/2 container of ready-to-spread frosting of your choice.

Monday, July 4, 2016

EZ Mini M&M Confetti Cookies


My cake mix cooky recipe is the summer counterpart (summer-temperature tolerant) to my winter cake mix cooky recipe "Minty Choco Chip Cake Mix Cookies". I wanted to bake some cookies that have chocolate that melts in your mouth, not in your hand. I thought about M&M's, then remembered chomping on mini M&M's the previous Halloween. Then I thought such cookies would look even more festive, besides having the colorful candy shells, if I added jimmies.

Several mini M & M cooky recipes I ran across are scratch and require about 10 ingredients. Well, how about starting with the standard cake mix cookie process that requires only cake mix, oil, egg?

My method of cake mix for this recipe was using 1/2 box of chocolate cake mix and 1/2 box of Pillsbury Funfetti cake mix. The Funfetti powder contains 2 tablespoons of jimmies, so my half box contained one tablespoon.

If you want the milk chocolatey cooky effect without weighing out cake mixes, you can use a marble cake mix. Stir jimmies into the cake powder(s) before mixing up the batter.

My pixstrip shows the following image areas:
  1. Initial
    1. Implements
    2. Ingredients
    3. Partially mixed dough (wet ingredients, dry ingredients) and set-aside mini M&Ms
  2. Main mixing
    1. Mixed dough and and set-aside mini M&Ms
    2. Dough with mini M&Ms being poured
    3. Dough and mini M&Ms being stirred together
    4. Mixed dough
  3. Baking
    1. Raw dough in pan
    2. Baked cookies in pan, some being scooped and flipped onto cooling rack
    3. Cooled cookies
Implements
  • Small mixing bowl
  • Larger mixing bowl
  • Pastry blender
  • Spoon for measuring out cooky dough
  • Measuring cup
  • Spatula for scraping dough onto pan
  • Cooky pan(s)
  • Cooling rack for done cookies
  • Cooky spatula to lift and transfer baked cookies
Ingredients
  • 2 eggs
  • 1/3 cup oil
  • 1/2 box chocolate cake mix
  • 1/2 box Pillsbury Funfetti cake mix (or 1/2 box white cake mix and at least 1 tablespoon of jimmies)
  • 1/2 bag of mini M&Ms (~ 5 oz)
Instructions
  1. Preheat the oven to 325°.
  2. Combine the powders and jimmies.
  3. Combine the oil and eggs.
  4. Combine the wet ingredients into the dry ingredients. The dough will be thick.
  5. Stir the mini M&Ms into the dough. Slow and steady works.
  6. Use a round tablespoon to scoop the dough, and use the rubber spatula to shape.
  7. Drop the spoon's dough onto the cooky sheet. (For slightly flatter cookies, slightly flatten the shaped dough rounds with the spatula or the measuring cup.)
  8. Bake for about 12 minutes.
  9. Use the cooky spatula to lift and transfer the done cookies onto cooling rack.
The yield was 41 cookies, amounting to ~73 calories each. YMMV

Post-recipe Thoughts
The confetti part of the cookies was sparse. To give the cookies a more "celebratory" look in the future, I'd probably ensure three to four tablespoons of jimmies for each batch.

I had some boxes of cake mix on hand, so I measured and used half boxes, storing the other halves in the refrigerator. An easier process would be to use a marble cake mix and stir in jimmies into the powder. If you prefer a vanilla instead of summer-tolerant chocolate cooky, use just white or yellow cake mix, jimmies, and mini M&Ms.

July 12, 2016: I baked a second batch Sunday. This time, the 1/2 box of chocolate cake mix was Duncan Hines Classic Devil's Food Moist instead of Betty Crocker Super Moist Chocolate Fudge. Also, I added more jimmies—2 1/2 tablespoons, all that was left in my jar. The image on the left has the BC mix; the one one right has the DH mix and extra jimmies.
 I was surprised to see that the BC-mix cookies were much darker than the DH-mix ones. IMHO, the DH ones are closer to my idea of milk chocolatey cookies.

The yield for DH-mix cookies was 45, probably as a result of 1 1/2 tablespoons of additional jimmies, and variation of my cooky dough dispensing. I calculated DH-mix cookies to be about 71 calories each (BC-mix cookies, about 73 each.)

Sunday, February 14, 2016

Those Two-Tone Confetti Cupcakes

This article is one of my rare ones about food that is more analysis than recipe. Last month, I made Cinnamon Two-Tone Cupcakes with 1/2 box of yellow cake mix, using Wilton two-tone cake inserts. I observed that the interior columns of the cakes were blobby. This time, for the other half box, instead of a cinnamon and nutmeg mix for the interior part, I used 3 tablespoons of rainbow jimmies.

This batch came out worse looking than the cinnamon ones. The interior "columns" seem to have clumped together, some pooling at the bottom. The (confetti) jimmies look smeary after baking. I'm thinking that the combination of moistness and baking temperature partly dissolves those decorations. (A magnified pic in Confetti Cupcake Bites shows the same kind of smeariness.)

Icing

I used 1/2 recipe for simple powdered sugar glaze, omitting the vanilla. I used a fork to stir 1 1/2 tablespoons of water into a container with 1 cup of powdered sugar. With the cupcakes bunched together on the cooling rack atop a baking pan, I poured the glaze onto the cupcakes.

I had set the iced cupcakes in refrigerator for an hour or so, then "sugared" them up as follows:
  1. Poured some red-color sugar on a saucer. (Happy Valentine's Day today!)
  2. Placed each cupcake upside down onto the sugar and rotated the cake to coat its top.
  3. Placed each of the cakes right side up.
Note: The image at the top of the article shows some cupcakes with glaze only and others with glaze and red sugar.

Post-batch Thoughts

 Batter Process
For the time I spent on dispensing the batters into the Wilton inserts and achieving the blobby, bland-looking baked results, I would not make the confetti version again. (If making confetti cupcakes, blend in maybe 5 to 6 tablespoons of jimmies into one batter bowl, foregoing Wilton cupcake inserts.)

The cinnamon two-tone cupcakes, although blobby, show visual contrast and taste really good. The image at page 31 of https://app.box.com/s/r62gd7ax0ctgjcw9os6bih5ic1z12vva shows more details than the image in the cinnamon cupcake article.

 Cake Topping Process
For future cupcake icing projects, I would pour the icing in small, tight circles or dip the tops of the cakes into the icing container. And I'd sugar them immediately instead of waiting till later. Why not coat with frosting?
  • I don't have any canned frosting in the house and don't want to buy any.
  • I have loads of powdered sugar I want to use up but don't want to make frosting using perishables like butter and milk.
  • I want to use up some of the many colored sugars I have in the pantry.

Thursday, January 21, 2016

Cinnamon Two-Tone Cupcakes


Around Thanksgiving, I went to Michael's and spotted an intriguing Wilton gadget for making two-tone cupcakes. The design is for making two-tone cupcakes—"Fill the inner portion of the insert with one flavor or color of batter and the outer ring with another". I bought one that day, and another one a few days later, both times using a 50% off coupon. Grand total came to $7.00 + sales tax.

Before trying out the gadgets, I decided to look up info and recipes. Did I get an eyefull. Lots of complaints!
  • Messy!
  • Time consuming!
  • While pulling up gadgets,
    • Batter stuck to gadgets before falling from gravity, resulting in a gloppy mess. (I'm thinking surface tension because of viscosity.)
    • The batter that stuck to the gadgets would also pull up paper liners.
    • Misalignment of inner ring and outer ring of gadgets resulted in batter seeping from one area to another.
With all those complaints in mind and some commenters' suggestions, I hoped to avoid sorry pitfalls. I made sure to include the following actions in the recipe:
  • Spraying oil into the Wilton gadgets and cupcake pan before pouring the batter in.
  • Omitting paper liners in the pan wells.
  • Initially pouring a small layer "outer" area batter into pan before placing Wilton gadgets. Doing so was intended to prevent breach between contrasting batters.
  • Carefully pouring batters by using small measuring cups that have little spouts. (Some bakers suggested piping the batters, but I consider the step to be extra work and wasting bags.)
Cinnamon seems to be a common flavor for cinnamon rolls, coffee cakes, and some muffins, but not so much for cakes and cupcakes. I did run across recipes for dozen-quantity muffins that called for cinnamon and nutmeg. And the pans were standard 12-well cupcake pans. Thus, my recipe has a not-so-common cake flavor (using 1/2 box of cake mix) and instructions for using Wilton two-tone cupcake inserts.

Video-recording the recipe process was a new experience for me. Generating the YouTube video and subsequent .pdf file were even more adventuresome. A future blog article will be about having used Microsoft Movie Maker, Acoustica (audio editor), and Irfanview (graphics editor) WRT to the video and secondary files.

As has been my tradition with recipes, I include a pixstrip, this one showing the following image areas:
  1. Implements
  2. Ingredients
  3. Spray oil with pan and Wilton gadgets
  4. Mixed cake batter, with cinnamon and nutmeg beside it
  5. Blending of cinnamon and nutmeg into the smaller bowl batter
  6. Dispensing of batters into the pan with Wilton gadgets(combo image)
  7. Removal of Wilton gadgets before placing the pan in oven
  8. Baked cupcakes
  9. Iced and some sliced-open cupcakes
Implements
  • Electric mixer
  • Mixing bowls
  • Measuring cups
  • Measuring spoons
  • Rubber spatula(s)
  • Cupcake pan
  • Wilton cupcake insert (I used two.)
  • Cooling rack
  • Butter knife or similar for removing cupcakes from pan
Ingredients
  • 1/2 box cake mix—white, yellow, vanilla to contrast with cinnamon/nutmeg
  • ingredients for half-box recipe, using the box info for guide
    • eggs
    • cooking oil
    • water
  • 1 teaspoon cinnamon
  • 1/2 teaspoon nutmeg
  • spray oil
  • icing or some other cupcake topping (I used a freebie Wilton decorating icing. I've provided links to alternative toppings at the bottom of the article.)
Instructions (Have the cake mix box handy!)
  1. Preheat the oven (350°).
  2. Prepare baking pan and Wilton gadget(s) with spray oil.
  3. Weigh 1/2 box of cake mix powder, and prepare the batter as instructed on the box.
  4. Pour 1/3 of the batter into a smaller bowl, and blend the cinnamon and nutmeg in. (Initially, I tapped and mixed a little of the cinnamon and nutmeg into the batter before divvying it into two portions.)
  5. Pour a small layer of "outer" batter into each cupcake well.
  6. Place gadget(s) into wells and dispense inner batter, then outer batter. Lift gadget(s) and place into wells needing filling. Repeat this step until finished.
  7. Remove the gadget(s). Place rack in oven and bake for about 18 minutes. YMMV
  8. Test cupcakes for doneness with toothpick.
  9. Remove the pan of baked cupcakes and place on cooling rack. Run a knife along the edges for loosening them.
  10. Decorate as desired.
Post-recipe Thoughts
Despite my oil-spraying of my cupcake pan and the Wilton inserts, the center cupcake columns looked blobby, and seemed more voluminous than the "outer" cupcake parts. I was surprised that they more resembled the globby one at Baking Bites than other nice and straight ones.

The next time I make two-tone cupcakes, I'll spray more oil, and I'll try using rainbow jimmies for the center columns. (2/19/2016—Baked a batch. Read "Those Two-Tone Confetti Cupcakes" for my results assessment.)

Nutrition: The cake mix box states 260 calories (prepared) for each serving, 10 servings a box. So, the cupcakes are about 110 calories each, plus an additional ~40 for the sorta light smear of Wilton icing. (Sigh, I miss the recent olden days when cake mix weighed 18.25 ounces and served 12 instead of the current 15.25 ounces for 10 servings. Grrr! Reduction by ~16%, jeopardizing *FORMERLY RELIABLE* results and yields.)

Alternates to cupcake toppings (viewed by me for possible future use), in two cases, part of main sweets recipes:

Saturday, May 30, 2015

Confetti Cupcake Bites

My recipe makes half-size cupcakes, using nonpareils and jimmies in two half batches during one baking session. Contrast the results of the sprinkle types, and decide on your own single or duo sprinkle-type morsels. I've been dancing around using both kinds of sprinkles for cake mix cookies in a couple of previous recipe articles. This time, I'm talking about using cake mix for actual cake.

In case you're unfamiliar with differences between nonpareils and jimmies, "Sprinkles, Demystified: An Explanation of All Types" explains a main difference as shape—round for nonpareils and cylindrical for jimmies.
Round Sprinkles: These can more specifically be referred to as nonpareils. These are those teeny-tiny round balls that can come in a single color or in rainbow.

Cylinder Sprinkles: Sprinkles with a cylinder shape are made by mixing up a paste ...a little slower to “bleed” color than the nonpareil type of sprinkle. ....In some parts of the United States, particularly Pennsylvania and the Northeast, this type of sprinkle (the chocolate type in particular, it seems) are referred to as “Jimmies”.
Caution: Nonpareils "bleed" rather readily in moisture, even more so with cake batter than with cooky dough as in my "Rainbow Nonpareil Cake Mix Cookies" recipe. Thus, minimize time and effort when stirring nonpareils into batter.

My pixstrip shows the following image areas:
  1. Implements
  2. Ingredients
  3. Mixed cake mix batter
  4. Batter divided into two Pyrex bowls—with nonpareils in the left bowl and jimmies in the right bowl
  5. Each batter type in separate cupcake pans
  6. Baked cupcakes
  7. Cut sample cupcakes for visual contrast
  8. Some cupcake bites arranged in a tin
Implements
  • Mixing bowl
  • Electric mixer
  • Cup for eggs
  • Measuring cup(s) for dispensing batter
  • Tablespoon measuring spoon for measuring sprinkles
  • Spatula for scraping batter
  • Same-size bowls if making separate batches of nonpareil and jimmies batter (If making only one kind of cupcake, skip using these two bowls.)
  • Cupcake pans
Ingredients
  • 1 box cake mix (I used Betty Crocker Golden Vanilla.)
  • Eggs (as listed on box)
  • Cooking oil (as listed on box)
  • Water (as listed on box)
  • Sprinkles as follows (option a, b, or c—pixtrip shows option "a".):
    1. 2 T nonpareils for 1/2 recipe, 4 T jimmies for the other 1/2 recipe
    2. 4 T nonpareils for a whole recipe
    3. 8 T jimmies for a whole recipe
  • Spray oil
Instructions
  1. Preheat the oven to 350°.
  2. Spray pans with oil.
  3. Follow box instructions for mixing powder, eggs, oil, and water together.
  4. If making separate nonpareil and jimmies recipes, divide the cake batter equally into two bowls. (I used two Pyrex bowls and evened out the weights.) If making a batch with only one type of sprinkles, skip this step.
  5. Add the sprinkles.
    • When using nonpareils, measure and very lightly stir them into the batter to minimize color "bleed".
    • When using jimmies, measure and stir them into the batter, but don't worry about color "bleed".
  6. Scoop the batter into the pan wells, each about 3/4 full. (For more crunch in the nonpareil version, sprinkle an additional pinchful over each well after dispensing the batter.)
  7. Bake for about 17-20 minutes. Test for doneness with a toothpick.
  8. Remove the baked cupcakes. Tilt them in the wells or place them onto a cooling rack to cool.
  9. Frost if desired. Beware of extra effort required and added calories in gilding the lily.
Post-Recipe Thoughts
Interestingly, the heat seemed to cause the jimmies to diffuse. That is, after baking, the jimmies looked wavy instead of retaining their rod shapes. But the jimmies morsels didn't bleed and change the cake color like the nonpareil morsels did.

When working with nonpareils, remember that they're itty bitty spheres. When I first opened the jar, I tilted it. Out came several orbs, rolling freely on the table, a challenge to easily stop their willy-nilly, runaway movements.

Cake mixes that already contain jimmies are available. When I made the jimmies version of cake mix cookies, using Betty Crocker's Party Rainbow Chip mix, I didn't think to sift it to measure the amount of jimmies. Maybe some day I'll break down and buy another box, remembering to check out the amount of jimmies before baking something.

Wednesday, May 20, 2015

Rainbow Nonpareil Cake Mix Cookies

Multicolor sprinkle decorations for packaged cookies, cakes, and cake mixes tend to more often be jimmies than nonpareils. These cookies vary from the ones I made when I used the Betty Crocker Rainbow Chip cake mix. Instead of using cake mix that already includes multicolor jimmies, I used basic cake mix and added rainbow nonpareils. (Wilton's product name is Rainbow Nonpareils.)

"Sprinkles, Demystified: An Explanation of All Types" explains a main difference as shape—round for nonpareils and cylindrical for jimmies.
Round Sprinkles: These can more specifically be referred to as nonpareils. These are those teeny-tiny round balls that can come in a single color or in rainbow.

Cylinder Sprinkles: Sprinkles with a cylinder shape are made by mixing up a paste ...a little slower to “bleed” color than the nonpareil type of sprinkle. ....In some parts of the United States, particularly Pennsylvania and the Northeast, this type of sprinkle (the chocolate type in particular, it seems) are referred to as “Jimmies”.
My pixstrip shows the following image areas:
  1. Implements
  2. Ingredients
  3. Stirred cake mix and nonpareils (dry ingredients)
  4. Stirred eggs and oil (wet ingredients)
  5. Blended dry and wet ingredients in the larger bowl
  6. Raw dough in pan
  7. Baked cookies in pan
  8. Cookies on a cooling rack (some flipped back to right side up)
Implements
  • Cooky pan(s)
  • Pastry blender
  • Mixing bowls (one medium-large, one small)
  • Measuring cup (optional for cracking eggs individually before pouring them into bowl)
  • Tablespoon for measuring out cooky dough
  • Spatula for scraping dough onto pan
  • Cooky spatula for lifting and transferring baked cookies
  • Cooling rack for baked cookies
Ingredients
  • 1 box vanilla cake mix (I used Betty Crocker French Vanilla.)
  • 4 Tablespoons Wilton Rainbow Nonpareils
  • 2 eggs
  • 1/3 cup cooking oil
Instructions
  1. Preheat the oven to 350°.
  2. Use the pastry blender to stir the cake mix powder and nonpareils together in a medium-large bowl.
  3. Use the pastry blender to stir the eggs and oil together in a small bowl.
  4. Pour the eggs and oil mixture into the larger bowl and combine the ingredients.
  5. Use a round tablespoon to scoop the dough. Shape to rounded, level, or concave height.
  6. Drop the spoon's dough onto the cooky sheet, using the rubber spatula to ease out each lump.
  7. Bake for about 9 to 11 minutes until the edges are lightly browned.
  8. Use the cooky spatula to lift and transfer the done cookies onto cooling rack.
The batch made 38 cookies, ~65 calories each.

Post-Recipe Thoughts
Those nonpareils in these cookies "bled" slightly into the dough during mixing, turning the dough a light bluish gray. Interestingly, enough of the nonpareils' texture remained so that after baking, the cookies still had some crunchiness within the soft texture. Eh, at some time, I should try another cooky batch with jimmies in an egg-oil-powder dough to see if the jimmies bleed.

A few months ago, I actually did bake a jimmies version, using Betty Crocker Rainbow Chip cake mix, but I used butter instead of oil. Looking at pix I had taken of the process for "EZ Buttery Confetti Cake Mix Cookies", the jimmies did not bleed and tint the egg-oil-powder dough.

The nonpareils came free with a supermarket promotion. Normal price would run about $1.75 for the 3-ounce jar. The four tablespoons amounted to over half the jar, thus, about a dollar's worth. Cake mix tends to run slightly more than a dollar for a 15.25-ounce box. The oil cost about 30¢, and the eggs cost about 34¢.

If I calculate the cookies as having free nonpareils, each cooky comes to a little over 4¢. If I include nonpareil price, each cooky comes to about 9¢. Sure, a big price difference. OTOH, you make them fresh instead of buying them from a store or bakery. Yum—freshness and lower cost!

For a quick reference to price of eggs and oil, scroll to the bottom table at "Whataburger Pancakes, Mix, or Scratch". (I calculated costs of scratch pancake ingredients, an egg and oil being two of the items.)

Wednesday, March 25, 2015

Baking Cookies with Trader Joe Cake MIx

I was visiting a relative and wanted to bake some cookies using cake mix, eggs, and oil. She showed me her two boxes of cake mix, a Trader Joe's Golden Yellow cake mix, and a Duff's Zebra cake mix. I chose TJ's. This baking experiment produced results that differ from my standard cake mix cookies.

Standard cake mixes from Betty Crocker, Duncan Hines, and Pillsbury weigh 15.25 ounces each these days. (Grrr! They used to weigh 18.25 ounces apiece.) The Trader Joe mix was 28 ounces. Funny thing, though, is that the pan and well sizes all claim the same thing—2 8" or 9" round layers, 9" x 13" rectangle sheet, or 24 cupcakes.

Wasn't sure I wanted to double my usual added ingredients (2 eggs and 1/3 cup of oil) for making the cookies because TJ weighed nearly twice as much as DH, BC, or Pillsbury. So I hedged my bets. My relative had larger eggs on hand than I usually do, so I used three. For the oil, I upped the amount to 1/2 cup. I should have taken TJ's cake ingredient requirements to be added into account—3 eggs, 1 cup water, 1 cup oil. BC, DH, and Pillsbury each call for 3 eggs, 1 cup or so water, and 1/2 cup oil—half the oil that TJ calls for.

Forged ahead with making the cooky dough with the pastry blender, then shaping cookies onto pans and baking at 350° for about 12 minutes each pan. The yield was 56 cookies. They tasted ok for not having additional enhancements.

Post-Baking Thoughts
  • The cookies stuck to the pan, requiring scraping with a spatula. Would put in 2/3 cup total oil AND spray the pans with spray oil.
  • I was correct to use more oil and eggs than normal, and ignoring TJ's yield prediction of same amount as BC, DH, and Pillsbury. TJ's yield was 56, compared to the other brands of about mid- to high 30s.
  • Would put in maybe 2 teaspoons of vanilla extract for extra zing.
  • Would add chocolate chips, coconut, nuts, or combinations for additional textures.
My Non-TJ Cake Mix Cooky Recipes (Try 'em!)

Friday, January 30, 2015

EZ Buttery Confetti Cake Mix Cookies

This recipe features Betty Crocker Party Rainbow Chip cake mix. Over the years, seems that companies have used labels like "party", "birthday party", "funfetti", and "confetti" for including the colorful, sugar mini-rod decorations. Hmmm, BC's webpage shows a Rainbow Chip cake mix, but omits "Party" from the product title and URL.

I'd been curious for a long while about using butter instead of cooking oil in my cake mix cooky recipes. (Try "cookies" in the search field at the upper left.) Rather than use a single-flavor cake mix, I decided on the confetti-ish mix. Interesting contrast between using butter and oil. The process is slightly different with softening the butter first. The buttery cookies came out softer and fluffier than cookies that I used oil instead.

My pixstrip shows the following image areas:
  1. Implements
  2. Ingredients
  3. Softened and slightly stirred butter
  4. The butter and two eggs
  5. Blended butter and eggs
  6. Blended butter, eggs, and cake mix
  7. Raw dough in pan
  8. Baked cookies in pan
  9. Cookies on a cooling rack (some flipped back to right side up)
Implements
  • Cooky pan(s)
  • Pastry blender
  • Mixing bowl
  • Measuring cup (optional for cracking eggs individually before pouring them into bowl)
  • Tablespoon for measuring out cooky dough
  • Spatula for scraping dough onto pan
  • Cooky spatula to lift and transfer baked cookies
  • Cooling rack for baked cookies
Ingredients
  • 2 eggs
  • 1/3 cup soft butter (2/3 stick)
  • 1 box Betty Crocker Rainbow Chip cake mix
Instructions
  1. Preheat the oven to 350°.
  2. Soften the butter in the microwave oven as necessary.
  3. Combine the butter and eggs.
  4. Use the pastry blender to stir the cake mix powder into the butter and eggs mixture.
  5. Use a round tablespoon to scoop the dough. Shape to rounded, level, or concave height.
  6. Drop the spoon's dough onto the cooky sheet, using the rubber spatula to ease out each lump.
  7. Bake for about 9 to 10 minutes until the edges are lightly browned.
  8. Use the cooky spatula for lifting and transferring the done cookies onto cooling rack.
The batch made 39 cookies, ~57 calories each. I did spot some other cake mix recipes using the Betty Crocker Party Rainbow Chip cake mix, but several added frosting atop the cookies. Adding the frosting seems to be gilding the lily, adding more calories and sweetness, in addition to using more time and effort. Assuming a hypothetical distribution of an entire 16-oz can of Betty Crocker Rich and Creamy Vanilla frosting, each cooky would have an additional ~47 calories—13 servings x 140 calories/serving ÷ 39 cookies = 46.7 calories/cooky.

Post-Recipe Thoughts
Another time, I'll try making cookies that emulate my "Krusteaz Choco Caramel Squares" from my previous article. However, I'll try making individual round cookies instead of a single slab that I cut up later. Haven't decided whether to use tablespoon/spatula method or use my cooky shooter to dispense the dough.

Saturday, January 24, 2015

Krusteaz Choco Caramel Squares

These sweet-tooth munchies have a fudge-brownie cooky base, topped with non-nut nougat and chopped nuts. Nougat etymology includes nuts; the sweet confection on the cooky is not nutty—only the final topper. For expediency in this article, "nougat" refers to that middle layer, a combination of melted chocolate chips and squeeze-packet caramel.

About a year ago, I bought a box of Krusteaz Molten Deep Dish Chocolate Cookie with Caramel Center. I periodically would read the instructions, wondering if I really wanted to use up all the ingredients for 12 cookies that had "molten" centers. The yield seems pretty paltry, especially considering extra hassle beyond other munchies I make.

I looked at suggested recipe alternatives on the box. I wasn't warm to requirements for additional ingredients.
So, I took inspiration from the Seattle Bars and tried something else, skipping all the additional ingredients except for nuts, and adding melted chocolate chips. Was the process less hassle? No. But the results won rave reviews, and gave me ideas for a future similar but different munchie.

This recipe differs somewhat from other recipes I've posted because I needed to improvise as I went along. I've added several parenthetical thoughts during the process. My pixstrip shows the following image areas:
  1. Ingredients and utensils (Pics do not include additional implements I needed to use later.)
    1. Utensils and ingredients. The dashed line indicates the mix kit is part of two preparation stages. (The left side shows the dough ingredients, the right side shows the topping ingredients.)
    2. Oblong pan and spray oil
  2. Doh!
    1. Bowl of the cooky dough—mixed eggs, soft butter, and Krusteaz powder
    2. Pan with the raw, pressed cooky dough, spread out to edges
    3. Pan with the baked cooky slab (Note: During the baking, I needed to press some of the dough down to flatten for height consistency.)
  3. Squares!
    1. Cooky squares in larger, wax paper-lined pan (Note: First, I flipped the cooky slab onto a cooling rack, cut it into 24 squares, then placed the squares right side up onto the larger, wax-lined pan.)
    2. Cooky squares, topped with with choco-caramel and nuts.
    3. Finished squares in cupcake liners and tote tin
Implements
  • 9" x 13" pan
  • Pastry blender
  • Mixing bowl for blending to-be-baked ingredients together
  • Mixing bowl for melting chocolate chips, then blending in the envelope of Krusteaz caramel "sauce"
  • Spoon(s) for later distributing the choco-caramel topping onto the baked cooky squares
  • Additional helpful items during process
    • latex or vinyl glove(s) for spreading out the cooky dough, then later for pressing down inconsistent-height dough during baking
    • Cooling rack
    • Wax paper
    • Additional pan or cooky sheet
    • Plastic knife for separating the baked cooky slab from the pan
    • Knife fur cutting squares
    • Plate for nuts
    • Cupcake papers
Ingredients
  • For the cooky slab
    • 1 egg
    • 1 stick (1/2 cup) butter
    • The bag of the Krusteaz mix powder
  • For the topping
    • 4 oz chocolate chips
    • The 4-oz package of the Krusteaz caramel topping
    • 1/2 cup of chopped nuts (Suggestion: Place on a plate or other flat area.)
Instructions (for the cooky slab)
  1. Preheat the oven to 350 degrees.
  2. Combine the oil and egg.
  3. Stir the Krusteaz powder into the wet ingredients.
  4. Spray the oil generously onto the pan. (Spray REALLY generously at the edges and corners!)
  5. Distribute the cooky dough evenly onto the pan. (Gloves help for less-mess pressing.)
  6. Bake for about 13 minutes, and check progress. (The dough rose unevenly, so I pressed the high part to flatten it even with the rest of the slab.)
  7. Finish baking for about another 3 minutes, verifying doneness with toothpick or lightly pressing the cooky slab for springiness.
  8. Remove the pan from the oven and let it rest for a couple of minutes or so.
  9. Use a plastic knife to carefully separate the cooky slab edges and corners from the pan, then flip the pan upside down onto a cooling rack.
  10. Cut the cooky slab into 24 squares, placing them right side up. (I initially subdivided the slab into 4 quarters, placed them right side up onto a larger, wax-lined pan, and finished cutting them into squares.)
Instructions (for the topping and completion)
  1. Melt the chocolate chips.
  2. Snip the envelope of caramel and squeeze it into the bowl.
  3. Alternately stir and heat the chocolate and caramel together.
  4. Use spoons or similar implements to distribute the nougatty mixture onto the cooky squares. (Using two spoons, I made use of the thick mixture's inertia for transports and gravity for the drops.)
  5. For each square, turn it upside down and lightly flatten it onto the plate of nuts, then place it right side up elsewhere. (The nougat acts as a glue.)
The batch made 24 squares, ~142 calories (gasp!) each. The box recipe itself would have made 12 molten-filling cookies at 220 calories each. Adding nuts and chocolate chips increased calories, but dividing the batch into 24 portions reduced the per-unit calories.

Post-recipe thoughts
If making similar squares and using cake mix, for the "molten" caramel, I'd try a spoonable caramel ice cream topping like they use for sundaes. "Smucker's" prominently comes up in Google for ice cream toppings, even without using Smucker's for a search term. These Smucker images are making my mouth water!

Friday, December 26, 2014

Minty Choco Chip Cake Mix Cookies

My previous recipe (Choco Cranberry Sauce Cake Mix Cupcakes) used cake mix powder that I sifted white and chocolate flavors together, using half of the mixture. This recipe uses the other half of the powder. My cooky recipes are almost all about using cake mixes because of convenience. Using cake mix in cooky making is more complex than using refrigerated cooky dough, but easier than blending soft butter into cooky powder mix. Furthermore, cake mixes come in more varieties and provide more options for the imagination.

Winter time seems to bring out inclinations for something minty. Do something different than chocolate chip cookies—make the chips mint! One year, I found mint-green chips, which I haven't seen lately. This year, I ran across Andes Creme de Menthe baking chips, which have chocolate and mint-green stripes. Did not know until now that Tootsie owns Andes.

Note: Both Tootsie and Amazon offer up Andes Creme de Menthe baking chips, but their prices are WAY more expensive than the local supermarket price.

Besides using chips with varying mint strengths, have the dough flavors meet in the middle—half vanilla-ey and half chocolatey. If you'd rather not commit to buying one box each of white and chocolate mixes, buy a marble cake mix and mix the powders together. My recipe for Diff Kinda Choco-chip Cake Mix Cookies includes marble cake mix, chocolate chips, and coconut.

Onto the recipe details!

My pixstrip shows the following image areas:
  1. Implements
  2. Ingredients
  3. Combo pic:
    1. Mixed eggs and oil
    2. Mixture of eggs, oil, and cake mix
    3. Dough, with chips stirred in
  4. Raw dough in pan
  5. Baked cookies in pan
  6. Flipped cookies on a cooling rack
  7. Cooled cookies on a plate
Implements
  • Cooky pan(s)
  • Pastry blender
  • Mixing bowl
  • Measuring cup
  • Spoon for measuring out cooky dough
  • Spatula for scraping dough onto pan
  • Cooky spatula to lift and transfer baked cookies (not shown—forgot for preprep pic)
  • Cooling rack for done cookies
Ingredients
  • 2 eggs
  • 1/3 cup oil
  • 1 box chocolatey cake mix (I used half fudgy chocolate and half white.)
  • 5 oz mint chips (I used Andes Creme de Menthe baking chips.)
  • 5 oz chocolate chips
Instructions
  1. Preheat the oven to 350 degrees.
  2. Combine the oil and eggs.
  3. Use the pastry blender to stir the cake mix powder into the wet ingredients.
  4. Stir the chips into the dough. (I might have saved a little energy if I had combined both kinds of chip together first.)
  5. Use a round tablespoon to scoop the dough. Shape to rounded, level, or concave height.
  6. Drop the spoon's dough onto the cooky sheet. (For slightly flatter cookies, slightly flatten the shaped dough rounds with the measuring cup.)
  7. Bake for about 9 to 10 minutes until the edges are lightly browned.
  8. Use the cooky spatula to lift and transfer the done cookies onto cooling rack.
The yield was 57 cookies, amounting to ~65 calories each. YMMV

Recipe Deviation Suggestions
If trying out this recipe, advanced deviations include the following modifications:
  • If you want to buy only one box of cake mix instead of two for making up half chocolatey and half white dough. buy marble cake mix and sift the powders together.
  • For more mintiness, use all mint chips instead of half mint and half chocolate chips. If you want to be really gutsy, you can add some mint extract into the wet ingredients before mixing the powders in.

Friday, December 19, 2014

Choco Cranberry Sauce Cake Mix Cupcakes

This simple recipe has three ingredients besides spray oil—a 14-oz can of jellied cranberry sauce, a box of chocolaty cake mix, and eggs. (Chocolate seems to go well with just about any red fruit.) For my cake mix, I sifted a boxful of white and chocolate flavors each, using half for these cupcakes and saving the other half for a different recipe. (Batter up for the next recipe article!)

I'd Googled high and low for cake and cooky recipes that use jellied cranberry sauce. All of them seemed to call for the lumpy-cranberry type sauce. I finally took a breath and decided to forge ahead with the can of sauce that greeted me every time for many …, uh, long time when I opened the cupboard. I revisited info about possible cake ingredients for substitutions, such as applesauce. The amount of applesauce and water volume called for was similar to the cranberry.

The jellied cranberry sauce was an unknown—jelly at room temperature. I decided to spoon it out into a small mixing bowl, break it up with a spoon, and microwave it in 30-second sessions, stirring between sessions. The warm sauce did not break up well until I pureed it with the mixer.

My pixstrip shows the following image areas:
  1. Implements
  2. Ingredients and spray oil
  3. Combo pic:
    1. Cranberry sauce out of the can and into small bowl, then pureed
    2. Mixed eggs in medium bowl
    3. Mixture of eggs and pureed cranberry sauce in the medium bowl
    4. Cake mix powder in largest bowl
    5. Mixture of the ingredients in the largest bowl
  4. Batter in the cupcake pans
  5. Baked cupcakes in the pans
  6. Cooled cupcakes on a cooling rack
Implements
  • Mixing bowls
  • Cup for eggs
  • Measuring cup(s) for dispensing batter
  • Spatula for scraping batter
  • Spoon for initial breaking up cranberry sauce (not shown—forgot for preprep pic)
  • Electric mixer
  • Cupcake pans
  • Cooling rack
Ingredients
  • 3 eggs
  • 1 box chocolatey cake mix (I used half fudgy chocolate and half white.)
  • 1 14-oz can jellied cranberry sauce
Instructions
  1. Preheat the oven to 350°.
  2. Spray oil into the pan wells.
  3. Beat the eggs and set aside.
  4. Break up and microwave the cranberry sauce in 30-second sessions, the puree with mixer.
  5. Pour the mixed eggs into the warm, pureed cranberry sauce and mix well.
  6. Pour the egg-and-sauce mixture into the largest bowl that has the cake mix powder.
  7. At low speed, mix all the ingredients for two minutes, scraping the batter down with the spatula. Mixture will become thick, like scratch-cake batter.
  8. Scoop batter into the pan wells, each about 3/4 full.
  9. Bake for about 17-20 minutes. Test for doneness with a toothpick.
  10. Remove the baked cupcakes onto the cooling rack.
  11. Frost if desired.
Post-Recipe Thoughts
As mentioned, the batter becomes very thick during mixing. In dispensing it, I was apprehensive about distributing the batter into the typical 24 cupcake wells. Well, the batter did not run over the sides during baking. Tasty and moist! (Hmm, color and bready texture made me think of sweetish pumpernickel). Calories amounted to about 105 each cupcake. If you frost as ready-to-spread frostings recommend, you'll add an extra 130 calories for each.

Friday, February 28, 2014

Mini-cupcake Offload: Pan Type & Prep, Batter Amt

In case the blog article title seems oddly abbreviated, my intent is to minimize the number of characters but still convey the topic, related to my previous article about offloading fudge. For that experiment, I contrasted spray oil vs. spray oil and powdered sugar for offloading fudge, using mini-cupcake silicone and aluminum pans. That dessert requires no baking, thus, use of powdered sugar for prepping some of the pan cavities.

Initially, my experimentation idea this time was using liner papers for mini-cupcakes after baking them. The first time I tried a mini-cupcake recipe and used a silicone pan, I poured the batter into paper-lined cavities. The paper boundaries, nearly vertical, were more challenging for avoiding spills at edges. The baked cakes were instantly and easily removable. Unfortunately, some cake tend to stick to the papers, lessening the edible amount.

So, this time around, was going to only contrast spray oil vs. spray oil and flour in baking Choco Cherry Choco Chip mini-cupcakes. But then, I also wanted to see how well mini-cupcake paper liners fit the baked cakes if I varied the amount of batter—underfill (level tablespoonful) and common fill (rounded tablespoonful).

I had intended on using only silicone pans, After prepping and one of them and putting it in the oven, it occurred to me that the baking process was going to take a lot longer if I switch out several pans' worth. So, I pulled out the aluminum pans and prepped and filled them also. The second oven batch took aa bit of arranging and rearranging, with the second silicone pan and three aluminum pans. I balanced one metal pan on an oven rack ledge and another pan's edge.

The original recipe I modified for the mini-cupcakes is Cherry Vanilla Chocolate Chip Cake. Lucky Leaf pushed its canned pie filling.

A more elaborate recipe that uses chocolate cake mix is Chocolate Cherry Cake, but the baker uses the chocolate chips for the frosting and none in the cake itself.

An extremely elaborate recipe is from SugarWinzy—Cherry Chocolate Chip Layer Cake. Her one-off recipe for cupcakes is Chocolate Chip Cherry Cupcakes. My eyes glazed over from the number of ingredients and artistry.

The simplest recipe would have been using only one flavor of cake mix, but I wanted my batch to be more like milk chocolate cake. Ingredients from the Lucky Leaf recipe and my deviations:
1 16.25-ounce box white cake mix (I used 1/2 box *each* of chocolate and white cake mixes.)
3 eggs
1 21-ounce can LUCKY LEAF Regular or Premium Cherry Pie Filling (I used a different brand.)
1 cup mini chocolate chips (I used regular size chips.)
Instead of using either a bundt cake or oblong pan, I used the silicone and aluminum mini-cupcake pans, baking at 350 for only about 16 minutes each batch. I also skipped the icing part of the recipe. I considered the cakes (yield of 84) to be sweet enough naked, with less work, fewer ingredients, fewer calories.

The spray-oil only method of prepping the pans resulted in fewer instances of cakes sticking to pans than using both spray oil and flour. Originally, I wondered if the papers might be undersized with the bigger post-baked cakes. I was happy to see that the papers hugged well. Maybe the pleats of the sides help accommodate mini-cupcakes for perimeter and volume. The baking session yielded 84 mini-cupcakes.

Try the "Lemon Poppyseed Mini-cupcakes" recipe. Besides putting in a pixstrip for step-by-step instructions, I also talked about muffin vs. cupcake. Also visit Square Mini and Whoopie Muffin Experiment, the recipe where I contrast square mini-muffins and whoopie muffins for shape.