Tuesday, December 29, 2015

Bowing to Greet, Etc.

After having poked around the web about bows, and discovering lots of different conventions, I had decided that simple is good. 1) Face the other person. 2) Bring palms together. 3) Bow slightly. Look friendly by making eye contact and smiling during the bow.

February 29, 2020: I published my article about bowing in late 2015. In light of recent coronavirus (Covid-19) news, bowing to greet seems even more appropriate to consider. My Google news search results for "banning handshaking" shows concerns in workplaces and sports.

Stats, Maps, Graphs: "Coronavirus COVID-19 Global Cases by Johns Hopkins CSSE"

 Another tracking resource (Reuters): "Tracking the spread of the novel coronavirus"


In the last few years, people have more reasons to bow instead of shake hands, more so in greeting. Note the proliferation of hand sanitizers.
  • Avoid physical contact that spreads illness-inducing germs.
    A few months ago (at time of writing this article), I had a bout of digestive illness. Thankfully, the severity lasted only a few days. Web info indicated that contagiousness could last a few weeks. It seemed prudent and considerate to greet people with bows rather than handshakes. OTOH, I haven't quite resolved how to greet long-time friends with whom I've greeted more heartily since forever.
  • Avoid awkwardness of the level of appropriate physical contact. Limp handshake? Strong handshake? Strong handshake accompanied by the other hand? Embrace? Kiss? Air kiss, which can resemble a gently blown kiss? Fist bump? Dap? (Eh, should skip the hands-clasp dap during these contagious times.)
  • At events where people are eating, exchange greeting bows instead of engaging in food smears or needing to wipe hands first, which tend to be less than cleanly effective.
From https://en.wikipedia.org/wiki/Bowing
Bows are the traditional greeting in East Asia, particularly in Japan, Korea, Taiwan, China, and Vietnam. In Taiwan, China, and Vietnam, shaking hands or a slight bow have become more popular than a full bow.

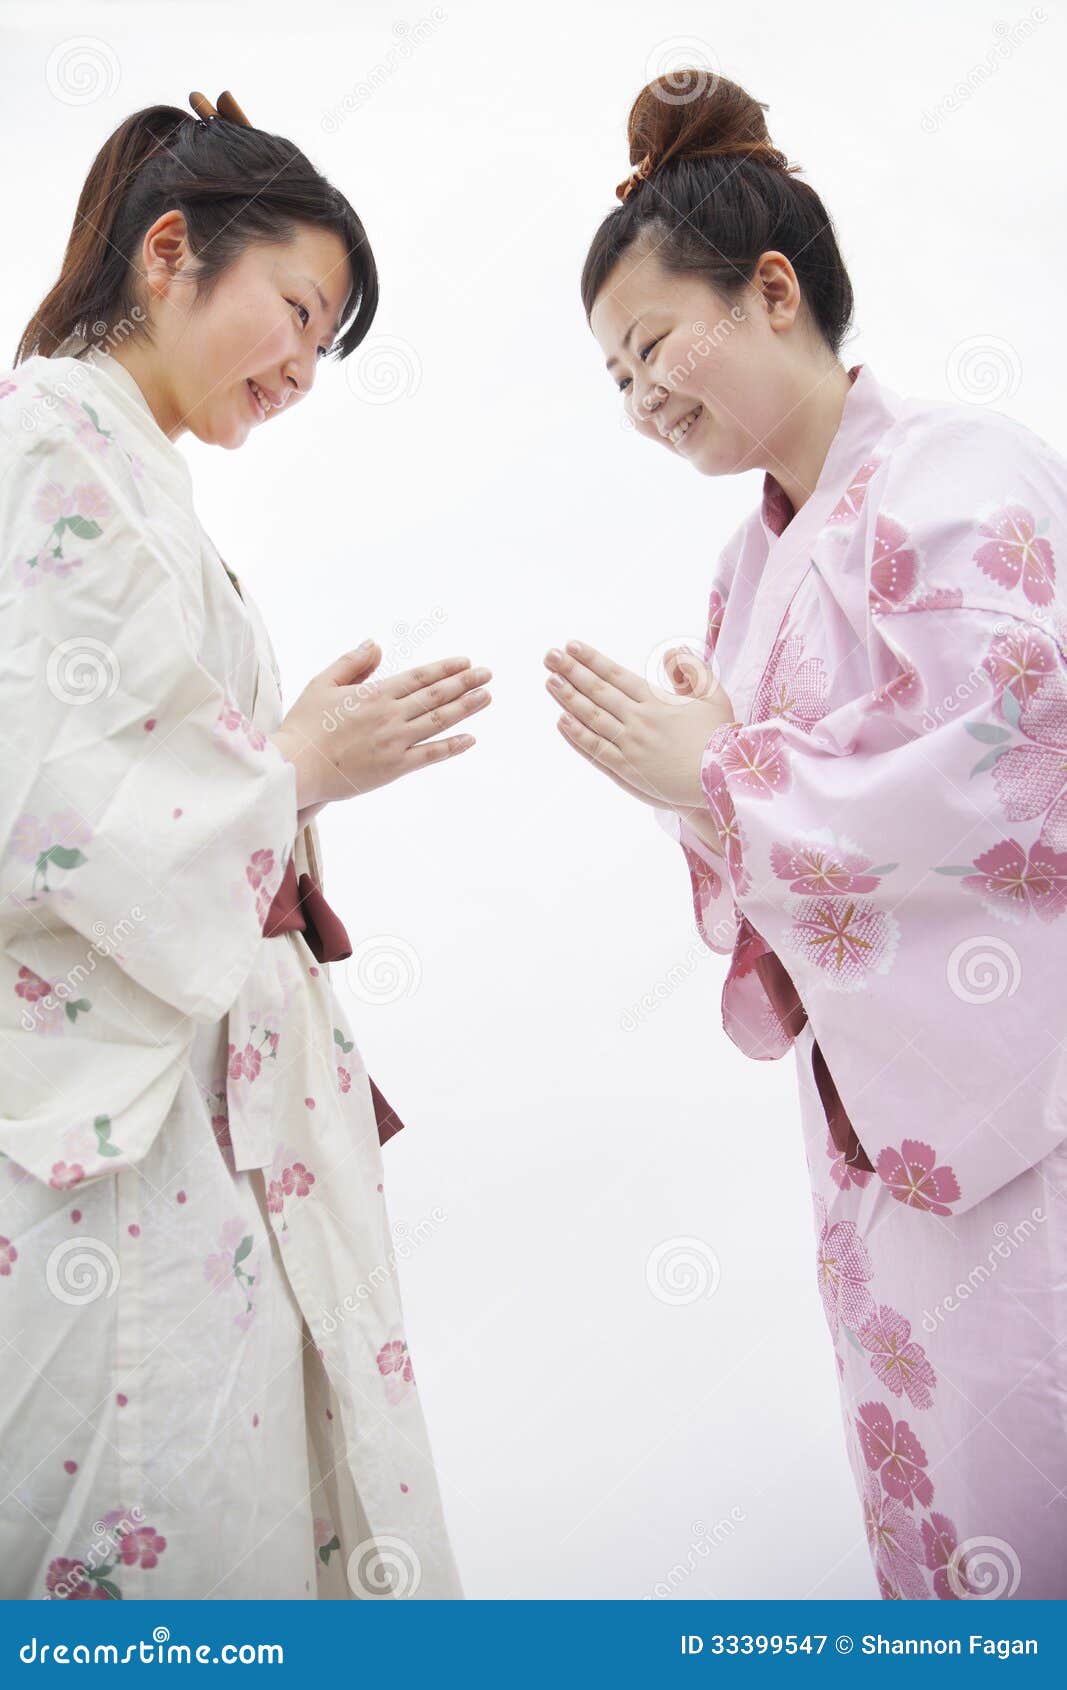
Bows can be generally divided into three main types: informal, formal, and very formal. Informal bows are made at about a fifteen degree angle and more formal bows at about thirty degrees.
While researching bows, I've run across various differences among different nationalities. For example, the "wai" bowing in Thailand involves exhaustive social settings and societal hierarchies.
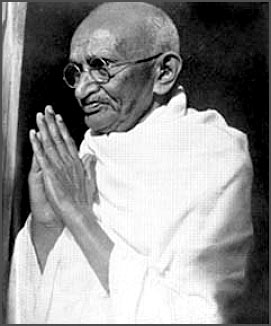
Some other images share similarities: the slight bow and palms together, some hands closer to the face than others.
Team sports, which I sporadically watch on TV, display additional contact, such as high fives and butt slaps, particularly communicating "good job", "congratulations", and "thanks". For more demonstrative celebratory contacts, actions include individual embrace and hoist, all-hands team hoists of the hero, and Gatorade keg hoist and dump onto coach.

For demonstrations of contact and no-contact greetings, watch "20 Handshakes". (Glimpses of bows are at 0:54, 1:00, and 1:07.) Watch "Professional Fist Bump" for an MD's advocacy of fist bump over handshake.

One charming gesture of thanks is Justin Yoon of Notre Dame bowing to two teammates when he successfully kicks a field goal. A video snippet of the ritual is in "FB vs Navy Highlights". The field goal segment starts at 1:08, with the ball clearing the posts at 1:10 (?). The bows and narration occur from 1:13 to 1:15. (Whew! I hunted high and low on the web to find any video that I could cite!)

Alas, Notre Dame's season ended November 29 (2015)—no more field goal bows till the following season. During my searches for images and videos of post-field goal bows, I did manage to scrape up some articles that had such bow pictures. An article that includes a good Justin bow is "Notebook: Kelly getting a kick out of Notre Dame freshman Justin Yoon".

Another article with a good bow picture is "This Guy Plays Notre Dame Football: #19 Justin Yoon":
Justin is known for his bowing celebration with both the holder and the snapper.
More bow info from "Confidence kick-starts Yoon's success":
The cheery freshman quickly built a rapport with his blockers, holder DeShone Kizer and long snapper Scott Daly. They came up with a celebration-Yoon, Daly and Kizer do a Sensei bow after every make.
Hmm, the Flickr Sansei bow seems "deep", with the hands much closer to the face than in the Notre Dame pictures. I Googled "korean bow greeting" for images, thinking Justin"s Korean heritage might exhibit some such characteristics. Well, I see images of lots of bowing, no greeter palm meets, some handshaking.

Monday, December 7, 2015

Hammacher Schlemmer Mmy Oh Mmy

Thus far, I've received few catalogs in the mail, unlike a long, long time ago in a residence far, far away. I'm guessing postal carriers don't mind the trend of fewer catalogs to lug around and deliver to recipients ("occupant" and otherwise named), who many might instantly dispose of theirs without giving them (catalogs) a glance.

WRT my article title, I'm kidding about the snail mail catalog I received last month from Hammacher Schlemmer. The cover claims "Offering the Best, the Only and the Unexpected for 167 years". Hmm, I don't believe I've ever heard of this consonant-rich (gimme an "m") company before. I paused at the slogan's weirdly capitalized nouns. I wondered if the capitalizations are a psychological gimmick for slowing the readers down and have them pay closer attention. Their slogan (or variant) pops up a LOT in their product webpages and video clips.

Gotta say, I consider HS's e-commerce website to be pretty impressive! Each page that I visited displayed reviews, suggested related items, and image enlargement capability. In many cases, the product pages included video links.

Note: No one is paying me for my good or bad words about Hammacher Schlemmer ("HS" in much of the rest of this article).

Some of the catalog offerings became entertainment for me as fodder for a blog article rather a trigger to acquire such items. BTW, I'd written a related article about gadgets in December 2009. The HS catalog reflects more modern times and items, the most prominent type (to me) being drones of varying sizes and purposes.

Bugaboo?

□ Bug-sized drones
Imagine—a drone that can float mistletoe, a quadcopter that is small enough to bug nearby people, and a similarly small "palmcopter".

□ Bug sucker and destroyer
Alrighty then! Bug out! Get a bug vacuum to suck it into place to meet its Maker! Check out the accompanying video. It's way more expensive than a flyswatter, but looks well-designed. Comes with AC battery recharger.

Getting pumped for Star Wars?

□ R2D2 humidifier
R2D2 blows his top! The same page also offers a link to the Darth Vader humidifier. R2D2 is short and squat, and the Darth Vader model is only the helmet. These humidifiers don't measure even a foot in any dimension—pretty small, imho, for the price pushing $100 each.

□ Star Wars-theme slippers, a la bunny slippers
Darth Vader, Chewbacca, and Yoda head these slippers. Maybe youngsters are out of luck for fit. Available sizes: "S (Men’s 7-9; Women’s 8-10) or L (Men’s 10-13; Women’s 11-14)"

Want convenience in holiday tree setups?

□ Popup and pullup artificial trees
Spare yourself from expending decorating time for hanging ornaments, lights, and other doodads. How about a spring-sprung popup tree, or a fancier Kincaide popup tree. How about a some-assembly-required pullup tree that's available with bulbs only, or a fully decorated one? Links for convenient storage bags ($29.95) are also offered in the product pages.

Are you a tee partier (golfer)?

□ Spectacles for spotting golf balls
Wear these glasses to spot golf balls easily. The page has three positive reviews, the oddest one recommending others purchase these glasses even though she hadn't yet tried them out.

Ready for retro for telling time?

□ Faceless, bracelet-like watch
LED watches are back! Not the 70s LED watches with black background that you need to press a button to view the digital time. No! These watches are continuous, textured bands, and you need to press a button to view the digital time! At least the older digital watches displayed the entire time on one row. For the HS watches, "The top row displays the hour and the lower row the minute ...". Zoom in images to see the innovative numerical displays!

Do the Locomotion?

□ Hoopy loopy skates
These portable people movers transport the riders like a hybrid between skateboards and skates. Video shows locomotion. Reviews are mostly positive. "Supports up to 200 lbs. Ages 8 and up." I noticed riders wearing helmets, but not pads. Oh, to be young again and fearless of falling while moving fast!

Tired?

□ Digital tire gauge
This gauge is lots fancier than the metal ones, with a price to match. Go-o-o-leeee! I've gotten sticker shock! The pencil-shape metal ones are a lot more expensive than in the old days of costing only a buck or so, with shops sometimes giving them away! Check out the Amazon page for tire gauges and weep over the metal ones!

□ Air pump
This pump looks like it's part battery-operated drill. For that matter, part of the description says "operating similarly to a cordless drill". Has digital readout, light, and psi-settable stop-pump capability.

Kitchen gadgets!
Some of these items make me think of faddish gadgets from the past, such as hot dog cookers and butter melters.

□ Battery-operated, self-stirring cup
Press the handle's button on the cup to activate the stirring mechanism.

□ Battery-operated spinning fork
Rotate the set of tines on the fork by pressing the handle. (The image does not clearly show how, and the page does not include a video.) Spins at 22rpm—slower than any vinyl records, for speed perspective.

□ Stanley Cup-shaped air popcorn popper
This popcorn air popper looks like the ice hockey trophy. I've always thought the trophy shape itself to be somewhat odd, compared to loving cup trophies. A little history of the Stanley cup explains its shape resemblance to a dairy milk can with a long neck. Hmmm, I know lots of air poppers can be had for lots less. Just Google "air popcorn popper".

□ Flameless marshmallow roaster
Hooboy! Use this electrical hybrid of toaster and fondue-ish community appliance to make s'mores the first-world way! Yet, with the mild statement "All pieces hand wash easily", somebody will need to hand wash, rather than toss the appliance parts into a first-world electric dishwasher. Love the video of the indoor campers and hearing the narrator say "Hammacher Schlemmer", which sounds like "hammacker schlammer", with the two names seeming to rhyme as they roll off the tongue.

□ Tabletop fireplace
Even though this wee fireplace is not a kitchen gadget, it's similar to the marshmallow toaster because it's small and emits heat. Good to put these two items close together in this article. Dimensions are a compact 11 x 14 x 5 1/2, yet weighs 8 1/2 lbs. The peewee appliance and replacement fuel are pretty pricey, imho. Curiously, the 24-second video is silent and "lifeless", in contrast to the marshmallow roaster one.

Sunday, November 29, 2015

Pineapple Slicing/Coring Gadget--Beyond Use Recs


On and off throughout the years, I've been using my pineapple slicer and corer (mostly referred to as "gadget" for the rest of this article), along with a knife and plate. It was a great deal when I spotted it in a bargain bin—formerly $10, marked for $2 (woohoo!). Because I use it only sporadically, I didn't include it as one of my "Frequently Used Non-electrical Long-time Kitchen Items".

For online look-sees of pineapple slicers/corers, visit here, here, and here. (OK, I'm doing a rare violation of my aversion to "here" URL pointers.)

A week ago, I bought a pineapple for $1.97. Today, I saw them for $1.50! For several weeks, the store sold them for $2.77. Seems pineapple prices have collapsed over the years. I remember having bought a few at $6 each back about 2000. The same afternoon that I bought the $1.97 one, I spotted a newspaper grocery ad for a different store for 99 cents. That ad for those pineapples did not specify "personal" size; like ones my store had tried to push the previous week. (I wasn't buying; those fruits are not easy to process.)

Between standard dissection instructions on pineapple tags and "normal" spiral-cutting instructions. I've come up with a method for fruitful (ha) yield with less hassle. My pixstrip shows the following pineapple images:
  1. First row
    1. Whole fruit and implements
    2. In sink (knife)
    3. In sink (sprayer and brush)
    4. Three parts (base, 2 other sections)
  2. Second row
    1. Upper portion, gadget cutting start
    2. Upper portion, rind trimming start
    3. Upper portion, rind trimming finish
    4. Upper portion spiral-cut section and gadget in container
    5. Gadget upside down and core trimmed, pushed in slightly
  3. Third Row
    1. Lower portion, most fruit in container
    2. Rest of pineapple needing processing—base, core, chunks (other items shown for reference)
    3. Container with all cut up pineapple on kitchen scale—approximately 3 1/2 pounds
Implements
  • pineapple slicer/corer gadget
  • two large plates (a cutting board if you prefer)
  • various knives for cutting options
  • container and lid
  • item for loosening fruit core as needed (I used cooking spoon handle, not shown.)
Instructions
Caution: Pineapples are unwieldy; maintain good grips while processing.
  1. Prepare the pineapple for slicing.
    1. Use the bread knife to cut off the top.
    2. Scour the rest of the fruit.
    3. Cut off the base for salvageable fruit from its core to the edge.
    4. Divide the rest of the pineapple at midpoint.
  2. Process the upper half.
    1. Center the gadget over the upper (smaller) half.
    2. Slowly rotate the gadget clockwise until the teeth grip the fruit.
    3. Continue motions for spiral-cutting the fruit as well as cutting around the fibrous core.
    4. Combine rotating the gadget while turning the fruit in the opposite direction can help. When the gadget reaches the bottom, it turns freely.
    5. Trim the rind away.
    6. Lift the gadget and fruit into a container, and use a paring knife to cut the section into slices or pieces.
    7. If part of the core is splayed at the bottom, use a knife to trim excess and push it toward the handle. Otherwise, remove the core and set it aside. (You CAN partially disassemble the gadget, remove the core, and reassemble the gadget.)
  3. Repeat steps a through g for the lower pineapple half. If the fruit does not slice as easily as the top half, you might need to slightly tip the fruit for better leverage in rotating the gadget. Be patient and careful as necessary.
  4. Remove the core as appropriate.
  5. Cut up the rest of the pineapple.
    1. Use a paring knife or comparably small knife to salvage fruit at the base.
    2. Slice the core into rounds if you want.
    3. Cut the rest of the pineapple into chunks.
For previous pineapple processings, I tended to use the gadget on the topless and bottomless pineapple (ooh-la-la), leaving rind on. Frugal as I am, afterward, I scavenged the fruit from the rind. The shape of the rind tended to be something of a challenge, even after cutting it into smaller pieces. With more recent past dissections, I concluded that spiral cutting was less laborious by processing two halves than the whole. YMMV for method preference.

Mmmm, fresh pineapple! Yummy, as it tastes fine for at least a week!

Don't have a pineapple slicing/coring gadget? Consult the fruit's tag. Also, Goggle for articles and videos about slicing pineapple.

Sunday, November 15, 2015

Sliced-Veggie Lentil Soup

Make an easy, robust soup that contains four veggies (1/2 pound each of carrots, celery, zucchini, and yellow squash), a 1-pound bag of lentils, and ~8 cups of water and seasonings (or broth). This recipe is a process that's a cross between making my veggie pasta and my short-cut, convenient veggie lentil soup.
  • The veggie pasta uses four kinds of fresh vegetables and other ingredients (pasta, mozzarella cheese, and parmesan cheese).
  • The convenient veggie lentil soup uses a vegetable dry-soup packet and lentils.
My pixstrip shows the following image areas:
  1. Implements
  2. Ingredients (veggies, lentils, fajita seasoning) laid out
  3. Washed, trimmed, and sliced veggies
  4. Sliced veggies in soup pot
  5. Boiling pot of veggies in front, saucepan of lentils in back
  6. Soup, ready to ladle out
Implements
  • Soup pot and lid
  • Ladle
  • Kitchen cooking spoon
  • Strainer
  • Saucepan
  • Plate for veggie handling
  • Paring knife
  • Peeler for carrots
  • Temporary bowls for sliced veggies if you want (not shown)
Ingredients
  • 1/2 pound each of the following vegetables: carrots, celery, zucchini, yellow squash—washed, trimmed, and sliced
  • 1 pound of dry lentils, rinsed and drained
  • Seasoning (Fajita seasoning works well. Also ok to refer to lentil package recipe for info.)
  • 8 cups water for soup—YMMV for the amount you eventually use.
Instructions
  1. Wash, trim, and slice the veggies. (My own favorite slicing device is my Presto Salad Shooter, which I've had since the early 90s.)
  2. Pour the veggies and water into the soup pot.
  3. Wash and drain the lentils, pour into saucepan with enough water to cover them. (OK, I'm squishy about the total amount of water.)
  4. Bring both pots to boil. If appropriate, watch to ensure contents don't boil over. Skim froth as necessary. Pour lentils into the soup pot; turn down heat to simmer. Season to taste.
Note: The heating process can take about an hour. The lentil bag instructions say bring to boil, reduce heat to low, cover the pot, and simmer for 35 minutes until lentils are tender.

Post-recipe Thoughts
The veggie preparation (wash, trim, slice) can take longer than anticipated—maybe an hour in addition to another hour for soup boil and simmer. Natural stages to break up the recipe process:
  1. Preparing the veggies, lentils
  2. Combining, heating, seasoning
As holidays are coming around, omnivores can easily incorporate use of leftover turkey or ham—
  • Use broth that you make instead of just water (adjustment for salt as appropriate).
  • Add leftover meat (2 cups or more of leftover turkey or ham pieces—you know, mostly oddball sizes that you chop into consistent bites or nibble sizes).
Suggestion: Freeze excess soup in suitable serving size containers so you don't feel compelled to consume it in consecutive days till done.

Saturday, October 31, 2015

Simply Simple Pineapple Cupcakes

How about pineapple cake that isn't upside-down cake or coconut-pineapple combo (piƱa colada-ish)? This recipe uses a standard recipe for yellow cake mix and crushed pineapple. Pineapple juice replaces the water. If you want to try an easy scratch recipe, visit "EZ Pineapple Cupcakes".

My cake recipes are usually for cupcake or mini-cupcake/muffin serving sizes; portions and handling are convenient for groups of people. They also take a lot less time to bake than sheet or round pan cakes. I can't work up enthusiasm for making a pineapple upside-down cake—too much mess and hassle for me, I guess.

I originally planned to try the bundt cake recipe that called for adding pudding, which I referred to in my "EZ Pineapple Cupcakes". This Dole recipe made my eyes glaze over, especially the need for 4 eggs and 3/4 cup of oil.

Fortunately, I spotted a related but more intriguing recipe. Although I want to bake a pina colada-type cake, I'm glad I read enough of the recipe to spot the part about replacing water with pineapple juice.

My pixstrip shows the following image sections:
  1. Initial preparing
    1. Implements
    2. Ingredients
    3. 20-oz can of pineapple (measured for juice and divided fruit). Note: I squeezed the fruit a LOT to obtain the 1 cup of juice I needed.
  2. Mixing
    1. Bowl with eggs, cooking oil, pineapple juice ("wet" ingredients)
    2. Lightly blended "wet" ingredients
    3. Cake mix powder poured onto the blended "wet" ingredients
    4. Mixed
    5. Pineapple poured onto the mixture
    6. Mixed
  3. Baking
    1. Batter in pans
    2. Baked cupcakes
    3. Cupcakes turned over onto cooling racks
    4. Cupcakes in tins (8 cut into halves and in checkerboard placement with the other 16)
Implements
  • mixer
  • medium-large mixing bowl
  • rubber spatula(s)
  • measuring spoon
  • measuring cup(s)
  • spoon and bowls for divided pineapple, measuring cup or jar for juice
  • cupcake pans (Use different size pans if desired, following baking time suggestions on the cake mix box.)
  • cooling rack for baked cupcakes
Ingredients
  • 1 box (16.5 oz) yellow cake mix (I used Duncan Hines Classic Yellow cake mix.)
  • half of well-drained crushed pineapple (6 to 6 1/2 ounces)
  • eggs, number as listed on cake mix box (3)
  • cooking oil, amount as listed on cake mix box (1/3 C)
  • pineapple juice as replacement for the water called for on cake mix box (1 C)
  • spray oil
Instructions (Have the cake mix box handy!)
  1. Preheat the oven (350°).
  2. Prepare baking pans with spray oil. (The box says to use baking cups for cupcakes, but I didn't.)
  3. Lightly blend the eggs, juice, and oil.
  4. Pour the cake mix powder into the bowl of liquids and beat as directed.
  5. Pour the crushed pineapple into the batter and blend.
  6. Distribute the batter into the baking pans. (Cupcake wells will be almost full.)
  7. Bake for time recommended (18-21 min for cupcakes). Test for doneness with toothpick.
  8. Remove the pans of baked cupcakes and place on cooling racks (~15 min).
  9. Place cakes upside down onto the racks. You might need to use a knife to loosen cakes from wells.
  10. When the cakes are totally cooled, you can serve them up (with or without frosting), or pack them up.
The recipe yielded 24 whole cupcakes. I cut 8 in half, then arranged all of them in checkerboard pattern. People can pick half size, full size, or combination cupcakes.
Post-Recipe Thoughts

 White Cake Mix Instead of Yellow Cake Mix
The day after I made the cupcakes with yellow cake, I tried the same recipe with Duncan Hines Classic White cake mix. I used the other half of the crushed pineapple and added 1 cup of canned pineapple juice. I also added 8 drops of yellow food coloring before I folded in the pineapple, but the outcome was still paler than using yellow cake mix. Interestingly, the white cake mix calls for 1/4 cup of oil instead of 1/3 cup for the yellow cake mix. The calorie amounts reflect the difference in oil amount.

The table contrasts calorie amounts for yellow vs. white Duncan Hines cake mixes that I used.
Ingredients yellow white
prepared mix
2750
2400
pineapple
93
93
juice
130
130
total
2983
2623
each cupcake (1/24 cake)
~125
~110

EZ Pineapple Cupcakes vs. Using Boxed Cake Mix
The process for the scratch vs. cake mix pineapple cupcakes mainly differs for mixing methods. Scratch requires gentler batter combining, and cake mix requires more vigor. The scratch results were moister than using cake mix. The calories for scratch is 125 (assuming 2 cups of sugar), same as for yellow cake mix. I skipped frosting the cake mix cupcakes to minimize calories and extra effort. I had also passed on adding extract.

Saturday, October 10, 2015

Stuck Blender Blade?


Does your blender blade seem stuck and not moving? Before you buy a new blender or blender blade, test for non-function, then try a home remedy of FIRST resort.

I'd had my Osterizer blender for, uh, awhile. It's one of my devices I refer to in my "Frequently Used Electrical Long-time Kitchen Items" article. A couple of weeks ago, I thought about using it to puree some canned beans for bean soup. As I hadn't used the appliance for a couple of years, I decided I should wash out the non-electrical parts.

When I removed the blade assembly and tried to gently rotate the blades around its disk, I winced when it didn't turn. I had a familiar, sinking feeling that the assembly froze up, same as its predecessor from maybe at least a decade or so. My recollection is that the replacement part cost half or more than half of a new blender—ten-ish or so dollars, at a bricks-and-mortar appliance repair place.

This time, I tried out a process that I distilled from some posts at "My blender blade is not turning?". The most helpful comments were by ceanothus, Andy, Jeffrey F, and Moondog. If your blender blade assembly sticks like I described, try my quick, no-cost home fix ("unsticking" procedure).


 Unsticking a Stuck Blender Blade Assembly

A: Confirm that the Blade Assembly Does Not Swivel
The first row of images shows the assembled and plugged-in blender, the top view with lid removed and blades viewable, and separated parts in the order they belong.
  1. Remove the blade assembly from the appliance, and gently try to swivel the blades on its disk. If nothing moves, follow this article's steps to safely "unfreeze" the mechanism.
  2. Plug the appliance in, then press Pulse to confirm that the blender's shaft rotates freely. This action helps confirm that the blade assembly is at fault.
  3. Re-assemble the appliance, and press Pulse just long enough to confirm that the motor hums but the blade doesn't move (perceived stuck), more confirmation that the blade assembly is at fault.
  4. Separate parts again.
B: Use Boiling Water for Loosening the Parts of the Blade Assembly
The second row of images shows a saucepan of boiling water, then the pan with the blade unit right side up, alongside a spoon for retrieval. This process dissolves residue that might be stuck in normally movable parts.
  1. Bring about 1 1/2 to 1 3/4 inches or more water to a rolling boil. The water level should be high enough to submerge almost all of the blade assembly.
  2. Use a spoon or tongs to gently lower the blade assembly into the pan, disk side down.
  3. Boil the blade assembly for 3 to 5 minutes.
C: CAREFULLY Clean the Blade Assembly and Manually Swivel It
The third row of images shows the blade assembly after its removal from the pan.
  1. Use a spoon or tongs to remove the blade assembly from the pan of boiling water, placing it on a cloth (terrycloth ok).
  2. Using extra care to avoid hurting yourself with the hot and sharp blades or disk part, wipe the blade assembly dry. You should now be able to easily twist/swivel the blades from the disk part.
  3. Carefully wash the blade assembly by hand with soap and water, and wipe dry. Confirm that the assembly still turns freely.
D: Re-assemble the Blender
The last row of images shows the re-assembling of the blender parts. Suggestion: Before re-assembling, wash all other washable blender parts.
  1. Re-assemble the parts in the order as shown. (The second image shows the jar and rest of the parts turned upside down. Be sure that the gasket is between the jar and the blade assembly.)
  2. Plug the blender in, and press Pulse to confirm that the blade assembly spins.

Periodically (monthly to annually), check that the blade assembly still freely spins. If not, try the "unsticking" procedure.

Want to peruse Oster blender spare parts? Also visit eye-catching bundling at Oster and Walmart: blade assembly, sealing rings (gaskets), bottom cap (which contains the jar items and seats onto motor unit), lid and filler cap (that might not work on your blender). Priced at just over $10, these kits cost much less than buying piece parts separately. YMMV WRT other possible sources.

For non-Oster blender parts, do a Google search for "blender parts [product name of your blender]".

Mounting Mason Jars instead of Blender Jars
In poking around for info about the blade assembly, was unable to find any about the blades, metal base, and bearing collar (?). However, I ran across images of Mason jars near or on blenders. Visit articles that describe using these jars to make their smoothies with instead of using the standard blender jars.
Caution: Firmly place a hand on top of the unit during blending to prevent the jar from unscrewing from the base cap.

Monday, September 28, 2015

Some Words (Homonyms) and Non-synonymous Antonyms

Ever thought about words that have more than one antonym, and that those antonyms are not synonyms to each other? As an example, during a car ride, one word that I am often cognizant about is "right". The best word to confirm a traffic turn is "correct", not "right", especially if turning left.

From Merriam-Webster:

antonym
a word with a meaning that is opposite to the meaning of another word

synonym
a word that has the same meaning as another word in the same language
a word, name, or phrase that very strongly suggests a particular idea, quality, etc.

In the following 18 common words with antonym pairs, for two cases, I list "ordinary/normal" for antonyms, as those antonyms are somewhat synonymous with each other.

left
RIGHT
wrong
right
LEFT
arrived
soft
HARD
easy
fall
RISE
set
spring
FALL
rise
cold
HOT
mild
less
MORE
fewer
gain
LOSE
win
small
GREAT
horrible
stranger
FRIEND
foe
familiar
STRANGE
ordinary/normal
even
ODD
ordinary/normal
heavy
LIGHT
dark
sad
HAPPY
angry
happy
MAD
sane
tall
SHORT
long
thick
THIN
wide
coarse
FINE
ill

While I jotted down words and antonyms, a few related word ideas popped up. Because I don't foresee writing up a separate blog article for them separately or collectively, I'm including these miscellaneous thoughts here.

scan: visually skim vs. using a machine to read an image

round shape: circle (2D) vs. sphere (3D)

2D confusion—pane vs. panel

From "Re: Pane or Panel ?":
A pane is a (usually) independently scrollable subsection of a window. It's what you get, for example, if you drag the splitter bar in a Word window.

A panel is an object that is used to group controls and other objects. It is often but not always dragable, occasionally resizable or scrollable. Most toolbars, for example, consist of a panel with buttons. Panels may or may not have a visible border.
From "window pane/panel":
Example: your window is 2 meters in width. The curtains come in 0.5m panels. You will need to buy four panels to cover the window with curtains.

Panels are made of fabric. Panes are made of glass.
As a final thought, I suggest a practical colloquialism to replace "practicable"—"doable". Although "practicable" seems to have finer granularity for definitions, I myself prefer "doable". BTW, I avoided using either word in technical writing.

October 5, 2015 Update

In a discussion about this article on the Publishing and Editing Professionals LinkedIn Group, a commenter pointed out that my 18 words are actually homonyms. Sure enough, one Merriam-Webster definition is "one of two or more words spelled and pronounced alike but different in meaning".

One of the other definitions is "homophone". Merriam-Webster's definition for "homophone" is "a word that is pronounced like another word but is different in meaning, origin, or spelling". Note the additional condition, "spelling". Thus, homophones are a special kind of homonym that often trips up people when they use the incorrect soundalike. And spell checkers don't even flag such words because they're real words.

Friday, September 18, 2015

Pancake-mIx Baked Donuts

My recipe makes 6 baked donuts, using pancake mix, water, and decorative sprinkles. Why only 6? Coz they're quicker to consume so that fewer might get stale. Also, good way to avoid overconsuming in a short time. Besides, I have only one 6-dunut pan and haven't felt inclined to acquire a second pan. Why baked? So you don't need to use a lot of oil and have a lot of it left over. Why pancake mix? For convenience of gathering and measuring fewer ingredients.

Initially, I had spotted an intriguing Parade Magazine recipe for baked donuts. After finding the online version, I googled other baked donut recipes. The Parade recipe started to lose its appeal—requirement of 9 items (too many for my taste), one being a different kind of flour than all-purpose. Turns out that many ingredients are used in pancakes.

I started googling for baked donuts that called for pancake mix. For my recipe, I inferred some processes, using minimal items. My pixstrip shows the following image areas:
  1. Implements
  2. Ingredients
  3. Bowl and mixing utensils used, batter in 6-donut pan
  4. Batter with sprinkles
  5. Baked donuts
  6. Donuts on plate, two cut open
Implements
  • Medium mixing bowl
  • Wire whip
  • Measuring cup for pancake powder
  • Measuring cup for water
  • Measuring spoons (just in case of needing any)
  • Spatula for scraping batter
  • 6-donut baking pan, available in crafts stores or online
Ingredients
  • 1 C pancake mix powder
  • 1 T sugar (Had omitted, but recommend, based on my outcome.)
  • 1/2 t vanilla (Had omitted, but recommend, based on my outcome.)
  • 2/3 C water
  • Sprinkles (nonpareils and jimmies shown)
  • Spray oil
Instructions
  1. Preheat the oven to 350°.
  2. Spray pan with oil, including the donut hole "posts".
  3. Stir pancake mix and water together in bowl.
  4. Dispense the batter evenly into the pan wells, about 1+ heaping tablespoon each.
  5. With finger, clear the batter off the "posts".
    Note: Several baked donut recipes say to pour the batter into a zipper bag and pipe into the wells.
  6. Sprinkle the decorations you want. (I sprinkled nonpareils in one row and jimmies in the other row.)
  7. With finger, clear the sprinkles off the "posts".
  8. Bake for about 15 minutes. Test for doneness with a toothpick.
  9. Note: If you're leery of raw batter spilling onto the oven, place a larger pan below the donut pan. In my case, the donuts did not spill over.
  10. Remove the donuts from the oven and let cool before using two spoons to lift and remove each from pan.
Post-recipe Thoughts
These donuts were less sweet than I expected, despite adding the sprinkles. One factor might be that I used buttermilk pancake mix instead of non-buttermilk. For future pancake-mix baked donuts, I would use non-buttermilk mix, add maybe an extra tablespoon of sugar, and add 1/2 teaspoon of vanilla.

As for the decorations, some nonpareils, because of their spheroid shape, tended to roll willy nilly when I didn't aim well as I shook them onto first row. I might use only jimmies for future batches, maybe measuring and stirring 2 tablespoons into the batter before dispensing into the wells.

Nutrition: Calories for each donut is about 90; sodium is about 200. Check out nutrition tables for Krispy Kreme and Duncan Donuts.

Cost considerations: My pancake powder cost less than $1.50 for 32 ounces (~7 1/2 cups), lots less expensive than scratch ingredients, and way less expensive than similar recipes using cake mix. This half-dozen donut batch cost about 20¢ (a smidge over 3¢ each). The decorations add a nit extra cost. (Consider how much convenient store-bought donuts cost these days.) If you don't have a donut pan, consider buying one and economize for future donuts.

Related articles from me:
Related articles from others:

Additional pancake-theme articles:

Monday, August 31, 2015

PB & Jammin' Sandwich Mysteriously Not Findable on the Web

PB&J and slight variations of the abbreviation are conventions to mean peanut butter and jelly sandwich, a food item going back over 100 years, according to "11 things you didn't know about peanut butter & jelly".

What's mysterious to me is that I've been unable to unearth "PB & Jammin' Sandwich" online for recipe title or for the recipe ingredients. Including quotation marks in my search doesn't significantly increase prospective hits. Furthermore, the online prospective recipes that I did view don't call for the hardcopy recipe ingredients of peanut butter, jelly, bread, and Libby's pumpkin. (The "PB & Jammin' Sandwich" hardcopy recipe was in a coupon pack a few weeks ago and also in a supermarket freebie magazine more recently.) Yet, only by adding "pumpkin" to the search field do the search results improve somewhat.

The three following sandwich recipes list bread, peanut butter, pumpkin, and bananas for ingredients, but no jelly.
Adding "jelly".to my Google search does not yield useful hits. Nor does adding "HEB" or "Libby's". Searching through recipes pages for Libby's and also HEB's do not yield any recipe pages for the peanut butter and jelly with pumpkin sandwich. What gives? Why is this hardcopy recipe not findable on the web?

The hardcopy recipe pages for both coupon pack and HEB magazine call for peanut butter, Libby's pumpkin, jelly, and bread. The preparation is the same—mix half each of peanut butter and pumpkin, then spread the mixture and jelly onto bread slices.

How appealing could such a sandwich be? Would you prepare and eat one? Prepare it for family? Contrasting the promo blurbs for the recipes, would people warm up to subbing half the peanut butter in a PB&J sandwich with pumpkin, whether canned or not?

Blurb from coupon pack recipe:
When you add LIBBY's 100% Pure Pumpkin to PB&J, you get a sandwich that's delicious, nutritious and filling. The kids won't even taste the difference, and you'll feel good knowing that they're getting protein with nearly half the fat.
Blurb from HEB freebie magazine:
Serve a better PB&J. This delicious and nutritious lunchtime makeover delivers essentials like protein and fruit. And for something a little different, try the pumpkin-peanut butter spread on celery or tortillas.
In the first blurb—"The kids won't even taste the difference", the statement indicates to me that if the "kids" know that the peanut butter is not ALL peanut butter, they might not bite. The second blurb touts deliciousness, nutrition, protein, and fruit. This statement looks to be an appeal targeted to grownups.

Now channel the kid: How appealing does this sandwich sound? Pumpkin AND peanut butter with jelly? Besides the odd combination, which I have not found online, the preparation is at least a smidge more complicated than just scooping and spreading peanut butter. A preparer actually needs to measure and mix these two ingredients before spreading, using additional kitchen implements!

For those who really want to mix their peanut butter with pumpkin, visit "8 Ways to Get Your Pumpkin-Peanut Butter Fix". If you insist on trying the PB&J and pumpkin sandwich recipe, click either or both recipes that I've mentioned (from coupon pack, from HEB magazine).

Bon appetit!

Sunday, August 16, 2015

Pokin' Ripped Jeans

Have you bought new holey pants for yourself? For someone else? If so, what's your rationale? Eh, one time last year in a donut shop, a woman (not in teens) walked in wearing a pair of holey-knee jeans. I almost wondered if I should slip her a few bucks so she could put them towards buying an unworn pair. Apparently, the trend of ripped jeans has been around for awhile. From "The History of Ripped Jeans", a key sentence:
"What was once a poor man's pant, now sells for anywhere between $50 - $300 and up, sometimes."

"Denim Trends 2015: Ripped Jeans For Women" shows 17 images of holey jeans on female forms from waist to hem. Furthermore, the article has links to go to additional sites. Ow, my eyes! It's hard for me to believe that holey jeans are considered mainstream fashion.

I'm not buying into the ripped jeans trend myself. I actually threw away a pair of old jeans last year. Now I wonder if I should have auctioned them off—the knees weren't holey, but the waist, inseam, and hems were frayed or threadbare. Ebay has a page that is thick with ripped jeans. "Ripped jeans, also called distressed jeans or boyfriend jeans, are actually more fashionable and popular for men and women than jeans that are brand new."

The last few years of mall walks and seeing holey jeans at Abercrombie and Fitch had made me muse that shoppers could get more serviceable jeans at Goodwill or Salvation Army—and probably pay lots less. The tipping point that inspired me to seriously consider writing about ripped jeans was recently seeing an Express Jeans video ad on the Beauty and the Beast TV series.

During a mall walk within a few days, I noted additional storefronts besides A&F that displayed ripped jeans. The idea of writing about the jeans percolated more. A followup mall walk, armed with camera, provided more opportunity to collect pix. Whew! Can hardly believe I snapped so many, which the pixstrip reflects!

As part of info and image gathering, I browsed through the previous Sunday's back to school sales print ads. I spotted a pair of ripped jeans ad for Kohl's. Can't find the ad online, but I did see a link to an Urban Outfitters website. Holey moley—"PRPS Goods & Co. Demon Slim Rip Repaired Jean $350"!

Stores that seemed to be staying off the ripped jeans bandwagon, at least in storefront windows and print ads were JCPenney, Macy's, Sears, Target, and The Gap. Hmmm, the journey from pre-wash to pre-rip could be a small hop. YouTube actually has videos (lots!) for DIY ripped jeans.

Monday, July 27, 2015

Low-Sodium Scratch Biscuits

A few weeks ago, i made scratch biscuits. Afterward, I calculated the amount of calories and sodium. (I used salted butter for the fat option and did not reduce the added salt.) I was surprised by the amount of sodium. The amount of sodium in the batch of 14 cut biscuits was 4600 mg (329/biscuit). The FDA provides information about salt consumption and methods for lowering it. Note: "The amount of salt in a food is listed as “sodium” on the Nutrition Facts label that appears on food packaging."

Sodium
I found some ways to reduce sodium in a future recipe.
  • Reduce or eliminate sodium in baking powder.
  • Reduce added salt when taking salted butter into account.
  • Use the finer granularity popcorn salt—thinking that it might dissolve more quickly and completely in dough than table salt—more flavor bang.
Common in many scratch biscuit recipes is using three teaspoons of baking powder. Almost all baking powders have 60 mg sodium per 1/8 teaspoon—1440 per biscuit batch, about 100 mg per biscuit. Hain Pure Foods Featherweight Baking Powder uses potassium instead of sodium. This product is more expensive and not as readily available as regular baking soda. Amazon reviews are helpful for product satisfaction, quantity substitutions, and availability at Whole Foods.
Salt info websites:
Fats
Fats called for in biscuits include salted butter, unsalted butter, margarine, shortening, and lard. Various recipes list a choice of salted and unsalted fats without addressing sodium adjustments. By personally perusing nutrition tables, I noticed that most salted butters and spreads would add about 720 mg of sodium to the recipe (~51 mg/biscuit) without regard to additional salt.

Various websites state that unsalted butter tends to have fresher ingredients than salted butter. In any case, if you choose to use salted butter in recipes, you should reduce the amount of added salt. For the biscuit recipe, I called for a conservative 1/2 teaspoon of popcorn salt. If you use salted butter, maybe use only 1/4 teaspoon salt.

Shortening and margarines have trans fats, in case you want to avoid them. Some margarines list 0 grams of trans fats. Note that all these fats list 1 tablespoon is one serving, and that if the amount of trans fats is less than .4 gram, companies can round off and show 0 to be the amount.

If you are a vegetarian (not a vegan), you can, in good conscience, consume butter. Related article: "12 Seemingly Vegan & Vegetarian Foods That Really Aren't"

Near the bottom of this article, look for calorie and sodium stats for ingredients.
My pixstrip shows five main image areas:
  1. Implements
  2. Ingredients
  3. Start of the process that is common to both drop and cut biscuits (milk excluded)
  4. Process continuation—1/2 amount recipe, drop biscuits
  5. Process continuation—1/2 amount recipe, cut biscuits
Implements
  • Group 1
    • Cups to measure with
    • Medium mixing bowl
    • Plate (optional for grating butter onto)
    • Forks for tossing grated butter into the dry ingredients
    • Pastry blender
    • Measuring spoons (various sizes as needed)
  • Group 2 (Item to cut or grate butter with—I used my salad shooter. Using a cheese grater is OK.)
  • Group 3 (bowls for separate drop and cut biscuit doughs—unnecessary if making only one kind)
  • Group 4 (baking pans)
Ingredients
  • 2 C all-purpose flour
  • 4 t no-sodium baking powder
  • 1/2 t popcorn salt
  • 1/2 C unsalted butter
  • Milk (1 C if drop biscuits, 3/4 C if cut biscuits)
Instructions, Initial
  1. Preheat the oven to 400°.
  2. Measure and pour the dry ingredients into the main mixing bowl, stirring them together with a pastry blender.
  3. Grate the butter into the dry ingredients (plateful of grated butter shown in pixtrip).
  4. Use two forks to toss the items together thoroughly, avoiding warming the butter.
  5. Use the pastry blender to fine-blend the mixture.
Instructions, Drop and Cut Recipe Differentiation
  1. Divide the dough evenly from the previous step into two bowls.
  2. Note: The pixstrip shows separate sections for 1/2 recipe each for drop and cut biscuits. If making only one type, don't bother dividing the dough.
  3. Use pastry blender to blend in milk.
    •  
    • □ Half-recipe drop biscuits, 1/2 C
    • □ Half-recipe cut biscuits, 3/8 C
    •  
    • □ Full-recipe drop biscuits, 1 C
    • □ Full-recipe cut biscuits, 3/4 C
    •  
  4. Continue steps for biscuit shapes as desired.
Shaping, Drop Biscuits
  1. Use the forks to collect and shape dough balls onto the pan(s).
  2. Bake for about 10-14 minutes.
Shaping, Cut Biscuits
  1. Place dough into lightly floured pan(s). Sprinkle flour on top, press to ~1/2 inch thick, fold; repeat at least three times. (I encountered some recipes that called for up to 10 times of similar kneading.)
  2. Cut shapes with biscuit cutter, cooky spatula, drinking glass, or other means and arrange on the pan. (Some recipes called for cutter diameters from 2" to 3". A plastic shape I used had once held icing from a tube of Pillsbury refrigerated cinnamon rolls.)
  3. Bake for about 10-14 minutes.
Post-Recipe Thoughts
The biscuits came out paler that I expected. Maybe the next time, I'll raise the temperature or bake longer. (I didn't want to overbake and dry by adding 4 minutes.) And although not as salty as I might have wanted, I could always spread salted butter.

I'm not sure that using popcorn salt, with its finer granularity, is more effective than ordinary table salt. Sure, it's more expensive, as is the potassium baking powder. The table shows, however, that the butter is the costliest ingredient. In the big picture, homemade biscuits are way cheaper than refrigerated biscuits or getting them from a bakery or eatery.

Contrasting Costs of Biscuits Using Regular and Specialty Baking Powders and Salts
low-sodium $ reg ingred $
Flour
.20
.20
Potassium baking powder
.51

Regular baking powder
.08
Popcorn salt
.03

Table salt
.01
Unsalted butter
.75
.75
Nonfat milk (1 C, drop)
.25
.25
Nonfat milk (3/4 C, cut)
.19
.19
Full batch of 14
drop
1.74
1.29
cut
1.68
1.23
Individual
drop
.12
.09
cut
.12
.09

The drop biscuits are way easier and require less effort and time to make than the cut ones. The difference in calories between drop and cut biscuits is negligible, about 2 or 3 calories each biscuit.

Regarding sodium, using a recipe that calls for 3 teaspoons of regular baking soda and a teaspoon of salt instead of my recipe adds 2640 mg sodium per batch, about 189 mg extra per biscuit. And who eats only one biscuit per sitting? :-)


Stats for Calories and Sodium
Ingredients Calories Sodium (mg)
flour (2 C)
800
0
potassium baking powder (4 tsp),
Hain Featherweight
0
0
popcorn salt (1/2 tsp),
Kernel Season's
0
940
unsalted butter (1/2 C)
800
0
milk 1 C, for drop biscuits
80
107
3/4 C, for cut biscuits
60
80

Biscuit Quantity Shape Calories Sodium (mg)
Full batch of 14
drop
1680
1047
cut
1660
1020
Individual
drop
120
75
cut
119
73

Further Considerations
Potassium and sodium balance: "The trade-off for no sodium is every teaspoon of this baking powder has 500-600 milligrams potassium. That could be a problem for people with kidney disease whose potassium is running high, or someone taking blood pressure medicines that save potassium in the body."

Grating butter: Most biscuit recipes call for cutting the fat into the dry ingredients. I saw two recipes that called for grating cold butter—one for drop, and one for cut biscuits. Grating makes sense to me for easier and more thorough blending of ingredients. My salad shooter did a decent job of grating and also preventing butter warming from hand contact.

Wednesday, July 15, 2015

Frequently Used Electrical Long-time Kitchen Items

Do you have kitchen gadgets or appliances that you you've had for a long time and still frequently use? I previously wrote about non-electrical kitchen items. This time, I talk mostly about electrical appliances, such as my popcorn air popper and salad shooter.

Wearever Popcorn Pumper 72000
This hot-air popcorn popper is listed as vintage, and having come out around late 70s, before microwave popcorn. This model has the butter warmer at the base rather than at the chute (73000). Looking at a webpage of poppers for sale, some people state usability for roasting coffee beans.

Works great still, and I use it several times a month. Instead of the included butter warmer, I microwave butter in a glass cup with a piece of wax paper covering the top. Yeah, more work, but I prefer to not put the aluminum warmer in the dishwasher.

Presto Salad Shooter
This appliance works like a portable food processor with a lot less bulk. I use it pretty much weekly, since the early 90s. It's great for slicing carrots for salads and multiple veggies for making veggie pasta.

Although the shooter has multiple cutting and grating cones, I use the slicing one the most often. Over the years, I'd put various cracks in the original slicing cone, Read my article for details of finding and buying the replacement cone (good purchase experience).

GE Hand Mixer
I've had a few mixers over the years. This one is maybe 10 years old; the previous one had a plastic free-rotation stand. This appliance gets the job done. It has only two speeds, and the beater blades sometimes don't lock easily. (I've never felt the urge to get a high-end muscly machine.)

Osterizer Blender
Hooboy! It's been in my household since the 70s! Over the years, I've used it weekly, but sometimes I've neglected it for long periods of time (years?). I used to use it frequently for pureeing chunky salsas. (I'm not wild about chunky salsas or similarly chunky pico de gallo. I've used it for chopping up ice and also blending hot butter into egg yolks for hollandaise sauce.

Maybe 15 years ago, the blades wouldn't rotate. Maybe I didn't fully dry the blade unit after handwashing it. I reluctantly bought a replacement, not thinking it sensible to buy an entire new blender.

GE 700-watt MIcrowave Oven


Yes! Only 700 watts! I've had this oven for about 25 years. It's so low- powered that most microwave meals list instructions for 1000 to 1100-watt ovens. Pretty much, if I'm doing a frozen meal, I add about 50% more time. A couple of the rack brackets are gone or broken, so I don't use the rack anymore. The lack of a full set of brackets don't seem to affect heating performance or make the oven unsafe to use.

Do you have appliances that you've had a loooong time that you still use regularly? How about sporadically? Eh, I have some electrical and non-electrical items that I use very infrequently or still haven't tried, but I'm not going there. :-).


Frequently Used Non-electrical Long-time Kitchen Items (June 2015)
Frequently Used Electrical Long-time Kitchen Items (July 2015)
Frequently Used Kitchen Items--Vintage, Newer (article, video)

Monday, June 29, 2015

Frequently Used Non-electrical Long-time Kitchen Items

Do you have kitchen gadgets or appliances that you you've had for a long time and still frequently use? These non-electrical kitchen items are so old that some are practically considered classics—many not available off the shelf anymore. I've had them sometime between about 15 years and, uh, a few decades. And I use them several times a week—maybe occasionally skipping only a week.

Tupperware Measuring Pitcher
This pitcher with spout and handle can hold up to 8 cups or 2 liters, with room to spare. The lid has a hinged overhang for storing excess liquid or batter. I use it often for mixing up pancake batter and easily pouring it onto a pan. In case you get nostalgic, maybe even want to buy any, some of these pitchers (and similar) are available on EBay.

Glass Food Jar with Measuring Marks
When was the last time you saw glass peanut butter jars with measure marks? Seems all these jars are now plastic. The one I use has a capacity of two cups, not counting the threaded area. One side of the jar shows 1/4-cup increments, and the other side shows 1/3-cup increments.

I use my jar often for making French toast batter (1/2 C milk, 2 eggs, 1 T sugar, 1 t cinnamon), which wets about 4 or 5 slices of bread. My recipe is based on a Betty Crocker paperback recipe, but not easy to find online. A similar and easy recipe is at food.com.
11/6/16--Alas, I broke the jar. It slid off a small appliance and rolled onto the floor.

Braun Kitchen Scale
This Swiss-made scale is strictly mechanical—no digital readouts for weight or units. It had come with a surface-aligned bowl, but it broke within the first year, I think. The weight labelings display either up to 4 pounds or 2 kilograms. I'm shocked that it's available now for $60.

I recently bought some scales for gifts, picking Taylor 3842-21 at a bricks-n-mortar store. The digital features are nice, and weighs up to 11 pounds (or 5 kg). Good thing about the Braun, though, is not needing to replace batteries.

Crank Can Opener
The opener I use is so old that our household doesn't remember who acquired it or when. I'm surprised that it's available on Amazon. I'd used an electrical opener a long time ago, but the edge didn't cut the can lids so well after a decade or so.

Coincidentally, more and more cans now come with poptop rings for easy lid removal.

Glassware (Mixing Bowls, Baking Pans)
Although I have multiples and similar items of glassware, I took a group pic to represent my faves. I use the wide-diameter, shallow Pyrex dish for making up and microwaving TV-dinner-type plates. This dish itself has served as a lid that mates with a deeper Pyrex casserole dish. Seems my most frequent casseroles are my veggie pasta, which I use the oblong glass pan for.

The mixing bowls have moved with me for several decades and numerous recipes. I omitted the largest bowl from the pic; it's still cradling the remainder of the watermelon I'm still working on consuming.

Kodak DC 3400 Digital Camera

Admittedly, a digital camera is not a kitchen item, I use it as often, maybe more often, than kitchen appliances or gadgets. When I first got it, the camera used to be the cat's meow. Contrasted with today's smartphones, it's now oversized, hefty, and feature-limited. Not planning to abandon it anytime soon. It serves my purposes and is easy to use.

7/8/2016: Sadly, the battery door broke a few months later. Used the camera, temporarily taping and untaping the door to deal with batteries, acquired a Fuji JX665. The Fuji has taken a bit of getting used to, but the additional features and video capability have helped wean me away from the Kodak.

8/28/2023: It looks like the Fuji lasted till end of Oct 2018, noticing filename extension changeovers just before Halloween. Since then, I've been using my Canon IXUS 180 camera for stills and vidoe clips.

Frequently Used Non-electrical Long-time Kitchen Items (June 2015)
Frequently Used Electrical Long-time Kitchen Items (July 2015)
Frequently Used Kitchen Items--Vintage, Newer (article, video)