Showing posts with label zucchini. Show all posts

Sunday, November 15, 2015

Sliced-Veggie Lentil Soup

Make an easy, robust soup that contains four veggies (1/2 pound each of carrots, celery, zucchini, and yellow squash), a 1-pound bag of lentils, and ~8 cups of water and seasonings (or broth). This recipe is a process that's a cross between making my veggie pasta and my short-cut, convenient veggie lentil soup.
  • The veggie pasta uses four kinds of fresh vegetables and other ingredients (pasta, mozzarella cheese, and parmesan cheese).
  • The convenient veggie lentil soup uses a vegetable dry-soup packet and lentils.
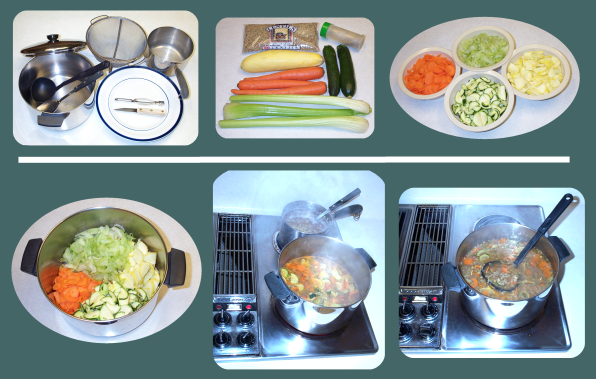
My pixstrip shows the following image areas:
  1. Implements
  2. Ingredients (veggies, lentils, fajita seasoning) laid out
  3. Washed, trimmed, and sliced veggies
  4. Sliced veggies in soup pot
  5. Boiling pot of veggies in front, saucepan of lentils in back
  6. Soup, ready to ladle out
Implements
  • Soup pot and lid
  • Ladle
  • Kitchen cooking spoon
  • Strainer
  • Saucepan
  • Plate for veggie handling
  • Paring knife
  • Peeler for carrots
  • Temporary bowls for sliced veggies if you want (not shown)
Ingredients
  • 1/2 pound each of the following vegetables: carrots, celery, zucchini, yellow squash—washed, trimmed, and sliced
  • 1 pound of dry lentils, rinsed and drained
  • Seasoning (Fajita seasoning works well. Also ok to refer to lentil package recipe for info.)
  • 8 cups water for soup—YMMV for the amount you eventually use.
Instructions
  1. Wash, trim, and slice the veggies. (My own favorite slicing device is my Presto Salad Shooter, which I've had since the early 90s.)
  2. Pour the veggies and water into the soup pot.
  3. Wash and drain the lentils, pour into saucepan with enough water to cover them. (OK, I'm squishy about the total amount of water.)
  4. Bring both pots to boil. If appropriate, watch to ensure contents don't boil over. Skim froth as necessary. Pour lentils into the soup pot; turn down heat to simmer. Season to taste.
Note: The heating process can take about an hour. The lentil bag instructions say bring to boil, reduce heat to low, cover the pot, and simmer for 35 minutes until lentils are tender.

Post-recipe Thoughts
The veggie preparation (wash, trim, slice) can take longer than anticipated—maybe an hour in addition to another hour for soup boil and simmer. Natural stages to break up the recipe process:
  1. Preparing the veggies, lentils
  2. Combining, heating, seasoning
As holidays are coming around, omnivores can easily incorporate use of leftover turkey or ham—
  • Use broth that you make instead of just water (adjustment for salt as appropriate).
  • Add leftover meat (2 cups or more of leftover turkey or ham pieces—you know, mostly oddball sizes that you chop into consistent bites or nibble sizes).
Suggestion: Freeze excess soup in suitable serving size containers so you don't feel compelled to consume it in consecutive days till done.

Sunday, August 31, 2014

Crustless Quiche Mini-Loaves

This recipe is flourless, thus, gluten-free. The filling ingredients are—besides evaporated milk and eggs—coarse-cut ham pieces, cut-up sliced Swiss cheese, and thawed and drained, previously frozen zucchini. Because has so much sodium, I decided Swiss cheese would contribute less additional sodium than cheddar or other saltier cheese.

I had spotted an intriguing recipe for crustless mini-quiche that used cupcake cups. I started poking around for additional crustless quiches, which I list some links at the bottom of this article.

My inclination to modify kicked in. Why not make the quiche totally gluten-free? With my crusted quiches, I was always adding one or two tablespoons of flour. How about, instead of using cupcake pans, I finally use my mini-loaf pan that I've had for years and not yet used? The one ingredient that nudged me to make the recipe items all come together? Zucchini! More zucchini from the co-worker who had already given me lots of!

My pixstrip shows eight image areas:
  1. Implements
  2. separate bowls of zucchini, cheese, ham
  3. zucchini, cheese, ham combined in a larger glass bowl
  4. eggs, evaporated milk, spray oil
  5. mini-loaf pan, prepped with the spray oil
  6. Combo pic:
    1. mini-loaf pan with the filling mixture parceled out into the pan wells
    2. evaporated milk and eggs whisked together in the measuring cup pitcher
    3. closer-in pic of pitcher showing the total amount of fluid
  7. baked mini-loaf quiches
  8. baked mini-loaf quiches, one dished onto a plate (yum!)
Implements
  • mini-loaf pan
  • wide-mouth mixing bowl
  • measuring cup pitcher or similar
  • wire whisk
  • measuring cups
  • measuring spoons
Ingredients
  • Solid fillings, listed in the order that the 2nd pic shows
    • thin-sliced zucchini, previously frozen, then thawed and drained to weigh 10 oz. (YMMV if you use fresh zucchini.)
    • 8 oz shredded Swiss cheese (I used thin-sliced Swiss cheese that I cut into smaller pieces.)
    • 8 oz cubed ham or similar (I cut ham pieces into small-cube size.)
  • Wet
    • 4 eggs
    • 12 oz evaporated milk
Instructions
  1. Preheat the oven to 350°.
  2. Spray oil into the pan wells. You can do this step any time before you add the solid fillings or fluids into the pan.
  3. Prepare the bowls of zucchini, Swiss cheese, and ham. Stir together in a bigger bowl.
  4. Divvy up the fillings into the mini-loaf pan wells.
  5. Beat eggs and evaporated milk together in a separate bowl. (I used a large, plastic measuring cup.) If desired, beat the eggs first, then blend in the milk.
  6. Pour the egg-and-milk mixture into the pan wells, being careful not to overfill.
  7. Bake for about 40 to 45 minutes. Test for doneness with a toothpick.
  8. Use a cooky spatula or similar to press a mini-quiche's sides away from pan walls, then lift it onto a plate.
  9. Repeat extraction for each quiche. You can store the rest of them by wrapping each individually in food wrap and freezing them.
Post-Recipe Thoughts
When I tried extracting a mini-loaf quiche (gingerly using a cooky spatula and plastic knife), I noticed some fluid at the bottom of the pan well. It's a good thing I had drained the zucchini before I mixed and baked.

Each wrapped mini-quiche weighed about 4 ounces. Hmmm, snack size!

On occasion, I've thawed one a few hours or overnight in the fridge, then microwave it for about a minute, using a nearly ancient, low-power, 700-watt oven). I'd still get fluid, which I concluded came from the ham. (I've reheated ham slices from the same ham and wound up with fluid.)

One friend, more patient than I, reheated one mini-loaf quiche that I gave her. She placed hers inside a dish and lid set, and heated it in a regular oven. Hers came out fine, without extra fluid.

What did I do with the fluid? Sipped it like it was a broth. Tasty!

My recipe is versatile enough for using different ingredients, different baking shapes. You could even try pouring the ingredients into a pie shell for a regular quiche. For that matter, try the cupcake-sized wells as several recipes say to use.

The following webpages attracted my attention while I searched for ideas for crustless, mini, and quiche:

Crustless Veggie Mini Quiches
This recipe uses Egg Beaters pourable eggs. Yields cupcake-sized quiches. Some good advice about ingredients:
Use your favorite vegetables in these mini quiches. Firm vegetables such as carrots, broccoli or asparagus will need to be cooked in the microwave a few minutes and then chopped finely so they will be tender at the end of the baking time.
Mini Loaf Pan Quiche Lorraine
This recipe calls for loads of ingredients, including flour. (This recipe makes crusted mini-loaves in individual pans.)

Crustless Quiche Lorraine
In contrast to the previous recipe I listed, this one makes a full-size quiche that calls for a pound of bacon, a whole onion, and six eggs. The author does mention using a 12" ceramic quiche pan. She suggests cutting the ingredients by about a third if using a pie pan.

Crustless Quiche for One
This crustless mini-quiche is flour-free and free of cow dairy products, using soy milk and soy creamer. Even though using vegan and soy cheese, the author suggests alternatives of mozzarella or cheddar.

Mini Crustless Quiches
The recipe looks heavy on the eggs (5) and light on the milk (1/4 cup). The yield is six muffin-size mini-quiches, but I can't tell the muffin well size. The author makes a statement about about types of veggies to use (similar to another sentiment):
you can add whatever veggies you like {or tolerate} or happen to have on hand in your home
Mini Quiche Recipe
This recipe is light on both the eggs (1) and milk (1/2 cup). She uses a mini-muffin pan for 15 crusted quiches.

Update, as of 9/10/2014
  • Original zucchini amount: 2 cups prviously frozen zucchini, thawed to measure 2 cups
  • Original baking time: about 30 minutes, then test for doneness
Thursday, August 21, 2014

Varying Zucchini Mini-Muffin Methods

I previously posted recipes for round and square mini-muffins, using zucchini that a co-worker provided from his summer bounty. I coarse-shredded it with my trusty Salad Shooter. I varied for pans—one type being round aluminum, and the other type being square-well silcone. As the batches were at least a week or so apart, it wasn't easy to contrast taste and texture results between them.

Since then, I baked another two batches, using both kinds of pans at the same time. One batch (upper part of pixstrip) had zucchini that I shredded, which another co-worker provided. (I have such sharing co-workers!) The most recent batch (lower part of pixstrip) had zucchini that I previously shredded, froze, and thawed.

Contrasting Round (Aluminum Pan) and Square (Silicone Pan)
For starters, neither recent batch of silicon-pan mini-muffins tasted of siliconey weirdness. As for different baking times, I encountered that issue in the most recent batch, when I positioned the baking pans differently from the batch before. More on that later.

The round mini-muffins look to have perfect crowns. The square ones, although also having crowns, seem to favor one edge over another. The slight lopsidedness might result from my not having sprayed the shots of oil as evenly into the squares as into the circles.

Contrasting Pan-Type Positioning in the Oven
The pixstrip shows the two different pan positionings in the oven. For the most recent batch, I placed the round-well aluminum pan on the bottom rack, closest to the oven element. The mini-muffins wound up browner and drier than the square ones, which were on the upper rack. (I had baked both batches at 350 for 15 minutes each, with pre-heating.)

Contrasting Fresh-Shred and Previously Frozen Zucchini
The thawed zucchini was very watery and less bulky than fresh-shredded. I poured and mixed in the entire thawed 8 ounces without draining the fluid. The batter was slightly easier to stir than when using fresh-shred. The results seemed the same as using fresh-shred. As noted, however, the pan positioning and timing seemed to affect the results.

Conclusion
  • No significant difference between using fresh-shredded zucchini and frozen/thawed zucchini. Frozen means convenience for using the zucchini whenever, and without fear of having too much or too little fluid.
  • If using metal pans, bake for a minute or so less than if using silicone. Or put the metal pan on a high rack.
  • My silicone pans have more wells for area than the aluminum pans, making them more compact for quantity.
  • It seems the silicone pans yield a slightly more moist result, but not by much.
  • The slight downside of silicone is that it requires structural support (a metal pan) in the oven because of its floppiness.

Update—Another batch
Yesterday (Th September 4), I baked a batch of 12 round and 24 square mini-muffins—using one aluminum and one silicone pan. The frozen zucchini that I took down from the freezer the previous night had ice crystals in it. Thus, when thawed, was very watery. Although I didn't think to weigh the bagful, it didn't feel any fuller than the bagful that I used in a previous baking session.

The results, after 16 minutes of baking, were 12 round mini-muffins that were nicely browned at the edges and tan on the surfaces and 24 square mini-muffins that were pale and had a texture as though I steam-cooked them. Delish as expected!

Monday, July 28, 2014

Fresh-Shred Zucchini Mini-Muffins (Square)

My previous article was a recipe for round mini-muffins, which I initially thought came out a little crier and chewier than I expected. I wondered if maybe vertical-side wells might make a difference. For this batch of 36 mini-muffins (same volume as 12 regulars), everything's the same except for using square silicone pans.

My pixstrip shows ten image areas:
  1. Dry ingredients (flour, salt, baking powder, baking soda, nutmeg, cinnamon, sugar)
  2. Wet ingredients (eggs, oil, vanilla)
  3. The wet ingredients, plus grated zucchini
  4. Implements
  5. Partial view of the implements, plus spray oil
  6. Bowl of stirred dry ingredients, bowl of stirred oil, eggs, and vanilla, and jar with shredded (or grated) zucchini (Yes, you do need to pre-process some zucchini for this recipe.)
  7. Bowl of stirred dry ingredients, bowl of stirred oil, eggs, vanilla, and the grated zucchini
  8. Bowl of the ingredients (now batter), stirred together
  9. Batter in square silicone pans (using only 1 and a half pans), which I sprayed oil on before filling with batter
  10. Baked square mini-muffins
Implements
  • square silicone mini-cupcake-volume pans
  • large mixing bowl
  • medium small mixing bowl
  • pastry blender or wire whip
  • measuring cup
  • measuring spoons
  • cooling rack for done muffins
Ingredients
  • Dry, listed in the order that the 2nd pic shows
    • 1 1/2 C all-purpose flour
    • 1/2 t salt
    • 1/4 t baking powder
    • 1 t baking soda
    • 1/2 t nutmeg
    • 1/2 t ground cinnamon
    • 3/4 C sugar
  • Wet (and also zucchini), listed in the order that the 3rd pic shows
    • 2 eggs
    • 1/3 C oil
    • 1 t vanilla
    • 1 1/2 C fresh, shredded or grated zucchini
Instructions
  1. Preheat the oven to 350°.
  2. Measure and pour the dry ingredients into the larger mixing bowl, blending them together with a pastry blender or wire whip.
  3. In the smaller bowl, mix the wet ingredients, then stir in the zucchini.
  4. Pour the mixed wet ingredients with zucchini into the larger bowl and stir the ingredients until they're moistened.
  5. Spray oil into the pan wells.
  6. Scoop about a rounded tablespoon spoonful of batter into each well.
  7. Bake for about 13 to 17 minutes or until the muffins are lightly browned. (Use toothpick test for doneness if desired.)
Post-Recipe Thoughts
Gee, they came out sooo cute! And they popped out of the flexible pans so easily. I turned each pan upside down, flexed it, and gently pressed from the back. I did pulled some from the topside, but the effort seemed a lot easier and faster than extracting the morsels from aluminum pans.

Another upside about silicone pans, besides easy fall out (grin), is each pan compactly having 24 wells, while my aluminum pans have only 12 wells. Mini-muffin pans with 24 wells are available, but I myself am not inclined to replace pans I already have. A downside to the silicone pans, because of its floppy nature, is needing a rigid pan underneath for physical support. On the other other hand, one of those rigid pans was convenient for flipping the freshly baked square mini-muffins into.

Were these square mini-muffins more moist and less doughy than the round ones? I thought so. My co-worker who brought me the zucchini wasn't sure, but then, he had liked the round mini-muffins fine. Another friend whom I gave some square mini-muffins to was very enthusiastic about them. Well, gotta do a followup experiment where I use both pans!

That batch will be a 3/4 recipe (3 eggs and appropriate proportions that are based on the Betty Crocker and Paula Dean amount of ingredients for zucchini bread). I'll put batter in both types of pans. The only other difference will be using shredded zucchini that I have stored in the freezer. I'll try not to crush or squeeze the thawed squash.

Will also see if the material (silicone) could itself could affect the outcome. One site has commenters talking about time required. Another site talks about odors.
8/21/2014—Published today! I contrast zucchini mini-muffins for round (aluminum pan) and square (silicone pan), pan positioning in the oven, and using previously frozen vs. fresh-shred zucchini. This article is the followup to July 2014 zucchini mini-muffin recipes, complete with pixstrip.

Monday, July 14, 2014

Fresh-Shred Zucchini Mini-Muffins (Round)

Make use of the abundance of zucchini! These round mini-muffins are 1/3 the volume of regular cupcakes. They're good for snacking when you don't want to commit to eating a larger unit. For potluck events, the small size helps spread the goodies around, particularly if lots of other desserts are available.

I wanted to find a zucchini bread recipe that fulfilled the following conditions:
  • Easy to make
  • Reasonable number of ingredients that are easily btainable
  • Easily convertible to mini-muffin portions
  • Recipe yield that could be easily downsized if appropriate
The Betty Crocker recipe fulfilled the conditions, and more.
  • Bread pan sizes, with baking times
  • Cupcake pan usage, with baking times and instructions
  • Recipe deviations, including substituting canned pumpkin
  • Nutritional stats
  • Easy-to-follow numbered steps
In poking around the web for zucchini bread recipes, I noticed most yield two loaves. Because the Betty Crocker recipe conveniently noted the cupcake quantity yield, I decided to hunt for recipes that easily divided by half. BC filled the divisibility condition with the call for four eggs. Numerous other recipes called for three—not so easily divided.

I wasn't totally sold on using only the BC recipe. I didn't want to add nuts, cloves, raisons. I also wanted to find recipes that called for nutmeg, which is something I use seldom and have a lot of. Paula Deen's recipe calls for nutmeg and four eggs. Convenient! She does also call for water, lemon juice, and nuts (option), which I skipped in my recipe.

The two recipes varied from each other for quantity of main ingredients—zucchini, oil, flour, sugar, salt. My version of the recipe is for mini-muffins (36). Based on the Betty Crocker recipe, however, you can consider that the yield equals one loaf or 12 cupcake-size muffins. (Refer to the BC recipe for those baking times.)

My pixstrip shows ten image areas:
  1. Dry ingredients (flour, salt, baking powder, baking soda, nutmeg, cinnamon, sugar)
  2. Wet ingredients (eggs, oil, vanilla)
  3. The wet ingredients, plus grated zucchini
  4. Implements
  5. Partial view of the implements, plus spray oil
  6. Bowl of stirred dry ingredients, bowl of stirred oil, eggs, and vanilla, and jar with shredded (or grated) zucchini (Yes, you do need to pre-process some zucchini for this recipe.)
  7. Bowl of stirred dry ingredients, bowl of stirred oil, eggs, vanilla, and the grated zucchini
  8. Bowl of the ingredients (now batter), stirred together
  9. Batter in mini-muffin pans, which I sprayed oil on before filling with batter
  10. Baked round mini-muffins
Implements
  • mini-cupcake pans
  • large mixing bowl
  • medium small mixing bowl
  • pastry blender or wire whip
  • measuring cup
  • measuring spoons
  • cooling rack for done muffins
Ingredients
  • Dry, listed in the order that the 2nd pic shows
    • 1 1/2 C all-purpose flour
    • 1/2 t salt
    • 1/4 t baking powder
    • 1 t baking soda
    • 1/2 t nutmeg
    • 1/2 t ground cinnamon
    • 3/4 C sugar
  • Wet (and also zucchini), listed in the order that the 3rd pic shows
    • 2 eggs
    • 1/3 C oil
    • 1 t vanilla
    • 1 1/2 C fresh, shredded or grated zucchini
Instructions
  1. Preheat the oven to 350°.
  2. Measure and pour the dry ingredients into the larger mixing bowl, blending them together with a pastry blender or wire whip.
  3. In the smaller bowl, mix the wet ingredients, then stir in the zucchini.
  4. Pour the mixed wet ingredients with zucchini into the larger bowl and stir the ingredients until they're moistened.
  5. Spray oil into the pan wells.
  6. Scoop about a rounded tablespoon spoonful of batter into each well.
  7. Bake for about 13 to 17 minutes or until the muffins are lightly browned. (Use toothpick test for doneness if desired.)
Post-Recipe Thoughts
I thought the mini-muffins seemed a little chewy (doughy?) and drier than I expected. I brought some in to share with the co-worker who gave me the zucchini. He thought they came out great! I speculated pan well shape might affect the texture and moistness outcome. My next recipe article describes using square mini-muffin-capacity silicone pans instead of the round aluminum pans.

I recall Paula Deen's recipe calls for 1/3 cup (5 1/3 T) of water in her double recipe, which would be 2 2/3 T for a half recipe like mine. I might try adding some water in a future batch.
8/21/2014—Published today! I contrast zucchini mini-muffins for round (aluminum pan) and square (silicone pan), pan positioning in the oven, and using previously frozen vs. fresh-shred zucchini. This article is the followup to July 2014 zucchini mini-muffin recipes, complete with pixstrip.
Also look into the square mini-muffin version—same ingredients, but using square-well silicone pans.

Monday, June 30, 2014

Zucchini Overflow?

Good harvest of zucchini lately? Gotten a bunch from people who have been harvesting them? An explanation for the overflow might be from wiseGEEK's "What is zucchini?" site. "Many markets carry this squash in the summer, and it is also a snap to grow at home, although some caution is advised, as the plants can produce way more fruit than one would think is physically possible."

A few times this month, a co-worker brought some gargantuan ones, and I've gleefully partaken of them, and passed on buying any in the store for awhile. I've grated or sliced these homegrown ones for recipes, or bagging and freezing after shredding and slicing, As of a week ago, I've baked two half batches of zucchini mini-muffins, varied by well shapes, and one batch of crustless ham-swiss-zucchini quiche.

For the next few articles, I'll publish three recipes for zucchini mini-muffins and one for the quiche.
The two half-batches of mini-muffins I baked last week had the same ingredients and baking time. The pans differed—aluminum round vs. silicone square—because I wanted to test my theory that one type of pan would yield moister results than the other pan.

My third batch of mini-muffins will again use the same ingredients, but the amount will be a 3/4-recipe batch, using both types of pans. I'll be using zucchini that I grated, froze, bagged, then let thaw. I'll not squeeze, as thawed zucchini is watery when squeezed.

I consider mini-muffin sizes to be a bit more appealing than regular cupcake size—more units that are available for distributing in a social environment. The amount of batter for making one cupcake-sized goodie is the same amount as for three mini-muffins. (At a potluck event, people can more easily pick up a small, self-contained morsel than commit to a larger item or something that requires slicing, particularly a pie.)

The Betty Crocker recipe has lots of details, including baking times for various pans. The Paula Deen recipe includes nutmeg, a spice I'd like to use in more recipes than I do. The most appealing reason I like these two 2-loaf recipes, besides relative ease of the process, is the even number of eggs. Making half-recipes is a lot easier when dividing four eggs than three eggs.

Some additional zucchini links: