Showing posts with label Salad Shooter. Show all posts

Monday, August 28, 2023

Frequently Used Kitchen Items--Vintage, Newer


I've taken a trip down memory lane for kitchen items that I blogged about in mid-2015. I still use a goodly number of them. "Ancient" ones include a Tupperware measuring pitcher, a Wearever air popcorn popper, and an Osterizer blender, I've replaced some items that broke or have improved capabilities or both reasons. I've accumulated a few newer gadgets since the 2015 articles.

Several kitchen items have shown up in various articles and YouTube videos I've produced over the years, mostly WRT to baking cookies or cakes. The star of my YouTube videos is my Osterizer blender, which is approaching 45,000 after being up since mid-2016. ("Stuck Blender Blade?" shows diagnosing and unsticking my blender blade assy, then reassembling and testing it.)

My composite pic in "Frequently Used Non-electrical Long-time Kitchen" l shows non-electrical implements and gadgets.

 My composite pic in "Frequently Used Electrical Long-time Kitchen Items" shows mostly small electrical appliances.

 Back in 2015, I used a still-images Kodak camera (1760 x 1168 resolution shrinkable to 640 x 425). In contrast, my more compact Canon takes varieties of stills and videos that surpass the Kodak, which broke after over 10 years of use. My video shows hands-on handling of the kitchen items, something of a show-and-tell session. Some viewers might actually recognize or have some of the same objects. Interestingly, some show up on the web with "vintage" in descriptions.

From "Vintage vs. Antique vs. Collectible | What’s the difference?"
Antiques have to be at least 100 years in age. That is what makes a true antique according to respectable dealers. Vintage can be anything from 20-99 years old and generally capture a sense of nostalgia that’s relevant to the culture in some way.

I've identified the items in the video. In case you don't recognize any or had anything similar, ask someone who's older if they owned such an object. Maybe they still have theirs!


Frequently Used Non-electrical Long-time Kitchen Items (June 2015)
Frequently Used Electrical Long-time Kitchen Items (July 2015)
Frequently Used Kitchen Items--Vintage, Newer (article, video)

Sunday, November 15, 2015

Sliced-Veggie Lentil Soup

Make an easy, robust soup that contains four veggies (1/2 pound each of carrots, celery, zucchini, and yellow squash), a 1-pound bag of lentils, and ~8 cups of water and seasonings (or broth). This recipe is a process that's a cross between making my veggie pasta and my short-cut, convenient veggie lentil soup.
  • The veggie pasta uses four kinds of fresh vegetables and other ingredients (pasta, mozzarella cheese, and parmesan cheese).
  • The convenient veggie lentil soup uses a vegetable dry-soup packet and lentils.
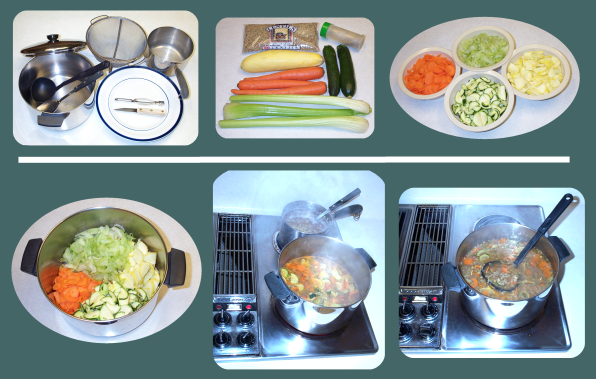
My pixstrip shows the following image areas:
  1. Implements
  2. Ingredients (veggies, lentils, fajita seasoning) laid out
  3. Washed, trimmed, and sliced veggies
  4. Sliced veggies in soup pot
  5. Boiling pot of veggies in front, saucepan of lentils in back
  6. Soup, ready to ladle out
Implements
  • Soup pot and lid
  • Ladle
  • Kitchen cooking spoon
  • Strainer
  • Saucepan
  • Plate for veggie handling
  • Paring knife
  • Peeler for carrots
  • Temporary bowls for sliced veggies if you want (not shown)
Ingredients
  • 1/2 pound each of the following vegetables: carrots, celery, zucchini, yellow squash—washed, trimmed, and sliced
  • 1 pound of dry lentils, rinsed and drained
  • Seasoning (Fajita seasoning works well. Also ok to refer to lentil package recipe for info.)
  • 8 cups water for soup—YMMV for the amount you eventually use.
Instructions
  1. Wash, trim, and slice the veggies. (My own favorite slicing device is my Presto Salad Shooter, which I've had since the early 90s.)
  2. Pour the veggies and water into the soup pot.
  3. Wash and drain the lentils, pour into saucepan with enough water to cover them. (OK, I'm squishy about the total amount of water.)
  4. Bring both pots to boil. If appropriate, watch to ensure contents don't boil over. Skim froth as necessary. Pour lentils into the soup pot; turn down heat to simmer. Season to taste.
Note: The heating process can take about an hour. The lentil bag instructions say bring to boil, reduce heat to low, cover the pot, and simmer for 35 minutes until lentils are tender.

Post-recipe Thoughts
The veggie preparation (wash, trim, slice) can take longer than anticipated—maybe an hour in addition to another hour for soup boil and simmer. Natural stages to break up the recipe process:
  1. Preparing the veggies, lentils
  2. Combining, heating, seasoning
As holidays are coming around, omnivores can easily incorporate use of leftover turkey or ham—
  • Use broth that you make instead of just water (adjustment for salt as appropriate).
  • Add leftover meat (2 cups or more of leftover turkey or ham pieces—you know, mostly oddball sizes that you chop into consistent bites or nibble sizes).
Suggestion: Freeze excess soup in suitable serving size containers so you don't feel compelled to consume it in consecutive days till done.

Wednesday, July 15, 2015

Frequently Used Electrical Long-time Kitchen Items

Do you have kitchen gadgets or appliances that you you've had for a long time and still frequently use? I previously wrote about non-electrical kitchen items. This time, I talk mostly about electrical appliances, such as my popcorn air popper and salad shooter.

Wearever Popcorn Pumper 72000
This hot-air popcorn popper is listed as vintage, and having come out around late 70s, before microwave popcorn. This model has the butter warmer at the base rather than at the chute (73000). Looking at a webpage of poppers for sale, some people state usability for roasting coffee beans.

Works great still, and I use it several times a month. Instead of the included butter warmer, I microwave butter in a glass cup with a piece of wax paper covering the top. Yeah, more work, but I prefer to not put the aluminum warmer in the dishwasher.

Presto Salad Shooter
This appliance works like a portable food processor with a lot less bulk. I use it pretty much weekly, since the early 90s. It's great for slicing carrots for salads and multiple veggies for making veggie pasta.

Although the shooter has multiple cutting and grating cones, I use the slicing one the most often. Over the years, I'd put various cracks in the original slicing cone, Read my article for details of finding and buying the replacement cone (good purchase experience).

GE Hand Mixer
I've had a few mixers over the years. This one is maybe 10 years old; the previous one had a plastic free-rotation stand. This appliance gets the job done. It has only two speeds, and the beater blades sometimes don't lock easily. (I've never felt the urge to get a high-end muscly machine.)

Osterizer Blender
Hooboy! It's been in my household since the 70s! Over the years, I've used it weekly, but sometimes I've neglected it for long periods of time (years?). I used to use it frequently for pureeing chunky salsas. (I'm not wild about chunky salsas or similarly chunky pico de gallo. I've used it for chopping up ice and also blending hot butter into egg yolks for hollandaise sauce.

Maybe 15 years ago, the blades wouldn't rotate. Maybe I didn't fully dry the blade unit after handwashing it. I reluctantly bought a replacement, not thinking it sensible to buy an entire new blender.

GE 700-watt MIcrowave Oven


Yes! Only 700 watts! I've had this oven for about 25 years. It's so low- powered that most microwave meals list instructions for 1000 to 1100-watt ovens. Pretty much, if I'm doing a frozen meal, I add about 50% more time. A couple of the rack brackets are gone or broken, so I don't use the rack anymore. The lack of a full set of brackets don't seem to affect heating performance or make the oven unsafe to use.

Do you have appliances that you've had a loooong time that you still use regularly? How about sporadically? Eh, I have some electrical and non-electrical items that I use very infrequently or still haven't tried, but I'm not going there. :-).


Frequently Used Non-electrical Long-time Kitchen Items (June 2015)
Frequently Used Electrical Long-time Kitchen Items (July 2015)
Frequently Used Kitchen Items--Vintage, Newer (article, video)

Thursday, August 21, 2014

Varying Zucchini Mini-Muffin Methods

I previously posted recipes for round and square mini-muffins, using zucchini that a co-worker provided from his summer bounty. I coarse-shredded it with my trusty Salad Shooter. I varied for pans—one type being round aluminum, and the other type being square-well silcone. As the batches were at least a week or so apart, it wasn't easy to contrast taste and texture results between them.

Since then, I baked another two batches, using both kinds of pans at the same time. One batch (upper part of pixstrip) had zucchini that I shredded, which another co-worker provided. (I have such sharing co-workers!) The most recent batch (lower part of pixstrip) had zucchini that I previously shredded, froze, and thawed.

Contrasting Round (Aluminum Pan) and Square (Silicone Pan)
For starters, neither recent batch of silicon-pan mini-muffins tasted of siliconey weirdness. As for different baking times, I encountered that issue in the most recent batch, when I positioned the baking pans differently from the batch before. More on that later.

The round mini-muffins look to have perfect crowns. The square ones, although also having crowns, seem to favor one edge over another. The slight lopsidedness might result from my not having sprayed the shots of oil as evenly into the squares as into the circles.

Contrasting Pan-Type Positioning in the Oven
The pixstrip shows the two different pan positionings in the oven. For the most recent batch, I placed the round-well aluminum pan on the bottom rack, closest to the oven element. The mini-muffins wound up browner and drier than the square ones, which were on the upper rack. (I had baked both batches at 350 for 15 minutes each, with pre-heating.)

Contrasting Fresh-Shred and Previously Frozen Zucchini
The thawed zucchini was very watery and less bulky than fresh-shredded. I poured and mixed in the entire thawed 8 ounces without draining the fluid. The batter was slightly easier to stir than when using fresh-shred. The results seemed the same as using fresh-shred. As noted, however, the pan positioning and timing seemed to affect the results.

Conclusion
  • No significant difference between using fresh-shredded zucchini and frozen/thawed zucchini. Frozen means convenience for using the zucchini whenever, and without fear of having too much or too little fluid.
  • If using metal pans, bake for a minute or so less than if using silicone. Or put the metal pan on a high rack.
  • My silicone pans have more wells for area than the aluminum pans, making them more compact for quantity.
  • It seems the silicone pans yield a slightly more moist result, but not by much.
  • The slight downside of silicone is that it requires structural support (a metal pan) in the oven because of its floppiness.

Update—Another batch
Yesterday (Th September 4), I baked a batch of 12 round and 24 square mini-muffins—using one aluminum and one silicone pan. The frozen zucchini that I took down from the freezer the previous night had ice crystals in it. Thus, when thawed, was very watery. Although I didn't think to weigh the bagful, it didn't feel any fuller than the bagful that I used in a previous baking session.

The results, after 16 minutes of baking, were 12 round mini-muffins that were nicely browned at the edges and tan on the surfaces and 24 square mini-muffins that were pale and had a texture as though I steam-cooked them. Delish as expected!

Monday, June 30, 2014

Zucchini Overflow?

Good harvest of zucchini lately? Gotten a bunch from people who have been harvesting them? An explanation for the overflow might be from wiseGEEK's "What is zucchini?" site. "Many markets carry this squash in the summer, and it is also a snap to grow at home, although some caution is advised, as the plants can produce way more fruit than one would think is physically possible."

A few times this month, a co-worker brought some gargantuan ones, and I've gleefully partaken of them, and passed on buying any in the store for awhile. I've grated or sliced these homegrown ones for recipes, or bagging and freezing after shredding and slicing, As of a week ago, I've baked two half batches of zucchini mini-muffins, varied by well shapes, and one batch of crustless ham-swiss-zucchini quiche.

For the next few articles, I'll publish three recipes for zucchini mini-muffins and one for the quiche.
The two half-batches of mini-muffins I baked last week had the same ingredients and baking time. The pans differed—aluminum round vs. silicone square—because I wanted to test my theory that one type of pan would yield moister results than the other pan.

My third batch of mini-muffins will again use the same ingredients, but the amount will be a 3/4-recipe batch, using both types of pans. I'll be using zucchini that I grated, froze, bagged, then let thaw. I'll not squeeze, as thawed zucchini is watery when squeezed.

I consider mini-muffin sizes to be a bit more appealing than regular cupcake size—more units that are available for distributing in a social environment. The amount of batter for making one cupcake-sized goodie is the same amount as for three mini-muffins. (At a potluck event, people can more easily pick up a small, self-contained morsel than commit to a larger item or something that requires slicing, particularly a pie.)

The Betty Crocker recipe has lots of details, including baking times for various pans. The Paula Deen recipe includes nutmeg, a spice I'd like to use in more recipes than I do. The most appealing reason I like these two 2-loaf recipes, besides relative ease of the process, is the even number of eggs. Making half-recipes is a lot easier when dividing four eggs than three eggs.

Some additional zucchini links:

Sunday, October 30, 2011

Veggie Pasta

Up until now, I have titled my recipes with "Convenient". This recipe is a bit less convenient, but it's veggie loaded, and produces 10 servings of 8-ounce portions. You can share with family, company, or you can store leftovers in the freezer (using food wrap, Ziploc bags, etc.) for future convenient meals.

My recipe uses four kinds of vegetables, spaghetti sauce, pasta, mozzarella and Parmesan cheeses, and a little bit of oil for separating the cooked pasta. The graphic provides a visual cue of the ingredients and stages of preparation.

Ingredients (guide for types and quantity—YMMV)

  • 1/2 half pounds each of celery, carrots, zucchini, and crookneck squash, sliced
  • 12 ounces of dry pasta
  • 28-ounce jar of spaghetti sauce
  • 8 ounces shredded mozzarella cheese
  • 1/4 cup of Parmesan cheese (minimum amount)

Utensils

  • Dutch oven or pan large enough for cooking and stirring stages
  • Large mixing bowl
  • Medium-large mixing bowl
  • Medium-large strainer
  • Baking pan (9 x 13)
  • Tablespoon
  • Measuring cup (1/4 cup or so)
  • Large metal or wooden spoon
  • Spoon rest

The following descriptions of the images (grid of 5 across and 4 down) can help walk you through the stages of preparation. Preheat the oven to 375° some time before you put the casserole in the oven, or add about another 15 minutes to the baking time.

  1. Image 1 through 5 show the initial stage of raw veggie preparation (paring and slicing). I use a Salad Shooter for making fast and consistent slices for cooking.
  2. Images 6 and 7 show the pre-processed, non-veggie ingredients and the measuring items.
  3. Images 8, 9, and 10 show the pasta-cooking stage. Cook according to box instructions, strain, and stir in enough oil prevent pasta clumpies.
  4. Images 11, 12, and 13 show the veggie-cooking stage. Cook about 8 minutes or until your choice of doneness.
  5. Images 14 and 15 show the merge stage for the cooked veggies, pasta, and spaghetti sauce.
  6. Image 16 shows the preparation before putting all the cooked ingredients and cheeses into the baking pan. Layer the ingredients into the baking pan as follows:
    Parmesan (top)
    Mozzarella
    Mix of sauce, pasta, veggies
    Parmesan
    Mozzarella
    Mix of sauce, pasta, veggies (bottom)
  7. Image 17 shows the pan with the ingredients, topped by the final Parmesan cheese layer.
  8. Image 18 shows the assembled casserole, covered with aluminum foil, ready for it to go into the oven.
  9. Image 19 shows the covered casserole in the oven. Bake at 375° for about 40 minutes. YMMV for time.
  10. Image 20 shows the finished casserole. Waiting a few minutes for the casserole to cool down a little helps portioning out rectangles with a griddle spatula or cooky spatula.

For other recipes, you can enter "recipe" in the Blogspot search. Or you can download my article catalog and visually scan for yellow rows, which include links to recipe articles.