Showing posts with label Taco. Show all posts

Sunday, May 20, 2012

Waffle-grid Tortillas

Just after Christmas while browsing for post-holiday sales in a department store, I spotted a clerk placing a sale sign for an appliance that I'd been lightly considering buying for the last couple of years. I'd seen waffle cone makers selling for $20, which I just wasn't willing to commit for. Woohoo! The sign said $7.99! What a deal! It took me a couple of months to try a recipe. A bit time consuming, and calorie-loaded because of a lot of sugar called for.

About a month later, I talked to an associate about waffle cones, how I was amazed that the baked disks were moldable for about only 10 seconds. He speculated that sugar in the batter crystallizes during the baking and hardens them when they cool. I decided to try making sugarless waffle cones. Well, I confirmed that the baked results did not retain a molded shape after cooling, whether cone or tube. So, this recipe is making waffle-grid tortillas, which are good for folding over or rolling up after microwaving fillings in them. (I've tried cheese and spinach, and cheese only.)

My tortilla recipe has significantly fewer calories than either the Simply Vanilla Wafer Cones or Orange Cinnamon Waffle Cones recipe at the Bella Waffle Cone Maker pdf manual, which I used for my basis. My tortilla batch makes about 11 5-inch disks. Interestingly, both waffle cone recipes claim 6-9 sweet cones for 2-3 T batter per waffle shape, although the volume of flour differs by about a third: 2/3 C flour all-purpose vs. 1 C cake flour.

My pixstrip's boundaries delineate the following sections:

  1. Equipment and utensils
  2. Ingredients
    1. Eggs and mixing
    2. Flour (replacement for cake flour)
    3. Oil and water, and mixing them into the flour and eggs
  3. Batter baking process
  4. Baked tortilla, microwaving with cheese (foldover, rollup)

Equipment and utensils

  • Waffle cone maker
  • Mixer (I used an electric hand mixer.)
  • Measuring cups
  • Measuring spoons
  • Rubber spatula(s)
  • Plastic spatula
  • Mixing bowls
  • Cooling rack
  • Cone shaper (for reference only, in case you decide to make sweet waffle cones)

Ingredients

I created the following table that shows ingredients and amounts for two model waffle cone recipes, and the would-have-been unsweetened cone recipe.

Note: Recipe #1 sweet refers to Orange Cinnamon Waffle Cones. Recipe #2 sweetrefers to Simply Vanilla Wafer Cones.
Ingredient
#1 sweet
#2 sweet
Tortilla
1 whole egg + 1 egg white
2 eggs
1/4 t salt
1/2 C granulated sugar
2/3 C granulated sugar
1 t ground cinnamon
2/3 C sifted all-purpose flour
1 C cake flour (can sub with 1 C flour -2 T flour +2 T cornstarch)
2/3 C cake flour (subbed with 2/3 C all-purpose flour -4/3 t flour +4/3 t cornstarch)
2 T butter, melted and cooled slightly
2 T vegetable oil
1 t orange extract
1 t vanilla extract
1/3 C water (Add more if needed.)

Recommended: Spray oil application about every other tortilla or so.

Eggs and mixing

Beat the eggs. If you want to make cone waffles, this is the stage where you mix in sugar after beating the eggs, then also add extract(s).

Flour (replacement for cake flour)

Choose the flour type and amount. I used the 2/3 C cake flour replacement.

Oil and water, and mixing them into the flour and eggs

Blend the flour, cake flour, or cake flour substitutions into the beaten eggs.

Batter baking process

Prepare the iron as instructed with your appliance. Because I've used mine a few times, I've only wiped the cooking surfaces with a clean, warm, damp kitchen rag for cleaning preparation, sprayed the cooking surfaces, and plugged the cord. Heating time is a minute or so.

For each disk, pour about 2 T batter, close the lid, and heat for about 60 seconds.

Note: The lid tended to not stay locked, so I held down the lid, using an oven pad for each hand. (Warning: The lid gets hot.)

Move the cooked disk onto the cooling rack. Continue the batter dispensing and baking process until you use up the batter.

Baked tortilla, microwaving with cheese (foldover, rollup)

If desired, as depicted on pixstrip, place filling on disk, microwave (about a minute, depending on filling, microwave power, and your preference), and fold over or roll up. Repeat for as many tacos or wraps as you want.

In case you want to use store-bought tortillas for fast preparation, try my convenient spinach-cheese taco recipe.
Monday, May 24, 2010

Pixstrips in Blog Articles


My convenient-recipe blog articles show series of progressive pictures at the top, from start to finish of each recipe. Each recipe pixstrip (the assembled image) contains eight images except for one that has nine. Clicking a pixstrip opens a new window with an enlargement. Nice of Blogspot to have that easy-access feature.

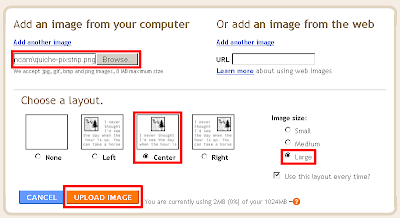
This article describes the process—staging the shots, processing the individual pictures, assembling them into a pixstrip, and uploading it into the article. The settings I use (outlined with red rectangles) appear in the image above. (I omitted the in-progress and completed images, as those stages should be obvious.)

The first time I made the decision to include pictures was for the spinach-cheese taco recipe. During preparation, I took pictures as follows:

  1. plate
  2. tortilla added
  3. cheese added
  4. spinach added
  5. contents microwaved
  6. more cheese added
  7. contents microwaved
  8. taco folded, with fork above it

My other convenient recipes I put pixstrips in are "A Convenient Cake Mix Cooky Batch" and "A Convenient Cake Mix Cooky Batch--Easter". The first cooky recipe is for Valentine Day cookies, which results in red cookies. The second one is for Easter-theme cookies. Both recipes use the basic ingredients of a box of cake mix, one-third cup of oil, and two eggs. I recently retrofitted "A Convenient Quiche" with a pixstrip. I took about a dozen pictures, winnowed the collection down to nine shots, then created the strip.

Principles for Pictures

  • Take more pictures than you'll need—preferably in the order of the actions. If you think you might use any shots, take them. Better to have the pictures and not need any than need any and not have them.
  • Find a decent-sized staging area that has minimal clutter or visual distractions. Most of my areas have been a countertop where I don't need to move many items more than once or twice. (I'm not a professional photographer; just using gut feelings.)

Gathering the Recipe Items

  1. Gather all the ingredients.
  2. Gather as many utensils as you can remember. Basic ones are bowls, spoons, spatulas, pans, and utensils to blend with. Secondary ones are cooling rack(s), oven mitts, egg timer as necessary. (I use the term "utensils" very loosely.)

Taking Pictures During the Recipe Process

  1. Stage ingredients and utensils for big-picture effect if it makes sense. Take a few pictures from different angles if unsure of how the items look together.
  2. Take pictures in the logical order of action. If possible, take the pictures from the same angle and distance. (Note: I stand on a stepladder about a foot away and shoot my pictures using my camera's highest resolution and quality.)

Storing and Processing the Pictures—Camera Off-loaded Set, Processing/Processed Set

  1. Offload the pictures into a folder; keep these originals in one place.
  2. Copy the original pictures into a different folder for modifying them. Typical modifications will include cropping and lightening as necessary, then saving them. (I save as .png to avoid losing picture quality.) Occasionally, cropped enlargements help.
I create a folder called "images". I create two subfolders—one I call "fromcam" for the pictures I off-load from my camera, the other I call "inprocess&finished".

Generating the Final Image (the Pixstrip)

  1. Resize and save each image to save filesize space. I resize to about 15%, or about 150 x 150 pixels.
  2. Enlarge the first image's canvass wide enough to accommodate the other images in order.
  3. Copy/paste the images as desired, then save the pixstrip, using a reasonable name.

Note: An alternative is to resize and save each image first (skipping the first step), follow the second and third steps, resize the entire strip, and save the reduced pixstrip under a different name.

Uploading the Pixstrip

  1. After logging into the blog account, select or create a blog article.
  2. Use the blog image-upload command to upload the pixstrip.
  3. View the image at the top of this article for the settings I use in Blogspot. YMMV for your own blog site.

Sunday, January 24, 2010

A Convenient Spinach-Cheese Taco


In November, I had written about a convenient quiche that required only five ingredients. The convenient food item this time around is a spinach-cheese taco that requires only three items—really convenient and inexpensive for road warriors, vacationers, other travelers, relocatees, and folks at home. The only items required are a plate (paper or microwave-safe), a taco-sized tortilla, shredded cheese, fresh spinach leaves, and access to a microwave oven.

If you want to skip straight to the recipe, go ahead. For those who want to read how I got to this topic, continue reading. At a recent networking event, I was talking to someone (BT) when we got to talking about making bread. He said he makes his own—kneading AND baking. (Wow—especially coz we're talkin' about a GUY!) I thought it interesting that we segued to the bread-making process. (I do bread machine bread myself.)

We talked about the fluid temperature and how to achieve it. We talked about the kneading (push, fold, rotate partway, etc. vs. machine's paddle action), the dough rise, the punchdown, the second rise. We talked about dough-rise easiness but didn't conclude much. My bread machine is squarish, requiring a bit of vertical rise against gravity. With hand-processing, the dough can spread out to bigger areas more easily (oblong, flattened round), requiring less vertical resistance, I think.

During the bread discussion, BT then suggested I view a youtube video "George Egg Hotel Survival" . The description includes "how to cook tortellini and how to bake muffins, all in a hotel room using just what he find there". Regarding the bread discussion, the snippet of interest for me (kneading) occurs around the 48-second mark. We then talked about the spinach and tortellini entree. I personally didn't care for the looks of the results, but the dish appealed to BT.

George Egg claimed his meal would have run £22, but he spent only £4. I told BT about my convenient recipe that calls for spinach, cheese, and taco-sized tortilla, which can include an egg if so desired. BT started expressing hunger, as in "I'm getting hungry". Our conversation led me to thinking that the topic would make a good blog article. Here goes.

Spinach-Cheese Taco Recipe

Ingredients: Taco-sized tortilla, shredded cheese, spinach leaves.

Other items required: Plate (microwave-safe or paper), microwave oven, fork to fold taco as necessary and also use as a utensil to eat finished item with.

Procedure:

  1. Place tortilla onto plate.
  2. Sprinkle about an ounce of cheese onto the tortilla.
  3. Layer spinach leaves onto the cheese.
  4. Place plate into the microwave oven and heat on high for about a minute, rotating halfway through if there's no rotator. (The leaves will shrink down some.) Add cooked egg if desired. (Recipe follows.)
  5. Sprinkle more cheese onto the heated plate of ingredients.
  6. Microwave the plate about another minute, rotating as necessary. (If the last layer of cheese hasn't melted to your satisfaction, fold the taco halfway, then microwave an additional 20 seconds or so.)
  7. Eat it!

Spinach-Cheese Taco with Egg

If you want to add an egg to the meal, follow the steps below:

  1. Obtain another plate, container for stirring the egg, oil spray, additional cheese.
  2. Spray the oil onto the plate.
  3. Crack open the egg, pour it into the container and mix it.
  4. Pour the egg onto the oiled plate.
  5. Place plate into the microwave oven and heat on high for about a minute, rotating halfway through if there's no rotator until suitable doneness.
  6. Flip the cooked egg onto the spinach-cheese taco AFTER shrinking down the spinach in Step 4 of the upper recipe.
  7. Add more cheese (yes! more cheese!!!!!).
  8. Microwave the entire plate of items for melted-cheese doneness, rotating as necessary. (If the last layer of cheese hasn't melted to your satisfaction, fold the taco halfway, then microwave an additional 20 seconds or so.)

Burp.