My convenient-recipe blog articles show series of progressive pictures at the top, from start to finish of each recipe. Each recipe pixstrip (the assembled image) contains eight images except for one that has nine. Clicking a pixstrip opens a new window with an enlargement. Nice of Blogspot to have that easy-access feature.
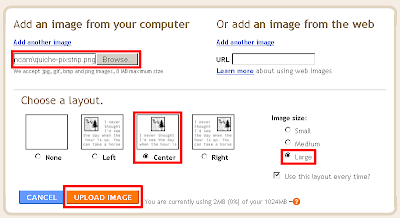
This article describes the process—staging the shots, processing the individual pictures, assembling them into a pixstrip, and uploading it into the article. The settings I use (outlined with red rectangles) appear in the image above. (I omitted the in-progress and completed images, as those stages should be obvious.)
The first time I made the decision to include pictures was for the spinach-cheese taco recipe. During preparation, I took pictures as follows:
- plate
- tortilla added
- cheese added
- spinach added
- contents microwaved
- more cheese added
- contents microwaved
- taco folded, with fork above it
My other convenient recipes I put pixstrips in are "A Convenient Cake Mix Cooky Batch" and "A Convenient Cake Mix Cooky Batch--Easter". The first cooky recipe is for Valentine Day cookies, which results in red cookies. The second one is for Easter-theme cookies. Both recipes use the basic ingredients of a box of cake mix, one-third cup of oil, and two eggs. I recently retrofitted "A Convenient Quiche" with a pixstrip. I took about a dozen pictures, winnowed the collection down to nine shots, then created the strip.
Principles for Pictures
- Take more pictures than you'll need—preferably in the order of the actions. If you think you might use any shots, take them. Better to have the pictures and not need any than need any and not have them.
- Find a decent-sized staging area that has minimal clutter or visual distractions. Most of my areas have been a countertop where I don't need to move many items more than once or twice. (I'm not a professional photographer; just using gut feelings.)
Gathering the Recipe Items
- Gather all the ingredients.
- Gather as many utensils as you can remember. Basic ones are bowls, spoons, spatulas, pans, and utensils to blend with. Secondary ones are cooling rack(s), oven mitts, egg timer as necessary. (I use the term "utensils" very loosely.)
Taking Pictures During the Recipe Process
- Stage ingredients and utensils for big-picture effect if it makes sense. Take a few pictures from different angles if unsure of how the items look together.
- Take pictures in the logical order of action. If possible, take the pictures from the same angle and distance. (Note: I stand on a stepladder about a foot away and shoot my pictures using my camera's highest resolution and quality.)
Storing and Processing the Pictures—Camera Off-loaded Set, Processing/Processed Set
- Offload the pictures into a folder; keep these originals in one place.
- Copy the original pictures into a different folder for modifying them. Typical modifications will include cropping and lightening as necessary, then saving them. (I save as .png to avoid losing picture quality.) Occasionally, cropped enlargements help.
I create a folder called "images". I create two subfolders—one I call "fromcam" for the pictures I off-load from my camera, the other I call "inprocess&finished".
Generating the Final Image (the Pixstrip)
- Resize and save each image to save filesize space. I resize to about 15%, or about 150 x 150 pixels.
- Enlarge the first image's canvass wide enough to accommodate the other images in order.
- Copy/paste the images as desired, then save the pixstrip, using a reasonable name.
Note: An alternative is to resize and save each image first (skipping the first step), follow the second and third steps, resize the entire strip, and save the reduced pixstrip under a different name.
Uploading the Pixstrip
- After logging into the blog account, select or create a blog article.
- Use the blog image-upload command to upload the pixstrip.
- View the image at the top of this article for the settings I use in Blogspot. YMMV for your own blog site.

No comments:
Post a Comment