 My February blog article was about YouTube video playlists that correspond to music-theme articles I had written. With this article, you can create your own YouTube playlist. Play the videos for viewing and listening, or for just listening.
 The assumption is that you have successfully registered for online accounts and know how to enter basic information requested of you. You should also be aware of and can handle interface requests for demographic information. Enter information and set the privacy controls that you feel comfortable with (wink).
Start at http://www.youtube.com/. In the page that opens, you must open a Google account or log in. Follow the steps. When a welcome page at YouTube opens for you, you can start creating your playlist. Click [your user ID] > Video Manager > Playlists. Download my tiled .png file with screenshot images.
Initial Considerations
Consider establishing a theme for your playlist. Think music genre, time period, artist, tempo. Search for YouTube videos that fit your theme. For my article, summer songs is my theme. Billboard's top 30 summer songs helped remind me of some additional songs for my final playlist.
Creating and Naming Your Playlist
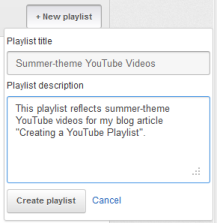
- After you settle on a theme, at the Playlist webpage, click New playlist.
- At the New Playlist window, enter the playlist title and playlist description, and click Create Playlist.
- The Edit Playlist page opens. While you create the playlist, for now, you might want to click Private until you finish the playlist creation process.
- Click Save.
Adding Videos to Your Playlist
Two methods of adding videos to a playlist is using the Playlist interface or adding videos while you play them.
Using the Playlist Page for Adding a Video
When you click Save at the Edit Playlist page, a new webpage opens, displaying the playlist title and description. You can click Edit Playlist and add video URLs in this interface. Click Add Video by URL, and follow the prompts.
Note: During the Creating an Naming Your Playlist stage, you CAN add URLs before saving the playlist. Follow the prompts. Continue adding YouTube URLs of videos that you want.
Newly added (September 2012)—Creating a YouTube Playlist PDQ, which emphasizes minimal keystrokes for the playlist creation process. The information is helpful if you have already successfully created your first playlist.
Adding a Video While Playing It
- Find and start playing a YouTube video.
- When you find one that you want to save in your playlist, just beneath the video window, click Add to. This action opens the "Add to playlist" window and displays your playlist name.
- Highlight and click your playlist name.
- Enter a note, and click Add Note. Or just click Close.
- Continue viewing videos and adding them.
Testing Your Playlist for Continuity
If your saved playlist is in a different browser window, go to it, and click Refresh/Reload so that changes to the list of videos show up. Otherwise, click [your user ID] > Video Manager > Playlists > [your new playlist]. Click the circled arrow (Play All) to test the playlist. Check for problem pages about copyright violations or disallowance of the video in a playlist. If either disallowance page shows up, the playlist automatically rolls over to the next video in your list.
When you click to play the playlist, the first video starts up. After it finishes, the next video starts playing. The process continues through the videos until the last video finishes playing. A successful playlist plays the videos without encountering error pages (disallowance messages). These messages tend to be about copyright or not-allowed-in-a-playlist information.
Shortening the Time for Testing your Playlist
To vet the playlist without needing to listen to the entire collection in real time, interrupt and advance each video while it plays. Click the forward arrow. Each time you do, the front number, which precedes the forward slash, counts to the next number. (The number that follows the slash indicates the total number of videos in your playlist.)
Encountering Error Pages with Your Playlist
If you encounter a disallowance message during playback, note the video. If you want, find a replacement video and add it to the playlist as it plays. Return to the playlist page and click the playlist hyperlink text, which displays the individual videos. Click the video that is just AHEAD of the one you just added. At the video window, click the forward arrow and confirm the added video does not open a disallowance page.
If your addition succeeded, delete the initial video as follows:
- Click [your user ID] > Video Manager > Playlists.
- Click Edit to display the list of individual videos.
- Click the X at the right of the video, which marks it for deletion.
- Click Save to finalize the deletion.
Reordering your Videos
If you want to change the order that the videos play, you can shift them with three move options:
- Quick move-to-top
- Quick move-to-bottom
- Click-and-drag (Be sure to FIRMLY drag the video to the position you want.)
- Click Edit Playlist to display the list of individual videos.
- Change the order of the videos as desired.
- While you are still in edit-playlist mode, you can select one of the video images as your playlist thumbnail icon. If you don't choose one, your playlist displays a nondescript icon.
- Click Save.
Uncloaking Your Playlist
If you initially made your playlist private, you can now make it public.
- At your playlist, click Edit Playlist to display the list of individual videos.
- Change the Private setting to Public.
- Click the Settings checkboxes if you want.
- Click Save.

